Bellum Field Manual
The official manual for Bellum's systems and practices: game modes, squad roles, factions, weapons and equipment, communication, medical care, spawning, movement, fire commands, and battle drills.
Maintained by Astarte Industries
v0.20 2026-9-08
Disclaimer
The information and procedures in this document are intended solely for the video game Bellum and are not meant for real-world medical or tactical use. This manual is a living reference designed to be consulted by section as needed rather than read cover to cover. Do not worry about memorizing every detail immediately; use this guide as a resource to learn and improve over the course of your time playing Bellum. Finally, keep in mind that Bellum is in active development and much of what you read here is subject to change or is work-in-progress.
Foreword
This manual is not required reading, but exploring it will greatly enrich your understanding of Bellum’s design philosophy and deepen your experience on the battlefield. It offers a comprehensive overview of the mechanics and systems that define Bellum, a tactical shooter built to emulate the cohesion and chaos of light infantry engagements.
With over a decade of experience in the military FPS genre, this passion project brings together years of lessons to deliver one of the most authentic firefight experiences possible. While some features may seem daunting at first, persistence will reveal Bellum’s underlying depth.
From core systems to terminology and techniques, this packet establishes an official shared foundation for players, promoting clarity, consistency, and coordination across the battlefield. It serves only as a starting point to acquaint players with key concepts. How these ideas are applied, adapted, or refined is left to the creativity of the players themselves.
To those joining the Bellum community, we commend your pursuit of a more challenging, authentic, and teamwork-oriented experience.
- The Astarte Industries Development Team
Keybinds
Movement Keybinds
| Action | Key |
|---|---|
| Movement | WASD |
| Sprinting | Shift |
| Toggle Run/Walk | Capslock |
| Vault/Climb/Drop | Hold Spacebar |
| Lean Left/Right | Q/E |
| Crouch | C |
| Variable Crouch | C + Mouse Wheel |
| Variable Walk | WASD + Mouse Wheel |
| Prone | Z |
Weapon Keybinds
| Action | Key |
|---|---|
| Fire Weapon | LMB |
| Standard Reload | R |
| Fast Reload | Double Tap R |
| Zeroing Up | X + MWU |
| Zeroing Down | X + MWD |
| Change Fire Mode | 1 |
| Aim Down Sight | RMB |
| Mag/Munition Check | CTRL + R |
| Equip Grenade | G |
| Grenade Menu | Hold G |
| High Ready | Spacebar |
| Check Fire Mode | CTRL + F |
Equipment Keybinds
| Action | Key |
|---|---|
| Proximity Voice | Hold V |
| Squad Radio | Hold B |
| Command Radio | Hold N |
| Squad Radio Volume | CTRL + B |
| Command Radio Volume | CTRL + N |
| Open B-TAK Map | M |
| Look at Watch | Hold Tab |
| Options Menu | Escape |
| Primary Weapon | 1 |
| Secondary Weapon | 2 |
| Special Weapon | 3 |
| Special Equipment | 4 |
| Equipment 5 | 5 |
| Equipment 6 | 6 |
| Check Equipment | CTRL + T |
| Zoom Watch In/Out | Tab + Mouse Wheel |
Medical Keybinds
| Action | Key |
|---|---|
| Medical Menu | Hold H |
| Apply Stimulant | MWU Anywhere |
| Apply Depressant | MWD Anywhere |
| Apply Tourniquet | LMB on Limb |
| Apply Bandage | RMB on Body Part |
| Apply Blood Bag | MMB on Limb |
Actions Keybinds
| Action | Key |
|---|---|
| Crossload Magazine | J |
| Crossload Wheel | Hold J |
| Delete Inventory Item | Hold J + RMB |
| Zoom | Hold Shift |
| Free Look | L Alt |
| Signal Friendly | F1 |
| Point/Direct | F2 |
| 15 Degree Estimate | F3 |
| Interact | F |
Drone Controls
| Control | Input |
|---|---|
| Pitch | [W] / [S] or mouse |
| Roll | [A] / [D] or mouse |
| Yaw | [Q] / [E] |
| Thrust up / down | [Left Shift] / [Z] |
| Auto Hover | [H] / [X] |
| Altitude hold | [T] |
| Camera control hold | [Left Alt] + mouse |
| Camera zoom | [Mouse Wheel] |
| Center camera | [Middle Mouse Button] |
| Change camera view (al-Zalaam only) | [R] |
| Release payload / fire (al-Zalaam only) | [G] |
| Terrain-lock camera (hold) | [Right Mouse Button] |
| Exit drone control | [Tab] or [Esc] |
Chapter 1: Game Modes
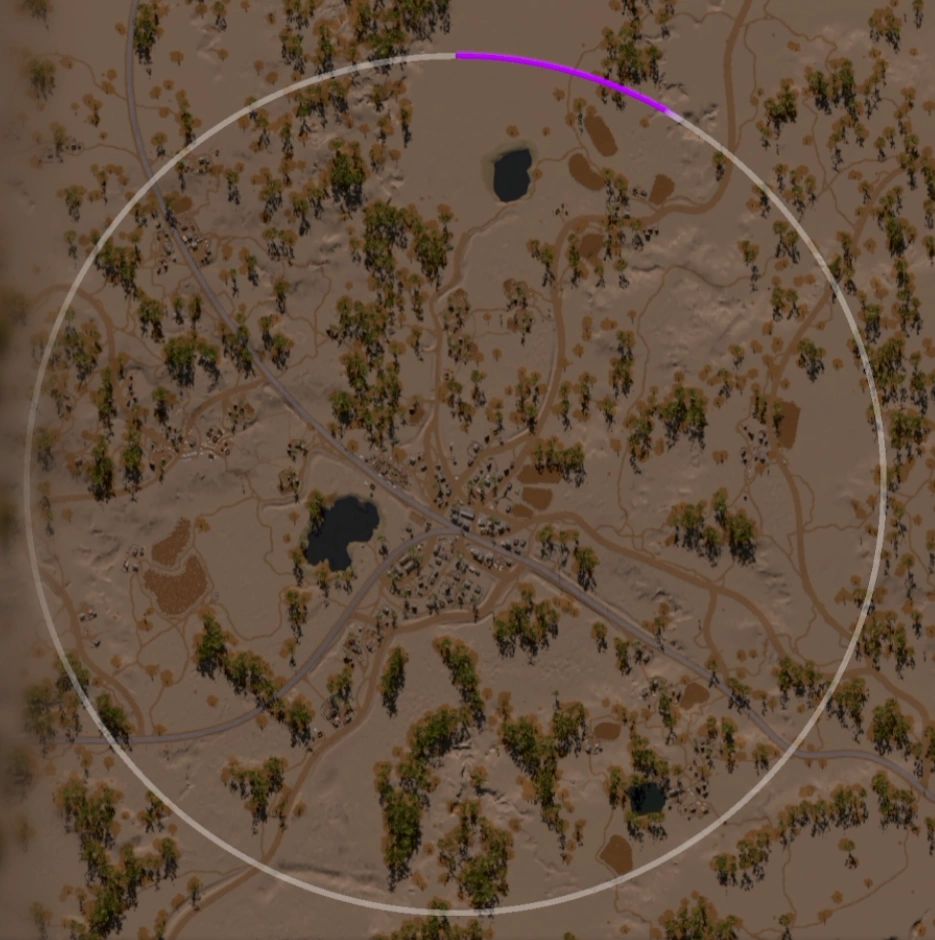
The Area of Operation
1-1. The Area of Operation (AO) is the designated play space for all game modes in Bellum and is denoted by a purple circle. Ranging from around 250 meters wide at its smallest up to 1.5km at its largest, the AO defines where scoring occurs and establishes the primary engagement zone for the match. In Attrition, teams gain Influence, the mode’s sole scoring resource, by maintaining a significant numerical advantage within the Area of Operation. If a team maintains this advantage long enough to reach 100% Influence, it wins the match. However, this outcome is rare, as both sides are usually locked in a numerical stalemate until a decisive engagement shifts the balance.
Designer’s note: Influence primarily serves as a mercy mechanic, ensuring that if one team is decisively or repeatedly pushed out of the AO, the match concludes swiftly. It also compels teams to maintain presence within the AO, as pursuing engagements outside of it risks defeat through Influence.
1-2. Most games of Attrition are not ended by reaching the Influence cap, but by the depletion of enemy Manpower. Each faction is allocated a total Manpower reserve, determined by both its faction type and the number of players on the team. Conventional Forces are given a maximum of 3 lives per player, while Unconventional Factions receive up to 4. When a conventional faction’s total Manpower is reduced to 39% of its total reserve, or an unconventional faction’s to 29%, that faction is considered combat ineffective, resulting in a loss and triggering the QRF Phase.
Influence
1-3. Influence is the Area of Operation’s universal victory resource. Once the AO goes active following the opening phase of the match, soldiers standing inside it can generate Influence for their team. Presence is weighted by position: a soldier near the center of the AO contributes full value, while one at the edge contributes far less.
1-4. Only the difference in presence matters. When both teams contest the AO in equal amounts, neither side gains Influence; Influence flows to the team that numerically dominates the zone. Soldiers on the team fielding fewer players are given additional weight, keeping undermanned teams in the fight.
1-5. Certain placeable structures contribute as well: Caches and Combat Outposts (COP) generate Influence over time from their spheres of influence (see Exploitation and Strongpoint). Reaching maximum Influence wins the match outright.
Quick Reaction Force (QRF) Phase
1-6. The Quick Reaction Force (QRF) Phase serves as the transitional stage between a team achieving a victory condition and the formal conclusion of an Attrition match. Its purpose is to create a natural and immersive end-state to the battle rather than an abrupt cutoff, allowing both sides to experience the final moments of combat as a cohesive narrative event.
1-7. During this phase, the defeated team is given a brief window to regroup and exfiltrate the Area of Operation, while the victorious force is tasked with pursuing and destroying any remaining opposition. During the QRF Phase, a watch and B-TAK notification is sent to all users: ROUT means you were victorious and should continue to press the advantage, while EXFIL means your element was defeated and should exfiltrate the AO.
1-8. In future iterations, as Bellum’s progression systems evolve, the QRF Phase will gain additional significance, factoring in remaining Manpower, casualties, and exfil success to affect post-match rewards and potentially campaign outcomes. This ensures that every life spent or saved carries weight, making the closing moments of battle as meaningful as the first engagement.
Attrition
1-9. Attrition is Bellum’s introductory and most straightforward game mode, built to highlight meeting engagements, small-unit maneuvers, and firefight fundamentals. Opposing forces are tasked with locating, fixing, and destroying one another within a defined Area of Operation (AO). Attrition also serves as a win condition for Bellum’s more complex modes. The simplicity of Attrition provides players the space to focus on small-unit tactics and learning base game mechanics without also having to account for more complex objectives or systems.
1-10. Victory is achieved when a team reaches maximum Influence or when the enemy’s Manpower is exhausted. If an operation reaches the time limit, the side with the higher combined total of Manpower and Influence is declared the victor.
Manpower represents a unit’s fighting strength. Each casualty depletes the reserve, and once it falls below the threshold (see 1-2), the force is deemed combat ineffective and is routed.
Influence represents a faction’s control within the Area of Operation. It increases when one force establishes numerical dominance in the AO. This is typically achieved by eliminating enemy squads, maintaining a sizable presence, and driving opposing forces out of the Area of Operation. Sustained superiority steadily builds Influence, and the first team to reach the limit (100%) secures victory.
Exploitation
1-11. At the start of the round, al-Zalaam leadership is given 15 minutes from the start of staging to place up to two supply Caches within the Area of Operation. Caches generate Influence over time based on how much of their sphere of influence is uncontested: any portion of the 500m radius overlapping another Cache’s sphere, or falling outside the AO, generates nothing. Spreading Caches apart, placing them wholly within the AO, and defending them is al-Zalaam’s route to an Influence victory.
1-12. The conventional force must find and destroy all existing Caches. Intel is gathered by killing al-Zalaam fighters and searching their bodies, though not all of them carry it. As intel accumulates, the search circle around a Cache tightens. al-Zalaam can likewise search fallen conventional soldiers, revealing which Cache the enemy currently holds intel on.
1-13. Players on either team can sanitize fallen friendlies to deny the enemy intel. Caches are destroyed by rocket fire (4 direct hits) or by 2 C4s planted by conventional leadership. Manpower attrition rules remain in effect throughout all game modes: a team that exhausts its Manpower loses regardless of the state of the Caches.
Strongpoint
1-14. Strongpoint reverses the roles: the conventional force defends while al-Zalaam attacks. The defenders may place only one Combat Outpost (COP), which generates Influence based on how much of its 500m radius sphere of influence lies within the AO; a COP placed wholly inside the AO generates maximum Influence.
1-15. al-Zalaam may place up to 2 Patrol Bases anywhere, inside or outside the AO, allowing them to attack from nearly any direction. Resist the urge to rush these placements: hold your Patrol Bases until the enemy COP is identified, then site them to support the attack.
1-16. The COP is destroyed by two IEDs planted by al-Zalaam leadership or the Saboteur. Manpower attrition rules remain in effect throughout.
Skirmish
1-17. Skirmish is a shorter match in a smaller AO and uses only the Attrition ruleset. With slots for only 36 players, Skirmish pits two squads per team against each other in a mad dash to control a drastically reduced area, encouraging more aggression and faster, tightly coordinated gameplay.
Chapter 2: The Deploy Menu
Anatomy of the Deployment Menu
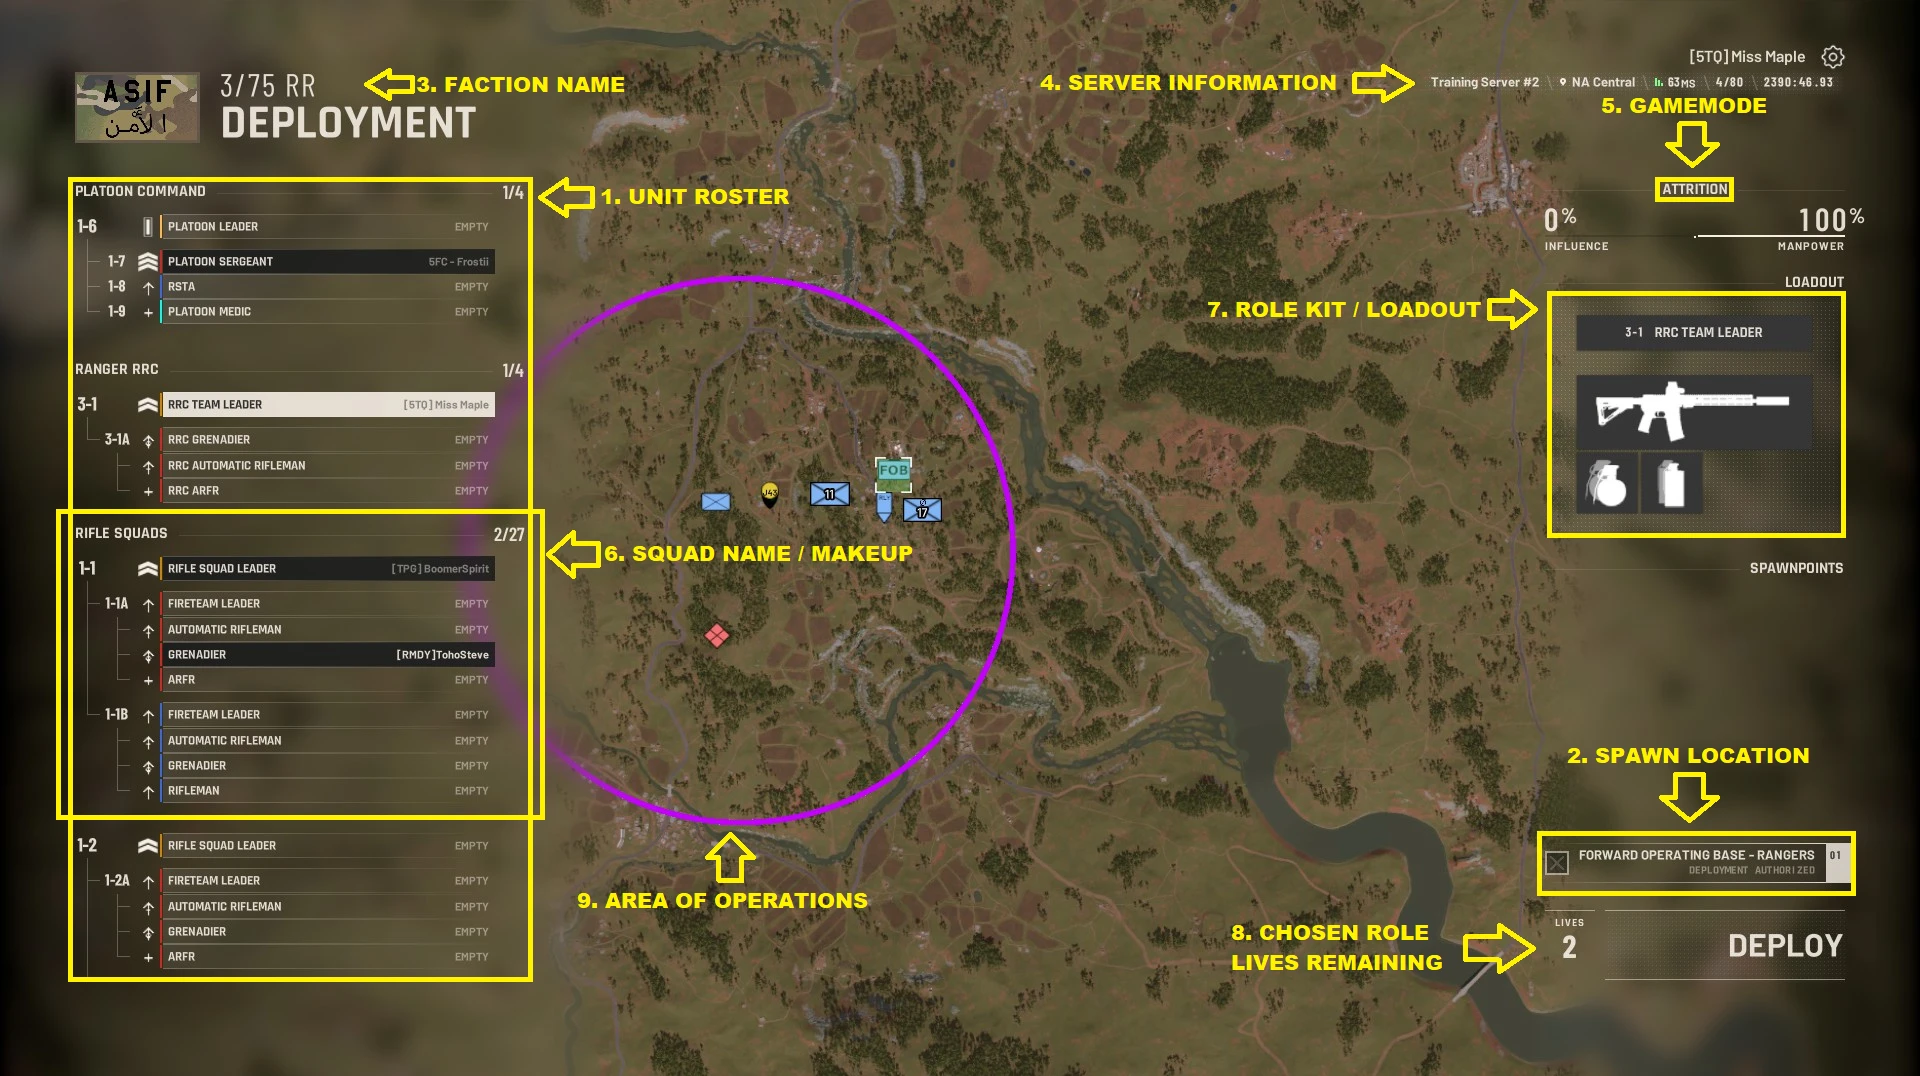
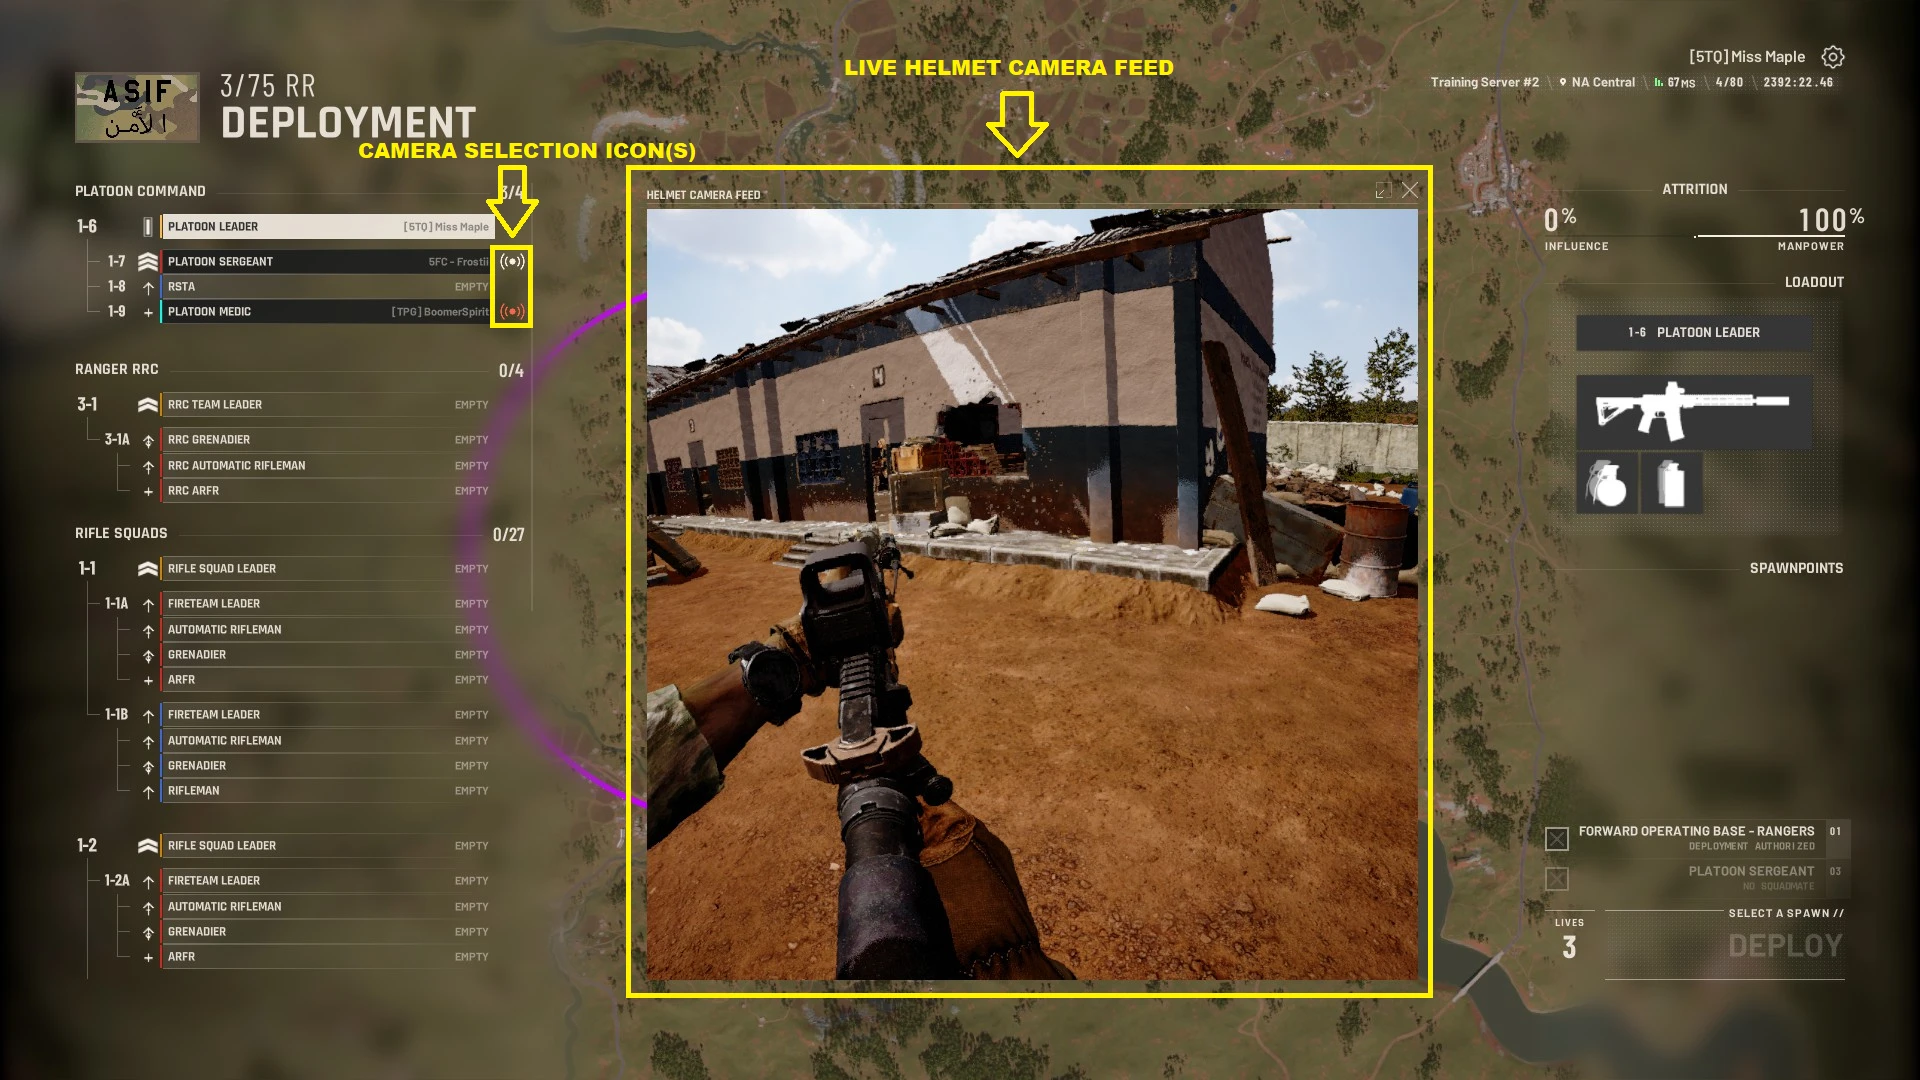
2-1. The Deployment Menu is where players select their squad/role (1.) and spawn location (2.). From this screen players can also see their current faction (3.), server information (4.), game mode (5.), individual squad designation/makeup (6.), selected role’s loadout (7.), chosen role’s lives (8.), and the AO (9.). On this screen, players can also talk with other undeployed squadmates by using the [B] hotkey.
Squad and Role Selection
2-2. On the left side of the Deployment Menu, players can select the squad and role they will assume for the match. To maximize combat effectiveness, it is recommended that players fill out existing squads rather than forming multiple small fireteams. Larger squads enable more assets and maintain greater staying power within the Area of Operation. Fireteams unlock sequentially, meaning each must be fully manned before the next becomes available.
Spawn Selection
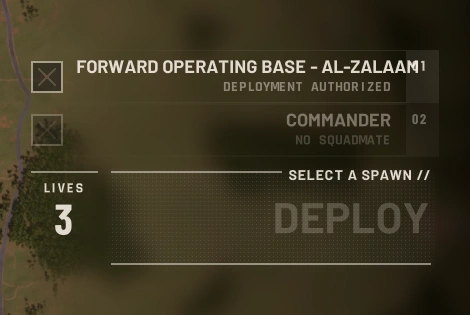
2-3. On the bottom right of the Deployment Menu, players can select their possible spawn locations. These include the Forward Operating Base, Leadership Reconstitution options, and team-constructed objectives. Here players will also see the number of lives they have remaining in a match, and any possible conditions preventing them from spawning (e.g., In-contact, Wounded, No Squadmate).
Role Lock-In and Field Promotion
2-4. Every role carries a limited number of lives, and those lives follow that role. A player who joins a slot mid-match inherits whatever lives remain on that role for the rest of the match (see Chapter 10, Spawn Mechanics).
Server Information
2-5. From left to right, this section lists the server name, server region, ping, server player count, and server lifetime.
Squad Spectate
2-6. While on the Deployment Menu, players can click on the Spectate icon to watch a live helmet cam of their teammates. This can only be done with members of their squad who are alive on the battlefield.
Chapter 3: Squad Role Overview
Squad Role Iconography
3-1. Icons displayed here are grey for readability. In-game they are color-coded to specific fireteams.
| ROLE | ICON | DESCRIPTION |
|---|---|---|
| SQUAD LEADER (SL) | 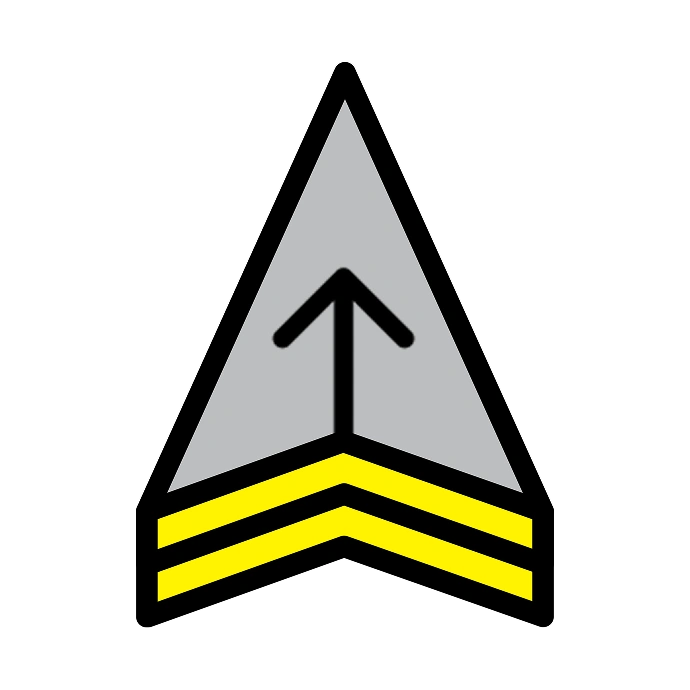 |
The Squad Leader directs squad-level operations, coordinating movement, cohesion, communication, and fires. They maintain situational awareness through the B-TAK system, ensuring their squad operates effectively with the rest of the platoon. |
| FIRETEAM LEADER (FTL) | 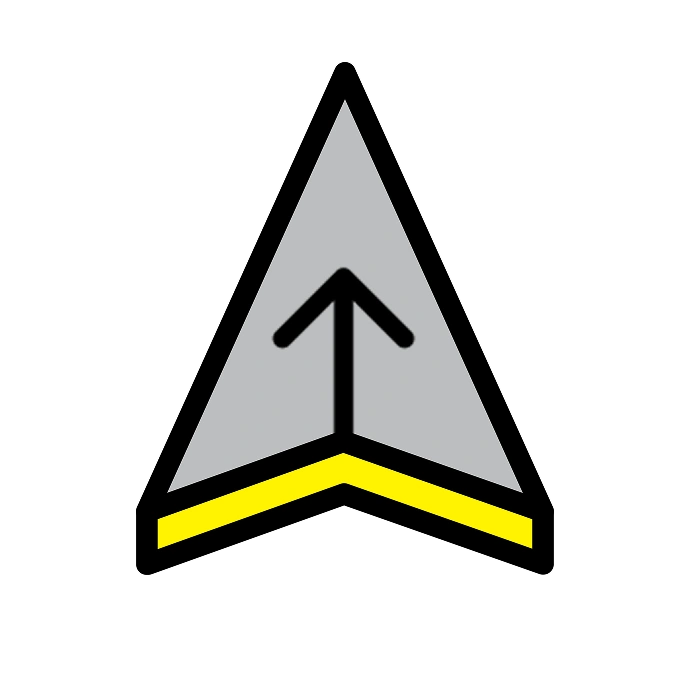 |
The Fireteam Leader commands a small unit within the squad, directing movement, target acquisition, and tactical positioning. They coordinate suppressive fire and maintain fireteam cohesion during maneuvers and engagements. |
| GUN/HAT TEAM LEADER (GTL/HTL) | |
Gun and HAT Team Leaders direct crew-served weapons, selecting positions and managing fire to maximize effect. |
| RIFLEMAN (RFL) |  |
Riflemen are tasked with engaging targets and maintaining security. |
| AUTOMATIC RIFLEMAN (AR) | 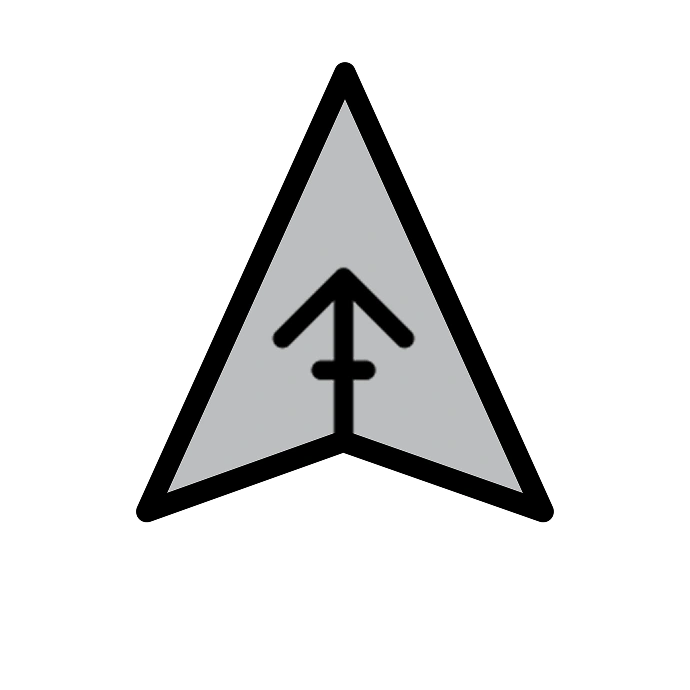 |
The Automatic Rifleman provides sustained suppressive fire to shape engagements and support maneuver. They operate the squad’s light machine gun, apply suppression, and cover advances, enabling teammates to close with the enemy, reposition, or withdraw. |
| MEDIC (MED) |  |
The Medic is responsible for treating casualties and keeping their squad combat effective. They stabilize wounded teammates and manage trauma under fire. Medics have access to special supplies like Blood Bags, Stimulants, and Depressants. |
| GRENADIER (GRN) |  |
The Grenadier provides indirect fire support for the squad, engaging enemies behind cover or in defilade and disrupting fortified positions. Equipped with a grenade launcher, they deliver explosive capabilities where direct fire is ineffective. |
| MACHINE GUNNER (MG) |  |
Machine Gunners work with Gun Team Leaders or Assistant Gunners to deliver high-volume suppressive fire that dominates open ground, fixes enemy forces in place, and allows friendly elements to maneuver effectively. |
| ANTI-TANK GUNNER (AT) |  |
The Anti-Tank Gunner provides the squad’s primary anti-armor and anti-fortification capability. Armed with a shoulder-fired launcher, they engage vehicles, fortified positions, and enemy concentrations. |
| HEAVY ANTI-TANK GUNNER (HAT) |  |
The Heavy Anti-Tank Gunner operates the platoon’s crew-served, high-penetration weapons to defeat armored threats and hardened positions. They work with the HAT Team Leader to acquire targets and time shots to deliver decisive strikes with a wide range of munitions. |
Squad Roles in Greater Detail
Squad Leader
3-2. The Squad Leader in Bellum serves as the tactical core of their unit, translating platoon-level coordination into actionable decisions on the ground. They coordinate squad movement and synchronize fires to achieve objectives while maintaining cohesion. A Squad Leader must constantly balance aggression with survivability, directing the tempo of engagements and preserving combat power for sustained operations. They direct Fireteam Leaders and manage Reconstitution when casualties occur, ensuring their element remains combat effective. An effective Squad Leader understands the flow of an engagement and the disposition of those they lead, and coordinates attacks, maneuvers, and withdrawals to preserve combat power and seize the initiative.
3-3. Squad Leaders have access to the Reconstitution ability, which allows all dead squadmates to spawn on them so long as they are not in contact with the enemy or actively wounded, and have at least one squadmate with them.
3-4. In terms of equipment, Squad Leaders carry the standard Rifleman loadout but may also be issued additional tools that enhance coordination and battlefield awareness, such as advanced organizational B-TAK functionality, like map marking.
Fireteam Leader
3-5. The Fireteam Leader in Bellum commands a small, four-person element within the squad and serves as the link between individual soldiers and the Squad Leader’s intent. They direct fireteam movement, control fires, and maintain cohesion during engagements. They also monitor the status of their team, relaying critical information such as casualties, ammunition, and enemy positions to the Squad Leader. A proficient Fireteam Leader manages their team closely, making rapid, moment-to-moment combat decisions that allow the Squad Leader to focus on broader coordination and overall tactical execution.
3-6. Like Squad Leaders, Fireteam Leaders have access to a slightly modified version of the Reconstitution ability in certain game modes.
3-7. Fireteam Leaders are typically senior members within the squad; to support this role, they carry the standard Rifleman loadout supplemented with specialized tools that enhance capabilities and control in the field. Possible equipment includes marking smokes, claymores, GM94 grenade launcher, GP25 grenade launcher, and RPG rockets.
Gun/HAT Team Leader
3-8. Gun and HAT Team Leaders command crew-served assets (heavy anti-tank launchers or medium machine guns), selecting firing positions, spotting targets, and managing sustainment tasks such as reloading and barrel changes. They control rates and sectors of fire to produce suppression or precision effects while deconflicting fires to minimize friendly casualties and conserving ammunition. A proficient Gun/HAT Team Leader knows which munition to employ, at what range, and exactly when to fire, selecting the correct round and firing solution to maximize effect while minimizing exposure.
3-9. Like all other leadership roles, Gun Team Leaders and HAT Team Leaders have the Reconstitution ability and access to the platoon radio.
3-10. Gun and HAT Team Leaders are equipped with the crew-served weapon system’s mount or tripod, spare barrels, extra ammunition belts, and additional warheads. HAT Team Leaders are also equipped with medical supplies, as they are the designated medic for the Weapons Squad.
Rifleman
3-11. The Rifleman is the foundation of the squad, and every other role originates from the Rifleman’s core responsibilities. They engage targets, secure sectors, and execute the Fireteam Leader’s orders. Focused on marksmanship, movement, and teamwork, Riflemen provide the steady firepower that enables the squad to maneuver and accomplish its objectives. A capable Rifleman delivers accurate, controlled fire while maintaining situational awareness under pressure, using cover, movement, and communication to remain effective in combat.
3-12. Riflemen lack specialized abilities but may carry additional or mission-specific equipment that supports the squad’s overall effectiveness. A standard Rifleman loadout includes a primary rifle, grenades, and standard medical supplies, like bandages and tourniquets, enabling them to cover flanks and treat casualties. Riflemen may also carry the element’s disposable launchers, extra ammunition, litters, ladders, or other unique tools as required by mission or environment.
Automatic Rifleman
3-13. The Automatic Rifleman provides the squad’s primary suppressive and area-control fires, anchoring positions and shaping engagements so friendly elements can maneuver. Reliant on volume and placement of fire rather than precision, the Automatic Rifleman fixes enemy movement, dominates avenues of approach, and enables assault or flanking actions by teammates. Automatic Riflemen should remain aware that the role’s longer static reloads limit their ability to maneuver rapidly. A proficient Automatic Rifleman maintains steady, well-placed suppressive fire to control the enemy’s movement, talks guns with other belt-fed systems, manages ammunition and heat, and positions themselves to keep their element maneuvering effectively.
3-14. Automatic Riflemen are equipped with a belt-fed weapon system, grenades, smokes, and standard medical supplies. They must carefully balance sustained suppression with ammunition conservation, managing their rate of fire and positioning to remain effective throughout prolonged engagements.
Medic
3-15. The Medic is the squad’s lifeline, responsible for stabilizing casualties, preserving combat effectiveness, and keeping the unit operational under pressure. They maneuver under fire to treat the wounded, prioritize triage, and coordinate with leadership to maintain cohesion and Reconstitution. A skilled Medic masters positioning, timing, and mass-casualty management, balancing personal survivability with the urgency to reach, stabilize, and return teammates to the fight.
3-16. Medics are equipped with advanced medical tools, including Stimulants, Depressants, and Blood Bags, that accelerate a casualty’s recovery to the Ambulatory state. With access to a dedicated medical net, they can also keep in contact with the Medics of other squads to better coordinate patient priority and supply distribution. Effective Medics must use these resources deliberately and efficiently, balancing urgency, supply, and tactical risk to keep their squad combat effective.
3-17. Medics operate most effectively from a Casualty Collection Point (CCP), a deployable position where wounded are consolidated, treated, and returned to the fight. When casualties mount, request that the platoon medic establish a CCP behind cover, and drag the wounded to it rather than treating them in the open.
Grenadier
3-18. The Grenadier provides the squad with flexible indirect firepower, bridging the gap between direct small arms fire and heavier support weapons. They specialize in delivering explosive area effects against dug-in infantry, soft-skinned vehicles, and light fortifications. Well-employed Grenadiers prioritize dead space, disrupting enemy movement, denying cover, and breaking defensive positions, creating decisive openings for friendly maneuver or assault.
3-19. Grenadiers are armed with a grenade launcher and can carry a diverse selection of munitions, including high-explosive (HE), thermobaric, and smoke. Their kit often includes standard rifle ammunition, grenades, and basic medical supplies to maintain versatility in close combat. The Grenadier’s balance of direct and explosive firepower makes them a critical asset in both offense and defense.
Machine Gunner
3-20. The Machine Gunner delivers sustained, high-volume fire to dominate avenues of approach and shape the battlefield. Operating as the element’s primary base of fire, they fix enemy movement, suppress hostile positions, and enable maneuver by friendly forces. A skilled Machine Gunner times rates of fire, leverages interlocking sectors with other guns, and positions the weapon to maximize effect while minimizing exposure and ammunition expenditure. Note that belts can only be linked when they hold between 5 and 99 rounds and the Machine Gunner is not actively firing.
3-21. Machine Gunners work closely with their Gun Team Leader to perform timely barrel changes and belt-link ammunition, maximizing sustained-fire uptime and overall system reliability.
3-22. Gunners carry the medium machine gun and immediate ready ammunition, while the Gun Team Leader is responsible for spare barrels, the tripod, and additional belts of ammunition.
Anti-Tank Gunner
3-23. The AT Gunner provides the squad with a lightweight, rapid-response solution for engaging vehicles, light fortifications, and hardened infantry positions. Using light multi-shot portable launchers, they deliver precise, opportunistic strikes that complement heavier anti-armor assets. Working independently or with an Assistant Gunner, the AT Gunner selects firing positions, engages at optimal ranges, and immediately displaces to avoid detection and counter-fire.
3-24. A typical AT Gunner kit centers on a portable anti-tank launcher with a small selection of munitions (anti-armor, anti-structure, and smoke/marking variants). Personal gear includes a sidearm and basic medical supplies.
Heavy Anti-Tank Gunner
3-25. The HAT Gunner delivers the platoon’s primary long-range anti-armor and anti-structure firepower, employing crew-served or crew-portable launchers to destroy vehicles, bunkers, and fortified positions. Operating under the direction of a HAT Team Leader, they manage the weapon system, coordinate firing data, and employ the correct munitions to achieve first-round effectiveness while minimizing exposure. Proficient HAT Gunners excel at target discrimination, range estimation, munition selection, and rapid repositioning after engagement.
3-26. The typical HAT Gunner kit centers on a crew-served or crew-portable heavy launcher system and a few munitions (HE, smoke, anti-armor, anti-infantry, and anti-structure variants). Personal items include a sidearm and basic medical supplies.
Reconnaissance Attachments
3-27. Beyond the rifle squads, each faction fields a dedicated reconnaissance element attached at the platoon level, equipped with minimal to no armor, increased movement speed, binoculars, and reduced ammo capacity, benefiting stealth and observation rather than sustained combat. These units are released into the AO early to provide advanced recon of the enemy.
3-28. Ranger Reconnaissance (RRC). A four-man team of Team Leader, RRC Grenadier, Automatic Rifleman, and Medic.
3-29. SATYR Reconnaissance. A four-man team of Leader, Senior Grenadier, Medic, and Machine Gunner, running suppressed weapons and claymores for covert screening and ambush work.
3-30. al-Zalaam Tracker Team. Two two-man elements of Tracker Leader and Tracker, the faction’s light scouting assets. Tracker Leaders are equipped with Lee Enfields, while the Trackers have standard al-Zalaam AKs. They do not get the speed boost the other factions have for their recon squad.
Headquarters Elements
3-31. Above the squads, each faction fields a headquarters element that commands the platoon. Its officers coordinate the fight on the Platoon Net, control the element’s fortifications, and field the faction’s drone.
3-32. Ranger Headquarters. Platoon Leader, Platoon Sergeant, Platoon Medic, and a Drone Operator (RSTA).
3-33. SATYR Headquarters. Platoon Commander, Deputy Platoon Commander, Platoon Doctor, and a Drone Operator.
3-34. al-Zalaam Command Cell. Cell Commander, Deputy Cell Commander, Drone Operator, and the Saboteur, the faction’s demolitions specialist who carries the large IED (see Chapter 1, Strongpoint).
Chapter 4: Factions
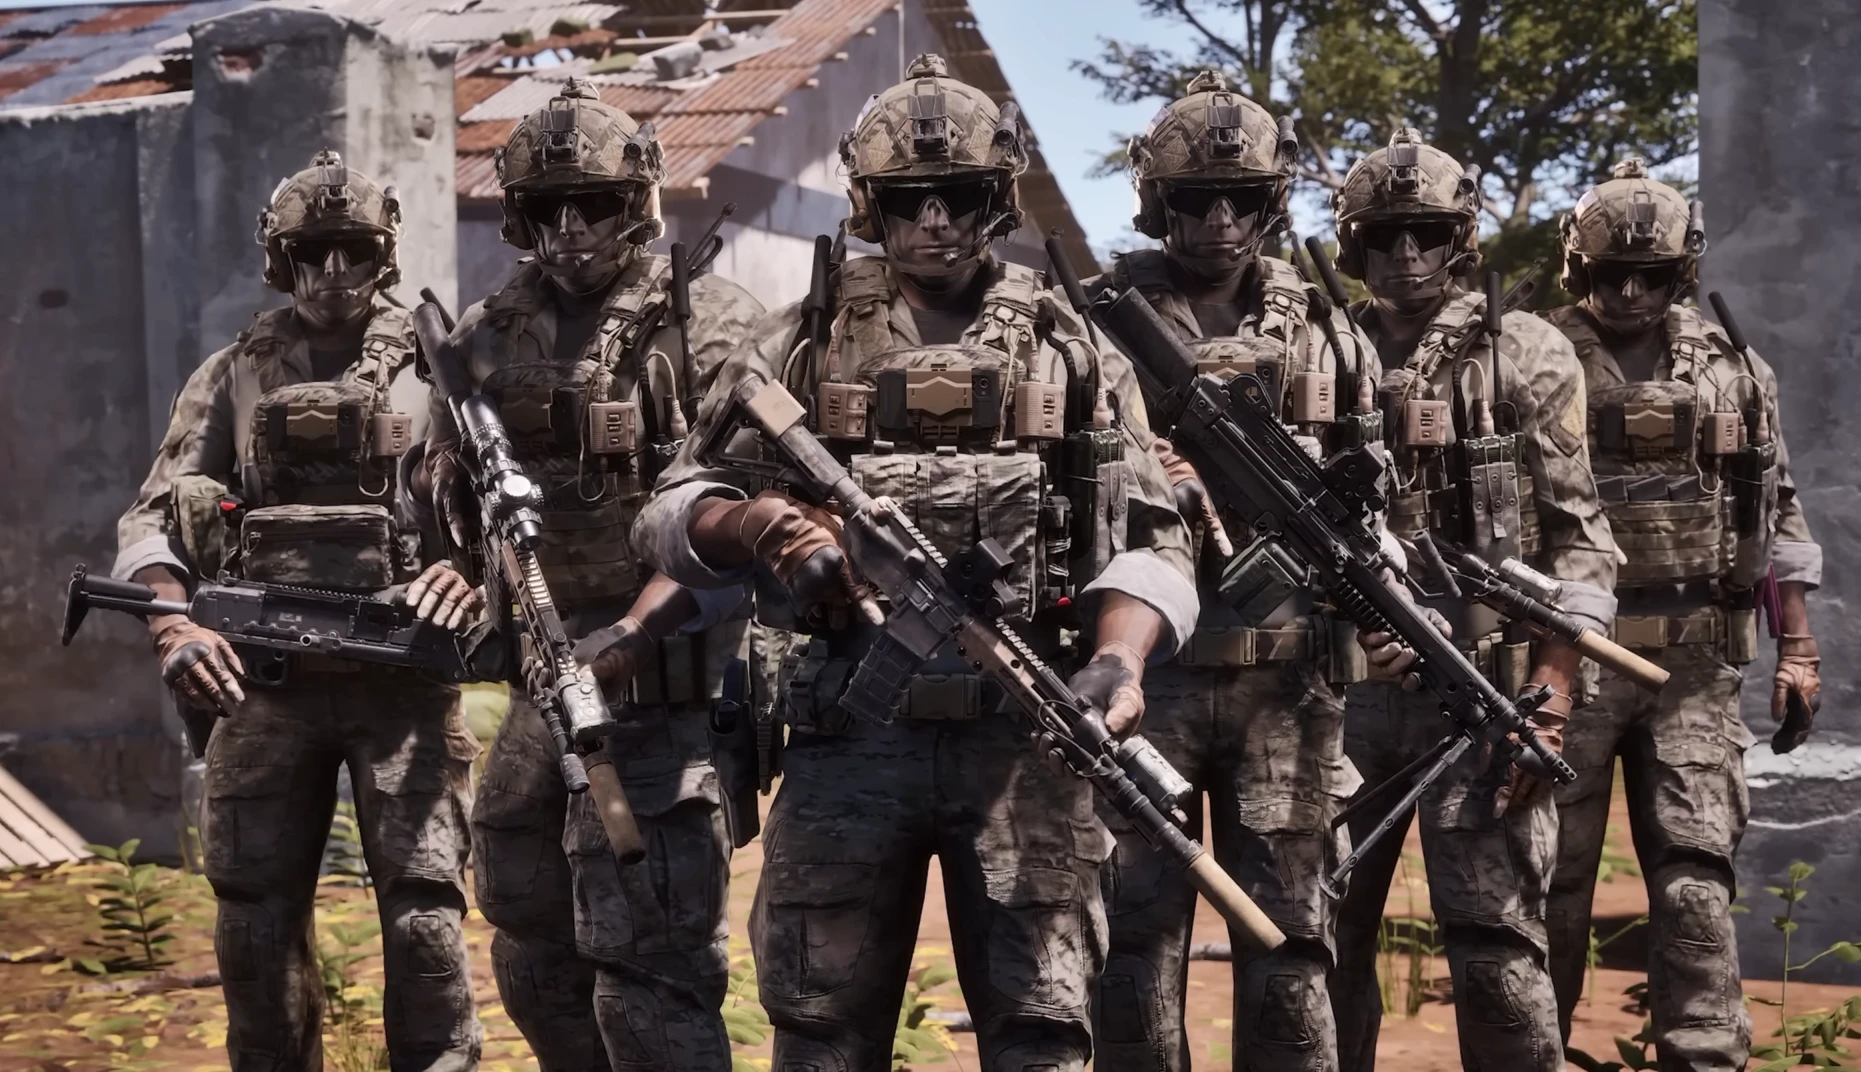
Ranger Regiment
4-1. The Ranger Regiment represents the pinnacle of U.S. light infantry in Bellum, a well-balanced, rapidly deployable conventional force capable of executing precision operations across the full spectrum of combat. Drawing inspiration from the 75th Ranger Regiment, this faction embodies coordination and overwhelming small-unit dominance. Rangers in Bellum operate as direct-action specialists: versatile, disciplined, and lethal in their execution and equipment. Their doctrine prioritizes controlled maneuvers, violence of action, and synchronization between squads, making them formidable in both offensive and defensive engagements.
4-2. Rangers excel in flexible, synchronized tactics, combining coordinated maneuver, suppressive fire, and inter-squad communication to isolate and destroy the enemy. Their command structure emphasizes initiative and cohesion, allowing squads to adapt seamlessly to shifting battlefield conditions and evolving objectives. The Ranger Regiment fields a dedicated Weapons Squad alongside its Rifle Squads, composed of three Medium Machine Gun teams and a single Heavy Anti-Tank team.
4-3. Equipped with modern U.S. military small arms, body armor, and support systems, Rangers combine cutting-edge technology with coordinated execution. From lightweight modular carbines and M320 grenade launchers to crew-served machine guns and anti-tank systems, every asset serves a tactical purpose. In Bellum, the Ranger Regiment embodies the apex of conventional military capability: structured, adaptable, efficient, and deadly when operating as a cohesive unit.
4-4. While playing as the Rangers, maintain tight coordination between squads and ensure mutual support across the platoon to avoid being overrun by the more aggressive and unpredictable tactics of other factions. The Ranger Weapons Squad serves as a critical force multiplier, delivering substantial firepower through its medium machine guns and anti-tank systems, but it demands deliberate coordination to employ effectively. Platoons can deploy the Weapons Squad as a single, cohesive, overwatching element to support the platoon, or attach its gun teams individually to Rifle Squads to enhance their individual firepower and sustainment during engagements. Success lies in using this asset intelligently, balancing overwhelming firepower with the cohesion and communication that define the Ranger Regiment.
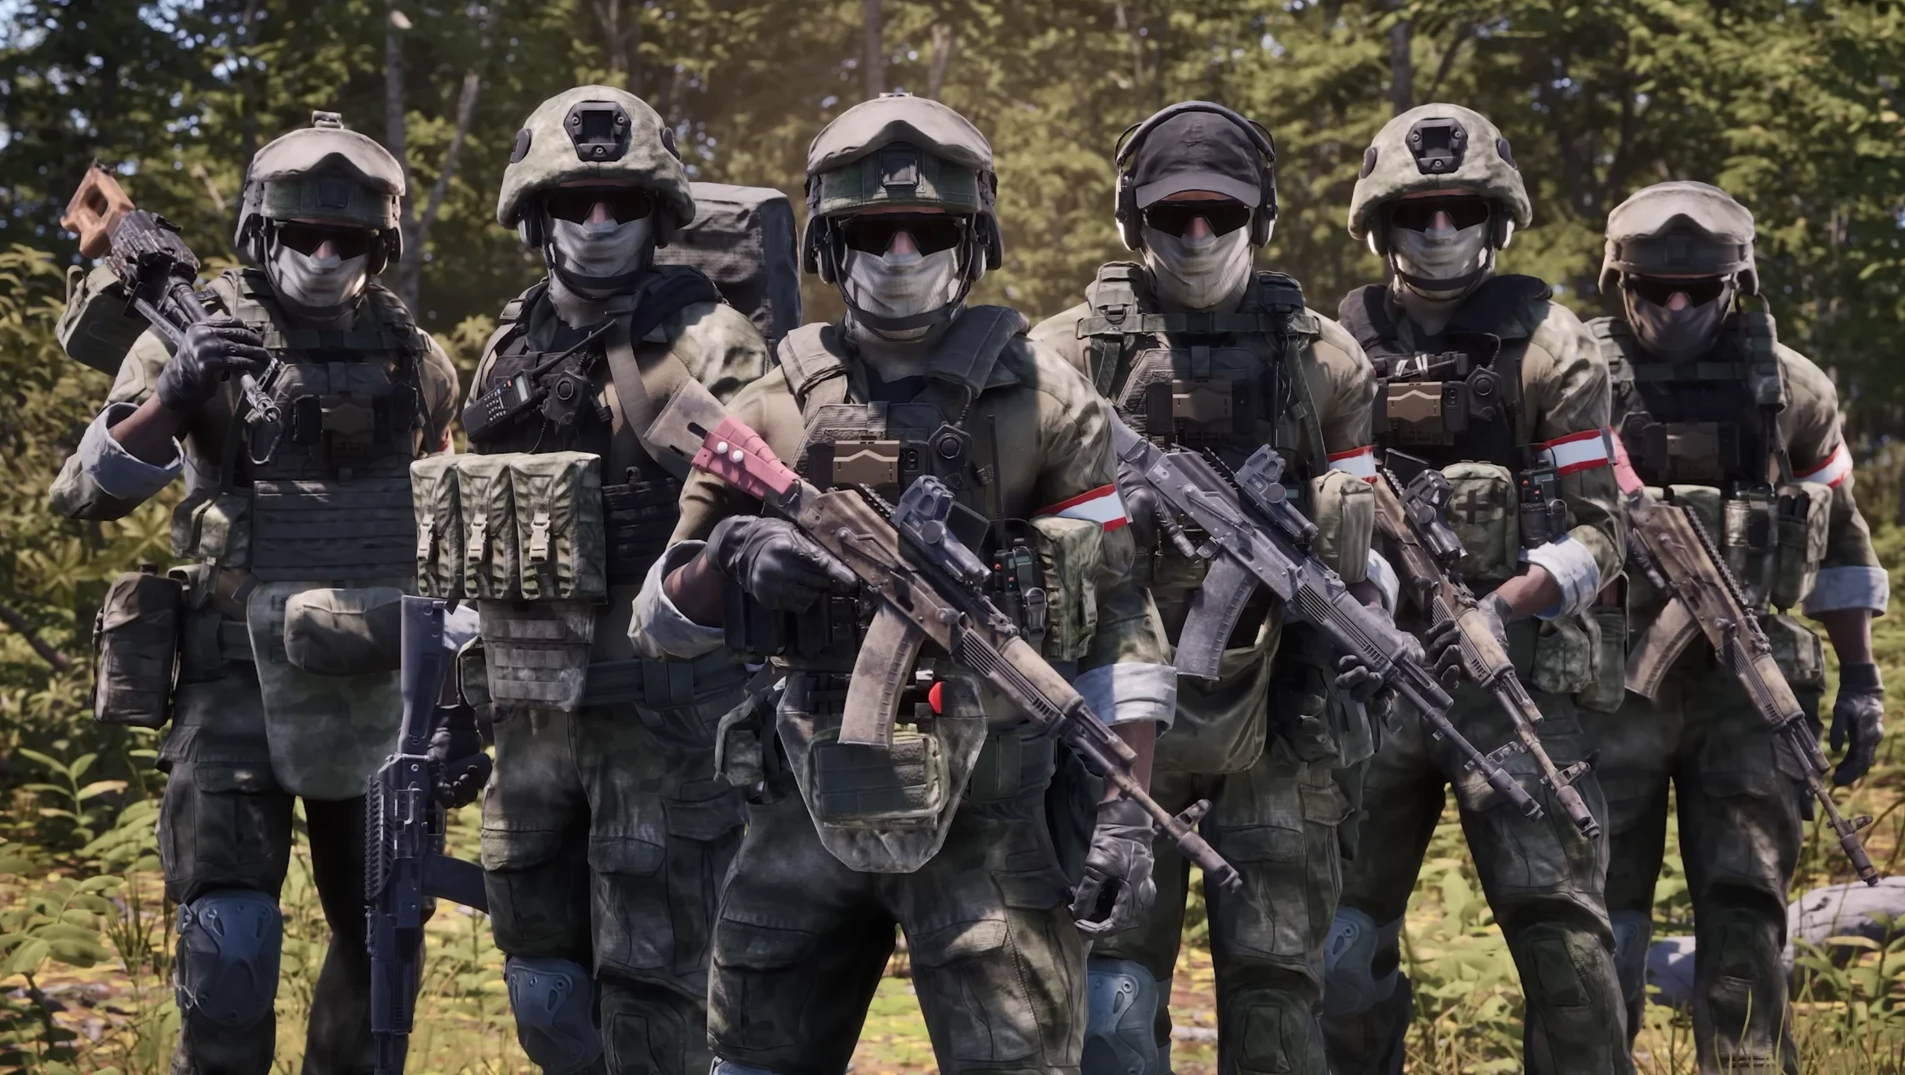
SATYR PMC
4-5. The Russian SATYR Private Military Company represents a hard-edged faction defined by tactical and morale flexibility. Composed of former soldiers, contractors, and opportunists, SATYR blends military discipline with the adaptability of a private enterprise. Their structure is pragmatic and results-driven, favoring adaptable leadership, aggressive maneuver, and a flexible command culture that prioritizes effectiveness and results over procedure.
4-6. Essentially a private conventional fighting force, SATYR is backed by private funding. They field modern Russian small arms, body armor, and equipment, yet lack the cutting-edge technology and next-gen support assets of forces like the Ranger Regiment. Their decentralized doctrine favors initiative and autonomy, enabling units to improvise and customize, exploit battlefield chaos, and turn disorder into tactical advantage.
4-7. When playing as SATYR, focus on mobility, aggression, and rapid exploitation of enemy weaknesses. Unlike other conventional military units, SATYR platoons are structured for self-sufficiency: each squad carries enough firepower to suppress, maneuver, and eliminate targets without relying on external support. Their extensive capability at the squad level allows them to adapt quickly and maintain momentum in fluid engagements. Success as SATYR comes from decisive action and battlefield awareness. Seize the initiative; exploit speed and superior squad-level firepower to outmaneuver heavier forces, striking before they can reorganize.
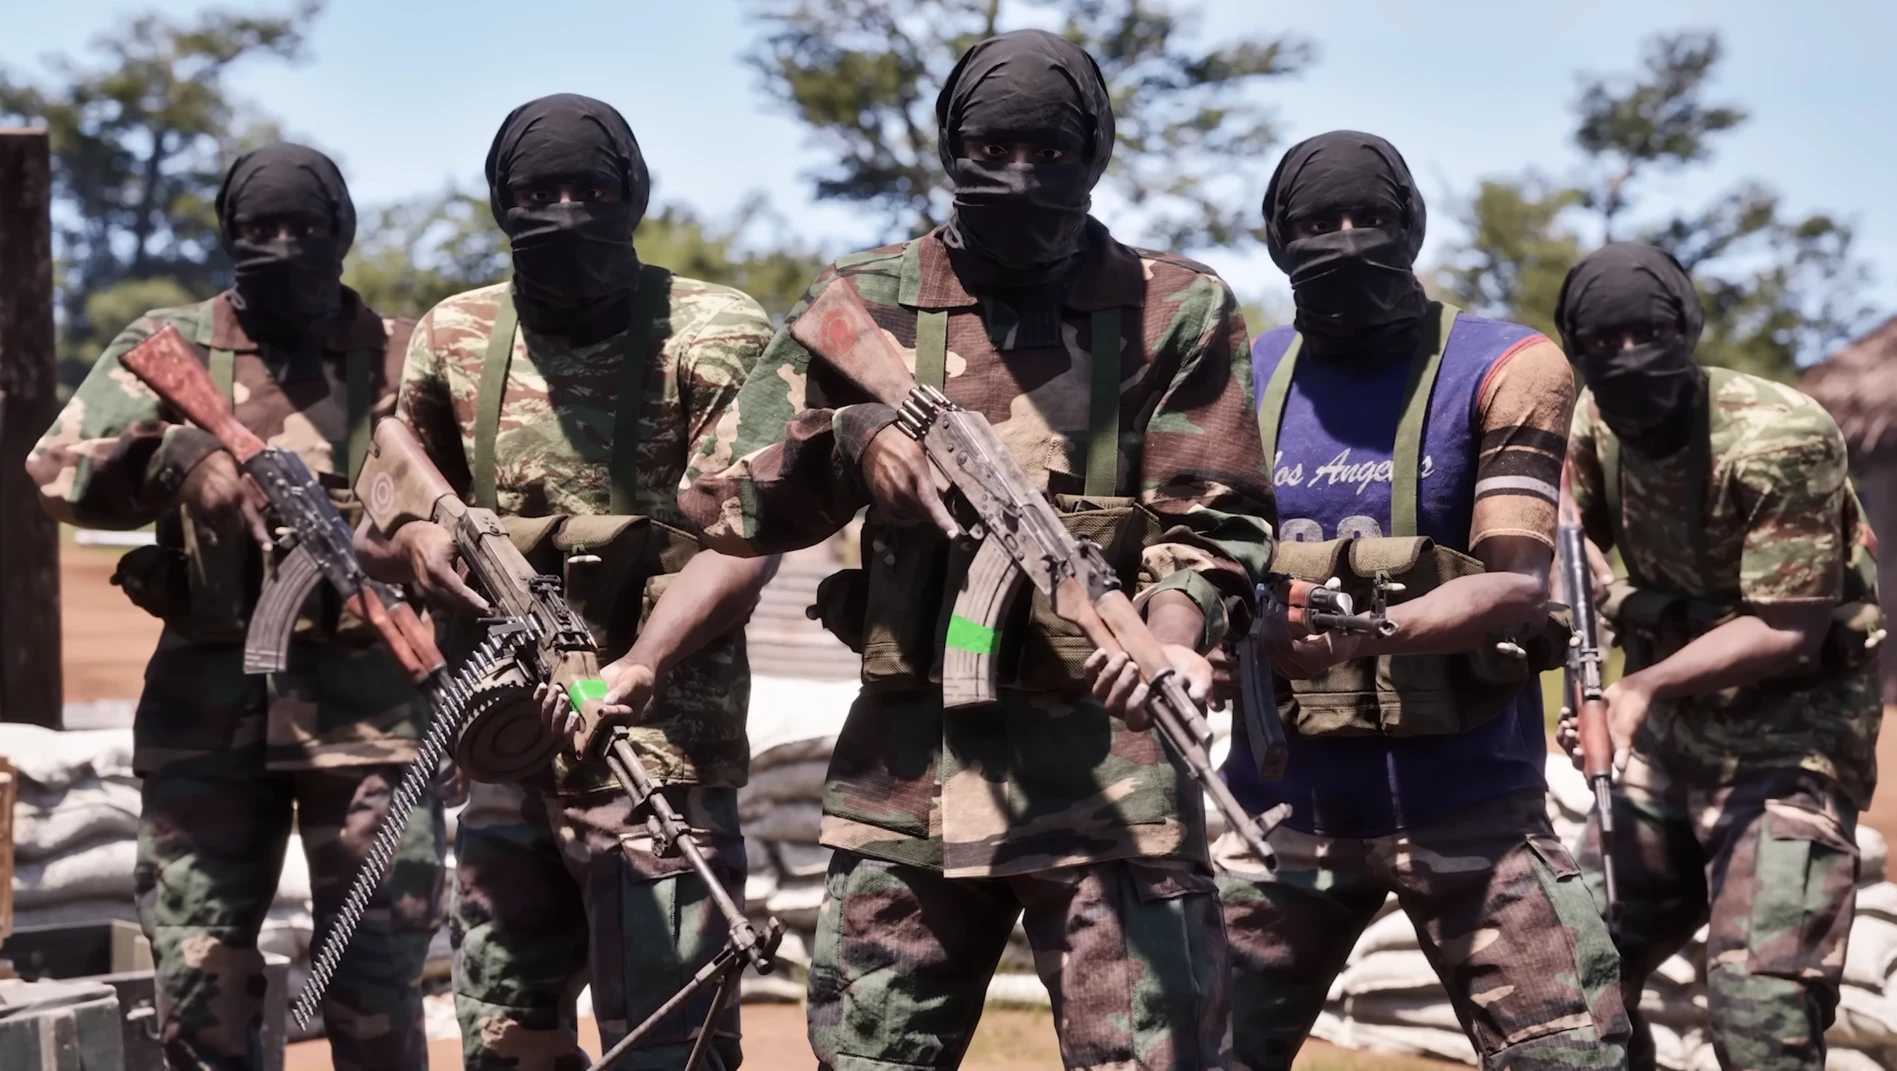
al-Zalaam
4-8. The al-Zalaam movement represents a hardened guerrilla force born from decades of regional instability and foreign interference. Rooted in local militias and warlord networks across Africa, al-Zalaam has evolved from a patchwork of tribal fighters into a unified resistance. Their ranks are vast, composed of local recruits, defectors, and foreign volunteers drawn by promises of power or profit. Though lacking the formal structure and precision of state-sponsored forces, their strength lies in numbers, mobility, terrain familiarity, and the ability to wage a war of endurance.
4-9. In combat, al-Zalaam fights as a rugged, highly adaptive guerrilla force. Their operations rely on ambushes, hit-and-run attacks, multi-directional flanks, and saturation assaults meant to overwhelm through chaos rather than coordination. Fighters are armed with whatever weapons they can acquire, be it through black markets, captured stockpiles, or relics scavenged from wars long past. They use the land itself as a weapon, leveraging their familiarity with the terrain to establish an early foothold in the Area of Operation, deploying ahead of conventional forces and dictating the tempo of the engagement.
4-10. When playing as al-Zalaam, success comes from patience, positioning, and controlled aggression. Disperse your elements across the AO to reduce detection, maintain visual control of key terrain, and open multiple lanes of approach when aggressive opportunities present themselves. Establish small observation posts overlooking likely avenues of approach and feed their reports back to the platoon; these OPs are the backbone of your strategy: see first, decide first, strike first. When an isolated or distracted enemy element is confirmed, swarm it quickly with overwhelming numerical superiority, using speed and coordinated violence of action to collapse their position before they can react. Make every small element appear larger than it is; employ deception, terrain, and precise timing to amplify your presence and let assaulting teams envelop the enemy undetected.
Chapter 5: Weapons and Attachments
Ranger Regiment Armament
5-1. URGI. 5.56×45mm carbine; semi-automatic and full-automatic. The standard rifle of Ranger riflemen and leaders, versatile from close quarters to medium range.
5-2. M249. 5.56×45mm light machine gun; full-automatic, belt-fed. The automatic rifleman’s weapon for sustained suppressive fire.
5-3. M240. 7.62×51mm medium machine gun; full-automatic, belt-fed. A crew-served weapon delivering heavier, longer-ranged fire from the gun team.
5-4. M320. 40mm grenade launcher; single-shot. Fires high-explosive and specialty rounds, carried stand-alone or mounted.
5-5. Carl Gustaf. 84mm recoilless rifle; single-shot. The Ranger heavy anti-tank weapon, effective against armor and fortified positions.
SATYR PMC Armament
5-6. AK-74M. 5.45×39mm rifle; semi-automatic and full-automatic. The standard SATYR service rifle.
5-7. RPK-74M. 5.45×39mm light machine gun; semi-automatic and full-automatic. The SATYR automatic rifleman’s support weapon.
5-8. PKM. 7.62×54mmR medium machine gun; full-automatic.
5-9. GP-25. 40mm underbarrel grenade launcher (VOG-25); single-shot.
5-10. GM94. 43mm grenade launcher; single-shot, pump-action. Fires thermobaric and fragmentation rounds, devastating in enclosed spaces.
5-11. RPG-7. Rocket-propelled grenade launcher (PG-7VM, TBG-7V); single-shot. Anti-armor and anti-material rocket system.
al-Zalaam Armament
5-12. AKM. 7.62×39mm rifle; semi-automatic and full-automatic. The standard insurgent rifle.
5-13. RPD. 7.62×39mm light machine gun; full-automatic, belt-fed.
5-14. RPK. 7.62×39mm light machine gun; semi-automatic and full-automatic.
5-15. DP-27. 7.62×54mmR light machine gun; full-automatic, pan-magazine-fed.
5-16. Lee-Enfield. .303 British marksman rifle; bolt-action. Manually cycled precision fire at long range.
5-17. GP-25. 40mm underbarrel grenade launcher (VOG-25); single-shot.
5-18. RPG-7. Rocket-propelled grenade launcher (PG-7VM, OFG-7); single-shot. al-Zalaam fields the same anti-armor and anti-material rocket system as SATYR.
Chapter 6: Equipment
Hand Grenades
6-1. M67. Fragmentation grenade; timed fuse. Standard Ranger casualty-producing grenade.
6-2. F1. Fragmentation grenade; timed fuse. Eastern-pattern defensive grenade in SATYR and al-Zalaam service.
6-3. RGD-5. Fragmentation grenade; timed fuse. Lightweight offensive-pattern grenade common to al-Zalaam forces.
6-4. Smoke grenades. The M18 (Rangers) and the RDG-2 and RDG-M (SATYR, al-Zalaam) produce screening smoke for concealing movement, marking positions, and covering casualty extraction.
Demolitions
6-5. C4 with fuse and ratclip. Ranger and SATYR Squad Leaders employ plastic explosive charges assembled from a charge, fuse, and ratclip initiator, used for breaching structures and destroying enemy fortifications and equipment.
Placement is a three-step process:
Place the C4 on a surface
Attach the fuse to the C4
Pull the pin on the detonator
6-6. IEDs. al-Zalaam fields improvised explosive devices in small and medium sizes, emplaced and detonated to ambush and deny terrain. The Sabatour IED is a 155mm shell, and the Squad Leader IED is a smaller version of the improvised explosive. Both types are triggered by an interactable button on your B-TAK.
Mines
6-7. Claymore. Directional anti-personnel mine fielded by Rangers and SATYR Team Leaders, emplaced as a charge and fired with a separate detonator, covering approaches and securing flanks.
Drones
6-8. Hornet. A Ranger palm-sized reconnaissance micro-drone, flown to scout positions and gain situational awareness without exposing the operator.
6-9. FPV Strike Drone. A SATYR first-person-view drone carrying an explosive RPG warhead, armed by reaching a minimum speed of 2 meters per second. It is flown directly into vehicles, fortifications, or personnel as a one-way precision munition.
6-10. VT Bomber. An al-Zalaam bomber drone that releases munitions over enemy positions before returning to its operator. These drones cannot be resupplied with fresh munitions.
Optics
6-11. Binoculars. Issued in faction patterns to all forces for long-range observation, target identification, and reconnaissance.
Field Fortifications
6-12. Leadership roles can emplace construction items that anchor their element’s logistics and spawn network (see Chapter 10, Spawn Mechanics): the Combat Outpost (COP), Objective Rally Point (ORP), Casualty Collection Point (CCP), and Patrol Base (PB).
Chapter 7: Watch and B-TAK Systems
Watch Functionality
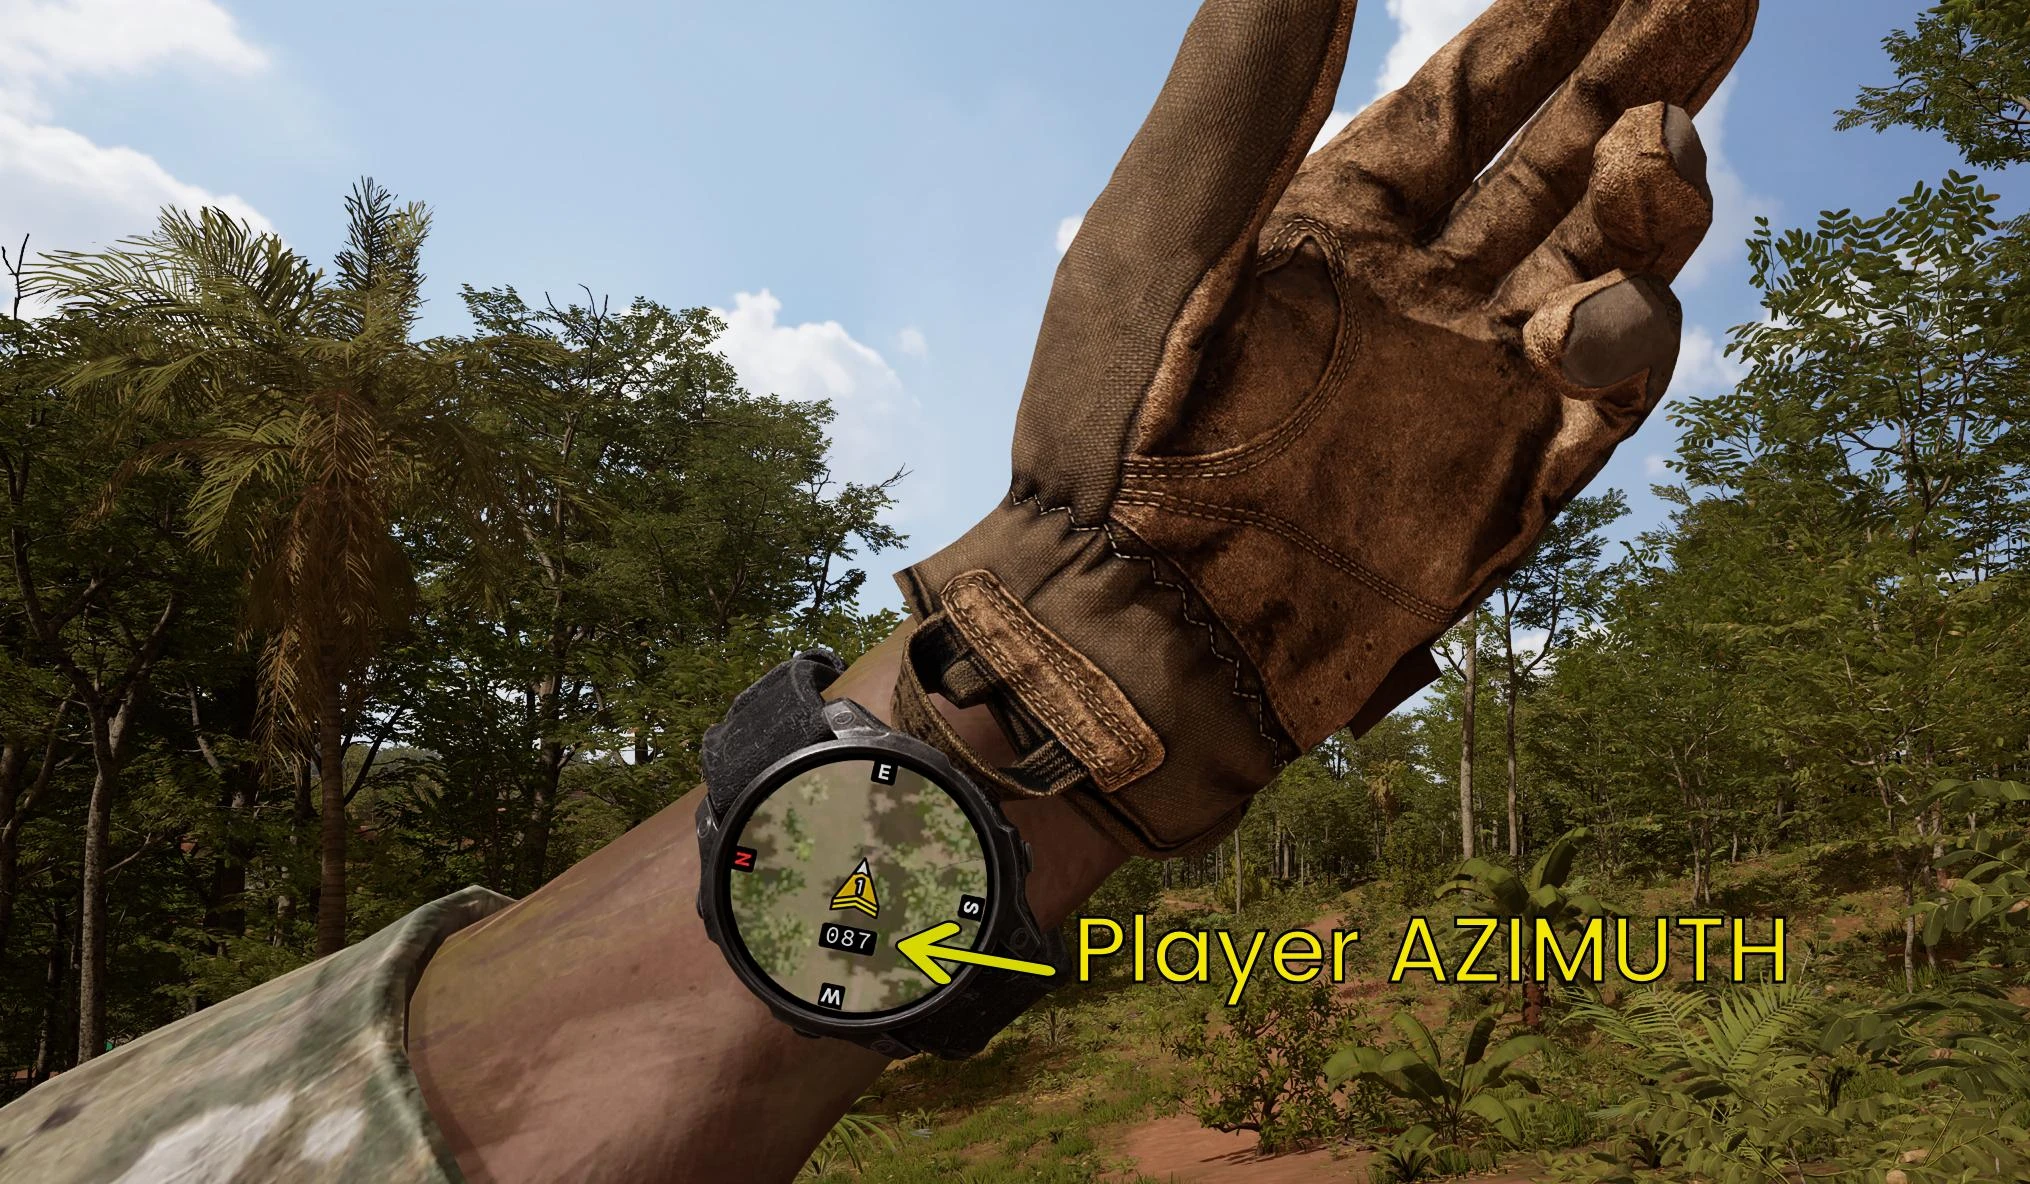
7-1. Every player in Bellum is equipped with a GPS watch that provides diegetic positional awareness within the Area of Operations. The watch displays the player’s immediate surroundings, serving as a vital tool for orientation and navigation during combat. By default, pressing [Tab] brings the watch to the center of the screen for improved visibility. While viewing, players can adjust their situational scope using [Mouse Wheel Up] and [Mouse Wheel Down] to zoom in or out as desired. Players can view the exact azimuth they are facing at the center of the watch display.
B-TAK Functionality
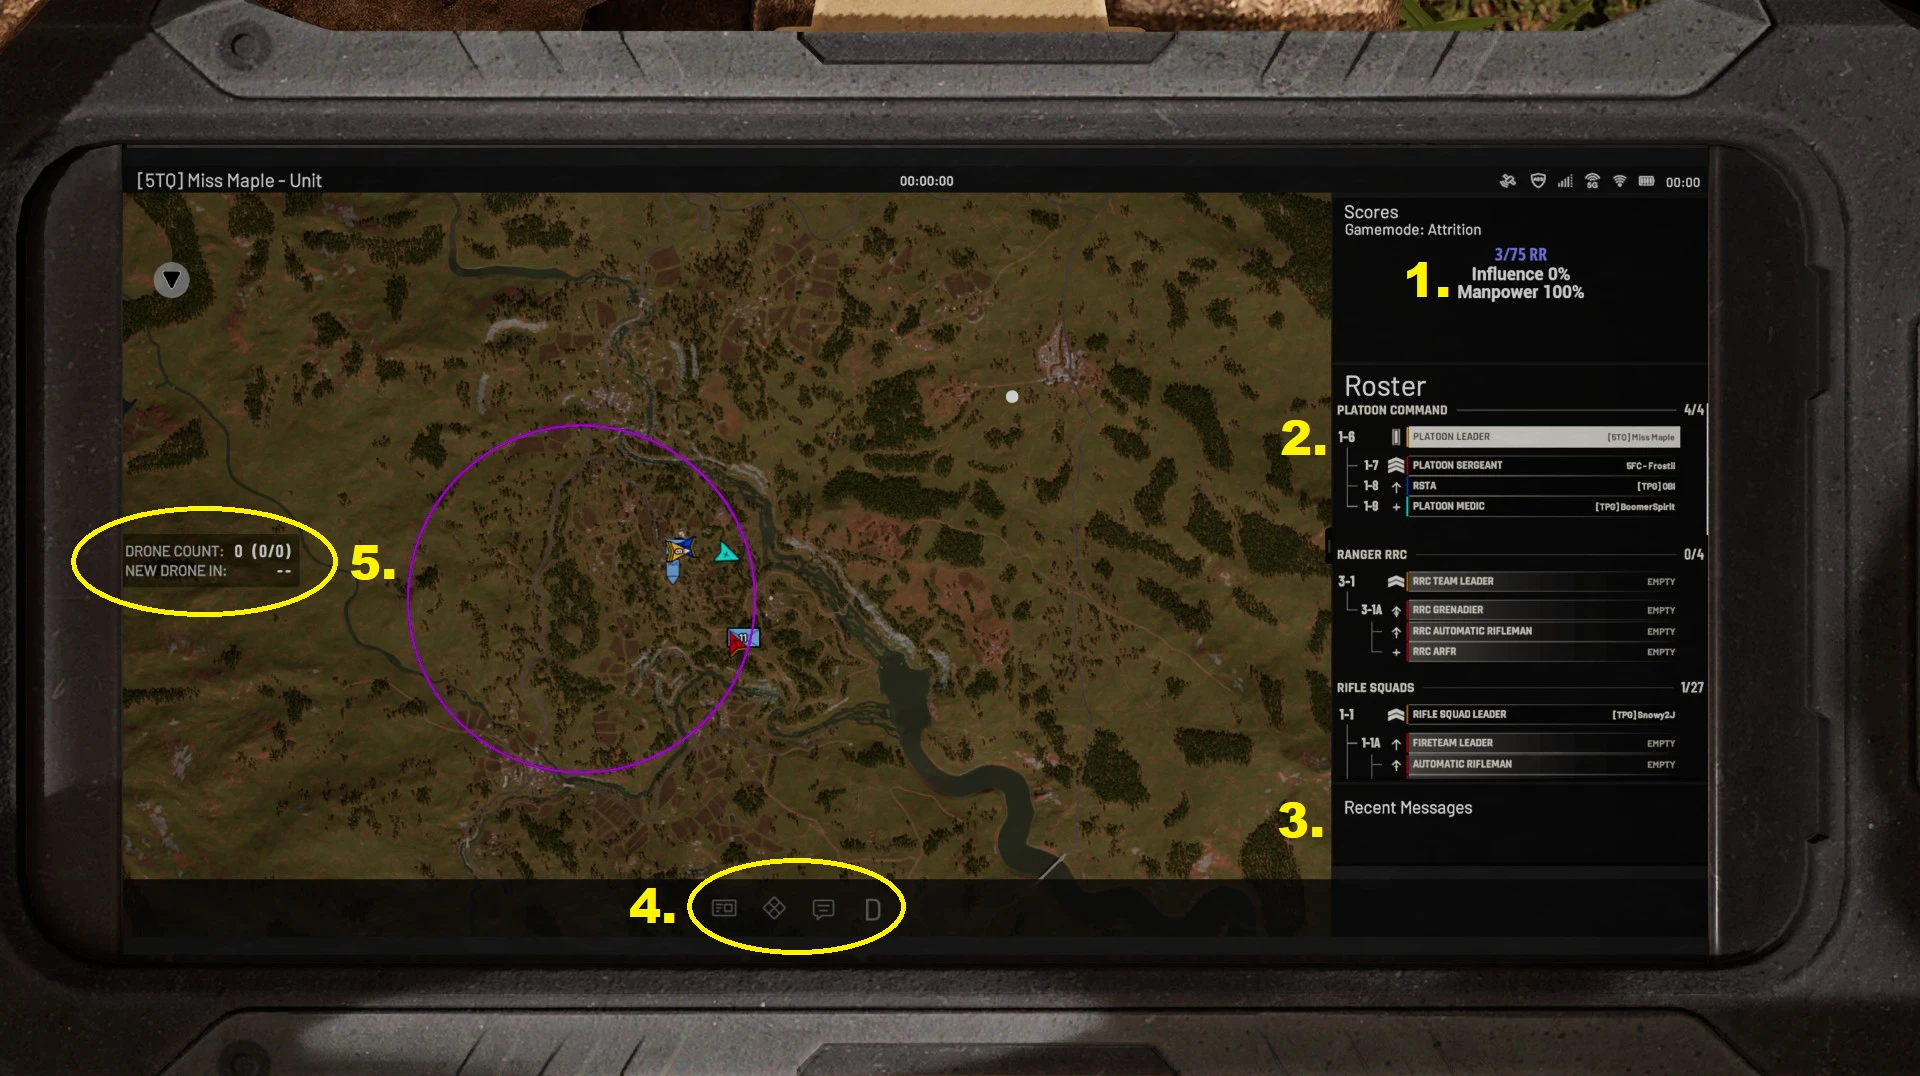
7-2. Each player in Bellum carries a mobile device equipped with B-TAK functionality, providing a digital extension of the unit’s battlefield awareness. The device is accessed using [M] by default. On the main B-TAK interface, players can view the status of their team’s win conditions (1.), their team’s roster (2.), and recent chat messages (3.). Players can access more dedicated map marking and chat interfaces by using the navigation menu on the bottom (4.). The popup on the left displays how many drone spawns are left and the cooldown timer for the next automated spawn (5.).
Operating the B-TAK and Watch
7-3. When the B-TAK is raised with [M], the interface becomes cursor-driven. Use [Left Mouse Button] to select and activate on-screen elements, and [Right Mouse Button] to perform context actions such as moving the map and clearing map markers. Placeable markers may be pressed and dragged to reposition them directly on the display; releasing the button completes the action. The [Mouse Wheel] zooms the active map or screen in and out.
7-4. While the B-TAK is displayed, press [Tab] to toggle a free mouse cursor on or off for fine interaction with on-screen controls and press it again to restore the locked state. Note that [Tab] raises the Watch during normal operation; once the B-TAK is open, [Tab] instead governs cursor mode.
7-5. Scrolling down past the roster reveals a slider that is used to change the size of your map markers. Adjust this to your preference for better viewing of the map.
B-TAK Applications
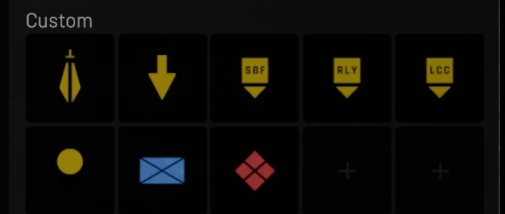
7-6. The set of icons at the bottom of your B-TAK gives you access to a few useful applications. Selecting the diamond pulls up the map marker menu, where any leadership role can place up to 5 markers on the map.
7-7. The top row of markers can only be seen by your squad, making them well suited for marking fireteam movements.
The Spear marker is used to designate a zone to be attacked.
The Arrow marker is used to specify movements, as well as general-purpose communication.
The SBF marker is used to designate a support-by-fire position.
The Rally (RLY) marker is used to designate a meeting point for 1 or more squads.
The Last Cover and Concealment (LCC) marker designates your last position of cover or concealment.
7-8. The bottom row of markers can be seen by your entire platoon. These are used by Squad Leaders and the Command Element to mark POIs, enemy contact, and friendly units that are not marked on the map.
The POI marker is a yellow circle that randomly generates a letter and two numbers for more accurate communication between squads.
The Blue Envelope marker is used to designate friendly forces.
The Red Diamond marker is used to designate enemy forces.
7-9. Selecting the D icon as the drone operator allows you to pilot your drone. For more information, see Drones.
Chapter 8: Communication
“The secret of war lies in the communications.”
- Napoleon Bonaparte
Communication Channels
8-1. Bellum features three primary communication channels available to players. All players can communicate through Local Proximity and Squad channels, while Fireteam Leaders and Squad Leaders also gain access to the Platoon Net, enabling coordination across the entire element. Keep in mind that when players are unconscious, they cannot speak at all, and that dead players can only communicate with other dead squadmates via the [B] hotkey. All communication hotkeys are push-to-talk and cannot be changed to toggle.
Local Proximity
8-2. Local Proximity voice is accessed via the [V] key and is directional, normalized, and limited to friendly players within the 10-15 meter range. Cross-team communication is not a feature in Bellum. Local voice serves as the primary means of coordination between nearby players, helping maintain clarity on Squad and Platoon Nets.
Squad Net
8-3. The Squad channel is accessed via the [B] key and transmits to all members of the squad. It enables coordination of movement, contact reports, and fire support between fireteams under the direction of the Squad Leader. Players are encouraged to keep transmissions concise and mission-focused to maintain clarity and prevent radio congestion. It is important to note that while dead players cannot communicate with live players, the [B] hotkey transmits to other dead squadmates while the player is in the Deployment Menu.
Platoon Net
8-4. The Platoon Net is accessed via the [N] key and is reserved for Fireteam Leaders and Squad Leaders. It serves as the command channel for coordination across the entire platoon and is used to relay orders, synchronize maneuvers, and share critical situational updates between squads. It is important to note that Fireteam Leaders are given access to this channel so they may communicate with other elements and update them if their Squad Leader is rendered unavailable.
Medic Net
8-5. The Medical Net is a medic-only channel accessed via the [N] key. It serves as a quick way to communicate with other medical personnel across squads, to coordinate patient priority and supply distribution.
Communication Etiquette
8-6. Remember your ABCs and keep transmissions Accurate, Brief, and Clear.
Use the correct channel.
Local Proximity: Close coordination and movement.
Squad Channel: Tactical communication within your element.
Platoon Net: Leadership and inter-squad communication only.
Communicate essential information only.
Structure your contact reports by using the Three Ds:
Direction – Distance – Description- “Contact South, 300 meters, three infantry moving left to right.”
Avoid filler language, unnecessary chatter, and descriptors like “I”, “Me”, “My”. Use your role instead.
“Bravo GL needs a medic!”
“Alpha AR is running low on ammo.”
Maintain radio discipline.
Pause half a second before speaking to prevent clipping.
Identify yourself when transmitting on both Squad and Platoon Nets.
“Alpha this is Bravo, shift fire, over.”
“One-One to One-Two, we are bounding, over.”
Confirm receipt of transmissions whenever possible:
“Roger/Check”, message received.
“Copy”, message received/information copied.
“Wilco”, short for “Will Comply”.
“Negative”, no.
“Affirmative/Affirm”, yes.
State the end of your transmissions whenever possible:
“Over”, finished speaking, expecting a reply.
“Out”, finished speaking, not expecting a reply.
Avoid stepping over active transmissions on the net.
Other common radio terms.
“Howcopy”, asks the receiving station to report the readability of the transmission.
“Net Call”, precedes a message intended for all users on the net.
“Interrogative”, precedes a transmission intended as a question.
“Break”, precedes a separation in the transmission.
“Break, Break, Break”, interrupting the net for priority or emergency traffic.
“Say Again”, commonly used in place of REPEAT, as REPEAT over the net is used to REPEAT fire missions.
Radio Management
8-7. Radio traffic can be tailored in the audio settings: the Squad and Platoon Nets can be panned to opposite ears, letting leadership monitor both simultaneously without confusion. In the field, holding [Ctrl] with [B] or [N] ducks that net’s volume, letting you prioritize the traffic that matters in the moment.
8-8. Death silences a soldier to the living. Dead players can speak only with other dead squadmates on a dedicated net (see 8-1); use it to coordinate your element’s Reconstitution rather than to wait in silence.
Chapter 9: Medical Familiarization
“The best medicine in a firefight is fire superiority.”
Health System
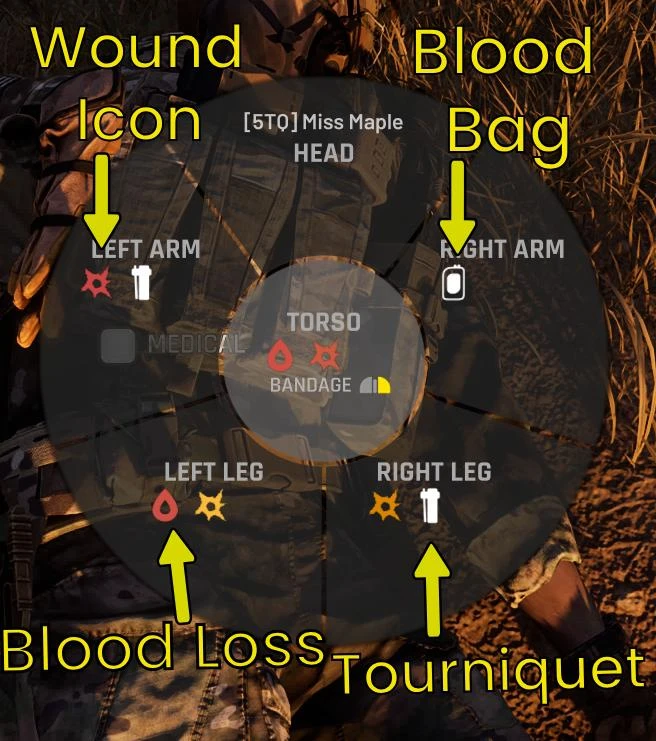
9-1. Players in Bellum possess a set blood volume, which represents their total health. The Health Menu can be accessed by holding the [H] key until the Medical Radial Menu appears. When looking at another player, holding [H] opens their medical interface (when prompted). Holding [H] without a target selected opens your own. The outer ring of the menu displays the target’s overall condition progressing from Green (Good Condition) to Red (Critical Condition) to Black (Grace State). You cannot open the Medical Radial Menu on players who are dead. Hovering the cursor over specific body panels provides detailed information about potential treatment/equipment options.
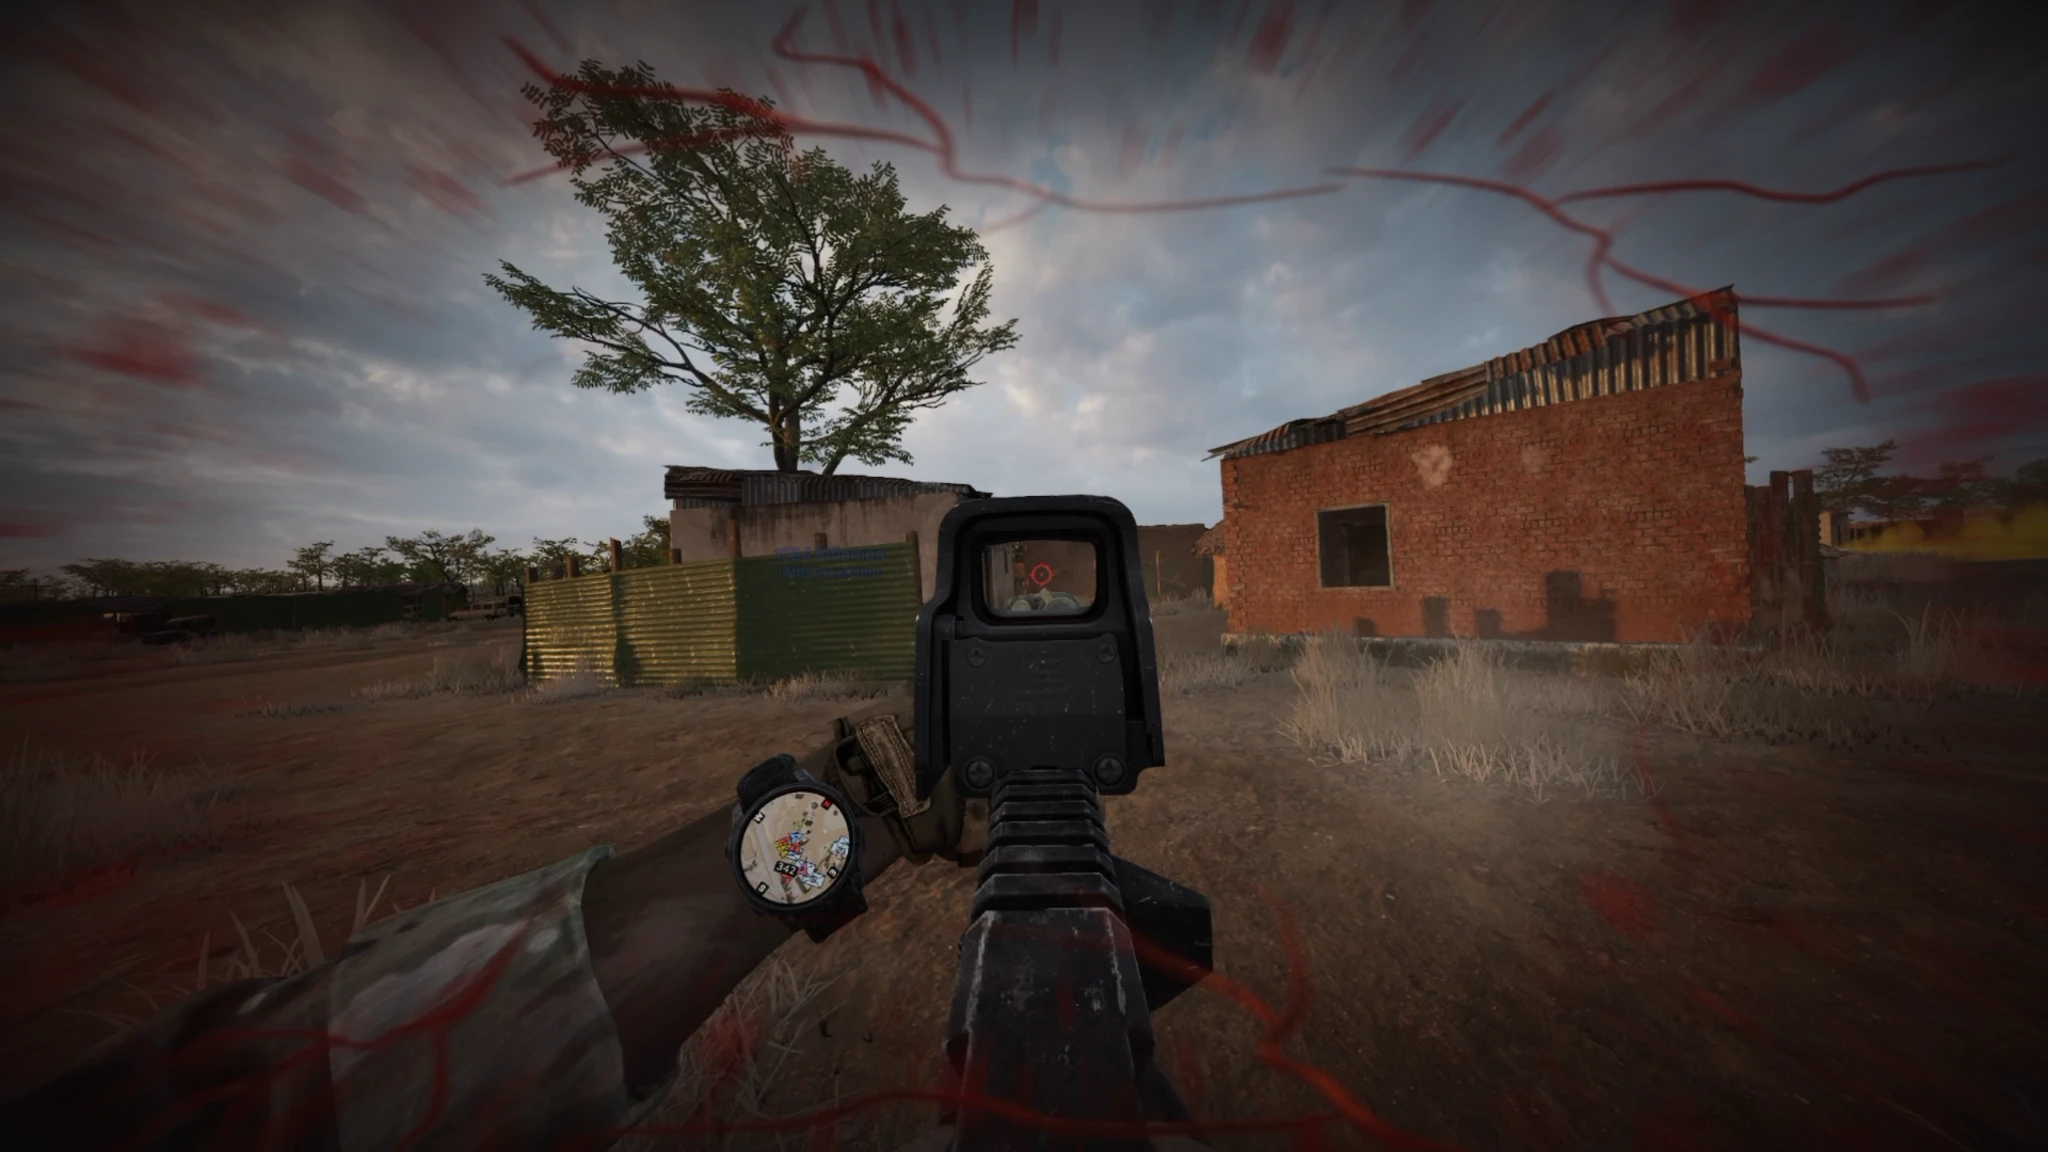
9-2. On-screen visual effects are also used to communicate the player’s health status. Lower blood values cause screen desaturation, severe wounds cause additional blood effects, and pain intensifies on-screen blur.
Health States
Ambulatory
9-3. Ambulatory is the standard state of players in Bellum. In this state, the player has access to all the actions and abilities assigned to their role, including general actions like movement and communication. Players slowly regenerate blood while Ambulatory if they have no existing or active wounds. Players can tell they are actively bleeding via the Blood symbol on their Health Menu. Players can ascertain the severity of their wounds via the color of the wound icon or via the intensity of on-screen visual effects. While wounded, the border of the player’s screen slowly accrues more bloody effects.
Incapacitated
9-4. When players lose a certain amount of blood, they enter the Incapacitated state. In this state, players are ragdolled, can no longer move, and are stripped of most abilities. However, Incapacitated players can still communicate in local and on radio channels and observe their health status by using the [H] key. Players know they are Incapacitated when they are ragdolled without player control.
Unconscious
9-5. Players can enter the Unconscious state through various means, including trauma to the head and blood loss. While Unconscious, players are essentially helpless until they wake up. During this state, players have no abilities and cannot look or speak. While Unconscious, players have a chance to regain consciousness based on their overall health condition. While Unconscious, the player has a solid black visual effect with occasional slight eye opening.
The Grace State
9-6. The Grace State activates when a player’s blood volume reaches zero. This state lasts for up to 300 seconds, depending on the severity of the wounds, during which time the player can still be stabilized and saved. If the player is not treated within this window, and does not regain positive blood flow, they will die when the timer expires.
9-7. The purpose of the Grace State is to provide a brief opportunity for medical intervention in otherwise fatal situations. However, players in this state remain vulnerable and can sustain additional injuries. In some cases, the severity of wounds and trauma may exceed what can be treated within the window of up to 300 seconds, rendering the casualty unsavable, unless in range of a friendly CCP.
Dead
9-8. Once a player’s Grace Period has run out, the player immediately dies, loses a life, and is sent to the deployment screen to select a new spawn location.
Effects of Pain and Wounds
9-9. Wounds do more than drain blood. Pain accumulates from injuries and lingers from untreated and tourniqueted wounds, and wounded arms directly degrade weapon handling: the more pain and arm wounds a soldier carries, the harder their weapon is to control under fire.
9-10. At maximum pain, a soldier develops tremors, violent shakes that make steady aim nearly impossible. Applying a Tourniquet to a wounded limb partially restores control of that arm, and pain decays over time once wounds are treated. Treat early: a stabilized soldier shoots straighter.
Concussions
9-11. Explosions concuss soldiers caught too close to the blast. Grenades, nearby detonations, and the backblast of rocket and recoilless weapons can all leave a soldier concussed, with dulled hearing and disoriented vision. Never stand behind a firing launcher.
9-12. Concussion severity scales with proximity to the blast, and its effects last from a few seconds up to a minute. There is no treatment; get behind cover and let your senses recover before re-engaging.
Medical Equipment
Tourniquets
9-13. Tourniquets are among the most critical medical tools in a player’s loadout, as they immediately staunch all bleeding from an affected limb and can be applied as quickly as, or faster than, a Bandage. To apply a Tourniquet, simply [Left Mouse Button] on the targeted limb while in the Radial Health Menu. This makes them ideal for controlling moderate to severe wounds that would otherwise take longer than ten seconds to pack and wrap.
9-14. However, Tourniquets are a temporary solution and do not completely address wounds. Leaving them applied for extended periods increases pain. Players should convert Tourniquets to packed Bandages as soon as the situation allows, to completely remove wounds, remove the negative effects associated with certain wounds, and decrease pain. While sprinting with a Tourniquet on your leg, you will rapidly lose blood through that wound.
Bandages
9-15. Bandages serve as the permanent method of treating wounds. Each wound requires 3 seconds to properly pack and secure, with wounds stacking to a maximum of 10 per body part. To begin bandaging a wound, simply [Right Mouse Button] on the targeted wound while in the Radial Health Menu.
9-16. Tourniquets should be applied first to immediately control bleeding. Once the situation stabilizes and time permits, players should remove the Tourniquet by bandaging the wound fully to restore the limb, remove negative wound effects, and prevent further blood loss from that limb.
Depressants
9-17. Depressants are carried exclusively by Medics and are used to temporarily improve blood conditions and reduce pain for 2 minutes. Once the effects wear off, the player will automatically assume the state associated with their immediate blood level. To administer Depressants, simply [Mouse Wheel Down] on the patient while in the Radial Health Menu. This treatment can be used to move a casualty, buy precious time, enable the patient to self-treat, or bring a teammate back into the fight during critical moments.
Stimulants
9-18. Stimulants are another drug only carried by Medics and are used to wake patients from the Unconscious state. To administer Stimulants, simply [Mouse Wheel Up] on the patient while in the Radial Health Menu.
Blood Bags
9-19. Blood Bags are carried by Medics and are simply used to transfuse a patient with more blood. This is a heal-over-time effect that slowly replenishes the patient’s health. To administer a Blood Bag, simply [Middle Mouse Button] on a limb while in the Radial Health Menu.
9-20. Keep in mind that Blood Bags only flow through limbs that do not have a Tourniquet applied, and that active bleeding wounds count negatively against the flow rate of the Blood Bag. Blood Bags are also removed if any new wounds are applied to the patient. Always stop or manage bleeding before a Blood Bag is administered. Blood Bags can be administered to multiple individual limbs simultaneously.
CCP
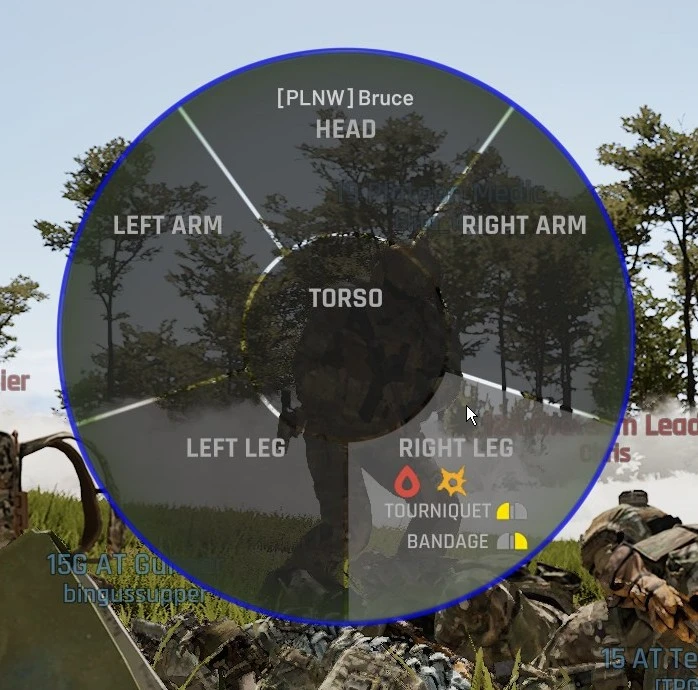
9-21. The CCP (Casualty Collection Point) is a placeable piece of equipment carried by the platoon Medic that can be picked up and moved. Casualties inside the 5-meter radius of the CCP are immune to bleeding out, and any players within the radius perform medical actions faster. You will know you are within the radius when your medical wheel has a blue border.
Tactical Combat Casualty Care
9-22. Should you observe friendly forces sustain a casualty, do not carelessly rush to render aid. Unless you are a designated Medic, your primary duty is to defeat the threat and establish sufficient security; only once hostile action has been suppressed should recovery and medical treatment be initiated.
Care Under Fire
9-23. Return fire, seize the initiative, and prevent further casualties.
Suppress or eliminate the enemy and communicate casualty location.
Direct the casualty to move to cover or self-apply a Tourniquet (if able).
Only apply Tourniquets at this stage.
Prioritize survival of the element before medical intervention.
Tactical Field Care
9-24. Treat casualties once immediate threats are neutralized or suppressed. At this stage, players can safely perform more comprehensive medical actions using the Medical Radial Menu.
Assess:
Check for responsiveness and bleeding.
Open the Health Menu with [H] to evaluate wound locations and severity.
Identify limbs with severe injuries.
Treat:
Tourniquets: Apply immediately to stop heavy limb bleeding.
Bandages: Pack and wrap wounds once safe; convert Tourniquets when possible.
Depressants/Stimulants: Temporarily revive Incapacitated and Unconscious teammates for evacuation or self-aid.
Blood Bags: Restore blood volume to stabilize vitals.
Moving Casualties
9-25. Casualties can be dragged out of the line of fire by interacting with their shoulder line. Approach a downed soldier and use the interact key [F] to begin dragging; alone, you grab the casualty and move crouched at reduced speed, and while prone, you can crawl-drag without rising.
9-26. A second soldier can join an existing drag by grabbing the casualty’s legs, at which point both carriers rise to a standing carry. Changing stance releases your grip, and moving too fast or stretching too far from the casualty drops them. Get casualties behind cover or to the CCP before treating.
Communication and Triage
9-27. TCCC is a team effort. Medical success depends as much on communication as on treatment.
Announce your intent: “Applying tourniquet left leg!”
Prioritize: Multiple casualties require triage; treat those you can save first.
Coordinate: Ask teammates to provide cover or move wounded to safety.
Report: Give quick updates to Squad or Platoon Net on casualty status.
Basic Aid Checklist
9-28. For use by non-medic roles.
Ensure you are out of immediate danger.
Check if the patient is treatable (not dead).
Is the patient Incapacitated?
Yes: Ask them if they have wounds / if they are in pain.
No: Go to step 4.
Is the patient bleeding?
Yes: In order of severity, treat the bleeds with Tourniquets, then Bandages.
No: Skip this step.
Did the patient lose a lot of blood?
Yes: Call for a Medic to push Blood Bags.
No: Go to step 6.
Is the patient awake now?
Yes: You’re done.
No: Return to step 3.
Medic Checklist
9-29. For use by Medics.
Ensure you are out of immediate danger.
Check if the patient is treatable (not dead).
Is the patient Incapacitated?
Yes: Ask them if they have wounds / if they are in pain.
No: Go to step 4.
Optional: Apply Depressant to temporarily make the patient Ambulatory.
Is the patient bleeding?
Yes: In order of severity, treat the bleeds with Tourniquets, then Bandages.
No: Skip this step.
Did the patient lose a lot of blood?
Yes: Administer Blood Bags to limbs.
No: Go to step 6.
Is the patient awake now?
Yes: You’re done.
No: Return to step 3.
Optional: Apply Stimulant to temporarily wake the patient to the Incapacitated state.
Chapter 10: Spawn Mechanics
Limited Life System
10-1. Player lives in Bellum are limited based on faction type and role selection. Conventional Factions receive 3 lives, while Unconventional Factions receive 4. Additionally, once a specific role has exhausted all its allotted lives based on the faction’s limitations, that role becomes unavailable for the remainder of the round.
10-2. This system promotes personal accountability and team-oriented decision-making. It encourages players to value survival, coordinate effectively, and assist wounded teammates whenever possible. It also supports more aggressive playstyles for Unconventional Forces. A life is expended each time a player dies, though deaths at the Forward Operating Base (FOB) do not consume one.
Forward Operating Base
10-3. The Forward Operating Base (FOB) serves as the main base spawn for all factions and is established automatically at the start of each match. The FOB should be viewed primarily as the team’s initial staging area, located well outside the Area of Operations. It is also the backup spawn location and ammunition depot should an element be wiped from the AO. Redeploying from the FOB does not cost a life and gives you a full kit reset on respawn.
Reconstitution
10-4. Squads in Bellum rely on the Reconstitution mechanic to respawn teammates directly in the field. This ability is available to both Squad Leaders and Fireteam Leaders depending on the faction and game mode. For al-Zalaam, Fireteam Leaders can only be spawned on in Attrition and Strongpoint. To Reconstitute, the non-ambulatory leader must have at least one non-ambulatory squadmate nearby and must not be in contact with the enemy.
Squad Leaders can Reconstitute their entire squad.
Fireteam Leaders can Reconstitute their fireteam and the Squad Leader.
Troops-In-Contact (TIC) Conditions
10-5. The Troops-In-Contact system reinforces squad cohesion, encourages elements to break contact, and ensures that leadership remains critical to maintaining combat effectiveness on the ground. Leadership may not perform Reconstitution while any of the following apply:
Engaged by the enemy or actively engaging the enemy.
Actively wounded.
Objective Rally Point
10-6. The Objective Rally Point (ORP) is a resupply point, not a spawn point. It is placed, and can be picked up again, by the 17. Each player may resupply their full kit from the ORP once per match, making its siting a deliberate logistics decision.
Patrol Bases
10-7. Patrol Bases are deployable spawn positions established by leadership. For al-Zalaam, up to 2 may be placed anywhere inside or outside the AO during Attrition and Strongpoint. For Conventional Forces, only one PB can be placed inside or outside the AO. These vital POIs can only be placed by Squad Leaders or the Platoon Leader, and act as a forward resupply point for the platoon. Site them concealed, defensible, and close enough to the fight to matter: they directly control how quickly your element returns to action.
Chapter 11: Additional Gameplay Mechanics
Contextual Weapon Bracing
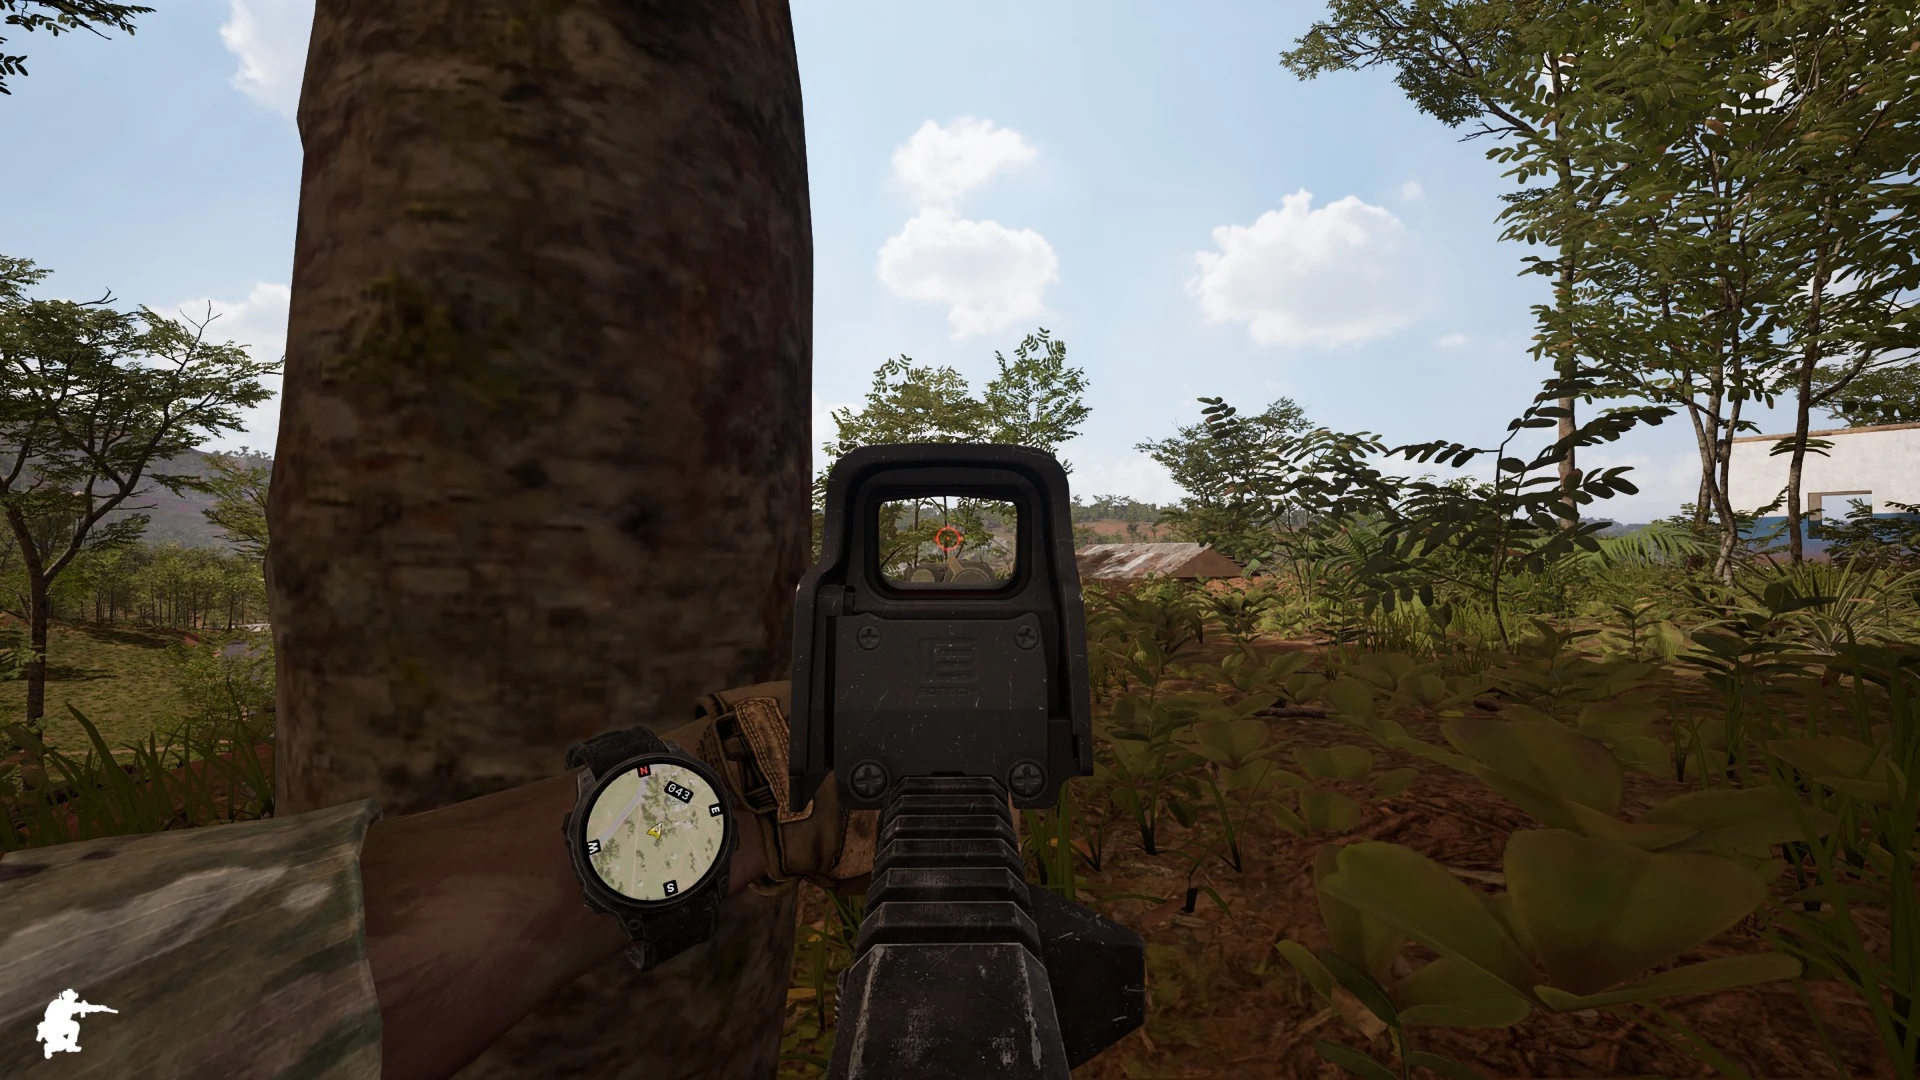
11-1. Weapons in Bellum receive a contextual weapon bracing bonus when the weapon model touches a valid object such as a tree, a wall, or the ground. This bracing bonus decreases recoil and sway dramatically.
Crew-Served Belt Linking
11-2. Belt-fed weapon systems that use loose belts can be linked by an assistant gunner. The assistant gunner equips the belt via the [6] key and then holds [F] while looking at the gunner’s feed tray. Belts cannot be linked if the new belt would be larger than 99 rounds or if the active belt has fewer than 5 rounds. Belts can also be linked if the gunner is actively firing.
Crew-Served Rocket Loading
11-3. Crew-served rocket loading for loadable launchers is executed in the same manner as belt linking for machine guns. The assistant gunner equips the correct warhead via the [6] key and then holds [F] while looking at the loading breech, whether the launcher is held or stowed. Additional rockets cannot be loaded while there is already a warhead in the launcher.
General Gunplay
11-4. Incoming fire may disrupt your aim. Rounds passing close by build suppression, which can flinch your weapon off target; the heavier and more sustained the incoming fire, the larger the disruption.
11-5. Taking a hit can also trigger aim punch, jerking your point of aim in a direction and forcing you to reacquire your target.
11-6. Stance governs control. Prone provides the steadiest platform, followed by crouched, then standing; bracing (see 11-1) and mounting further steady the weapon. Wounds and pain degrade control (see Chapter 9).
Armor Degradation
11-7. Body armor is not permanent protection. Plates weaken locally where they are struck: ceramic plates fracture across a wide area while steel deforms in a smaller zone, and repeated hits to the same region progressively destroy the plate’s ability to stop rounds.
Ammunition Cross-Loading
11-8. Sustained fights are won by ammunition management. Open the cross-load menu with [J] to redistribute ammunition and equipment; each item costs points against a limited cross-load budget, shown as spent versus maximum. Every player is given 4 extra cross-loading points to be filled with selected equipment from their FOB and PBs.
11-9. Items in your cross-loaded inventory flow into your normal inventory automatically when you can use them, freeing up the cross-load slot. Usable items are those that come in the base loadout of your chosen role.
11-10. Cross-load point costs are as follows:
| Item | Points |
|---|---|
| Rifle magazine, 5.56×45 (PMAG) | 1 |
| Rifle magazine, 5.45×39 (AK-74) | 1 |
| Rifle magazine, 7.62×39 (AKM/RPK) | 1 |
| 40mm round, M443 HEDP | 1 |
| 40mm round, M713 | 1 |
| 40mm round, M714 | 1 |
| 40mm round, M715 | 1 |
| 40mm round, M716 | 1 |
| 40mm round, VOG-25 | 1 |
| 40mm round, VG-40MD | 1 |
| 43×30mm round, Frag (GM94) | 1 |
| 43×30mm round, Thermobaric (GM94) | 1 |
| Single round, 7.62 M80 (bolt rifle) | 1 |
| Bandage | 1 |
| M67 fragmentation grenade | 1 |
| F1 fragmentation grenade | 1 |
| RGD-5 fragmentation grenade | 1 |
| M18 smoke grenade | 1 |
| RDG-2 smoke grenade | 1 |
| RDG-M smoke grenade | 1 |
| Extended magazine, 5.45×39 45-rd (RPK-74) | 2 |
| Loose belt, 7.62×51 M80 | 2 |
| Linked belt, 5.56×45 M855 (M249) | 3 |
| Linked belt, 7.62×51 M80 (M240) | 3 |
| Machine gun box, 7.62×54R (PKM) | 4 |
| Machine gun box, 7.62×39 (RPD) | 4 |
| Pan magazine, 7.62×54R (DP-27) | 4 |
| 84mm round, HE 441 (Carl Gustaf) | 4 |
| Rocket, PG-7VM (RPG-7) | 4 |
| Rocket, OFG-7 (RPG-7) | 4 |
| Rocket, TBG-7V (RPG-7) | 4 |
| Rocket, GTB (RPG-7) | 4 |
Drone Operation
11-11. Drones are flown remotely while the operator’s body remains at the point of control; protect your operator, as they are defenseless while flying. The Ranger Hornet is the only drone deployed from the operator’s inventory, with two drones available per life and resupply. SATYR and al-Zalaam drones are deployed from base, with eight and four available respectively.
11-12. The drone’s camera feed is monitored through the B-TAK, which displays the aircraft’s battery and signal strength alongside a compass heading. Signal degrades with range; a drone flown beyond its link is lost.
11-13. Flight is fully manual, with pitch, roll, yaw, and thrust under operator control. An altitude-hold mode steadies the aircraft for observation work, and the camera can be slewed, zoomed, and re-centered independently of the flight path. The control scheme is as follows:
| Control | Input |
|---|---|
| Pitch | [W] / [S] or mouse |
| Roll | [A] / [D] or mouse |
| Yaw | [Q] / [E] |
| Thrust up / down | [Left Shift] / [Z] |
| Auto Hover | [H] / [X] |
| Altitude hold | [T] |
| Camera control hold | [Left Alt] + mouse |
| Camera zoom | [Mouse Wheel] |
| Center camera | [Middle Mouse Button] |
| Change camera view (al-Zalaam only) | [R] |
| Release payload / fire (al-Zalaam only) | [G] |
| Terrain-lock camera (hold) | [Right Mouse Button] |
| Exit drone control | [Tab] or [Esc] |
Chapter 12: Basic Movement Techniques
Fireteam Wedge
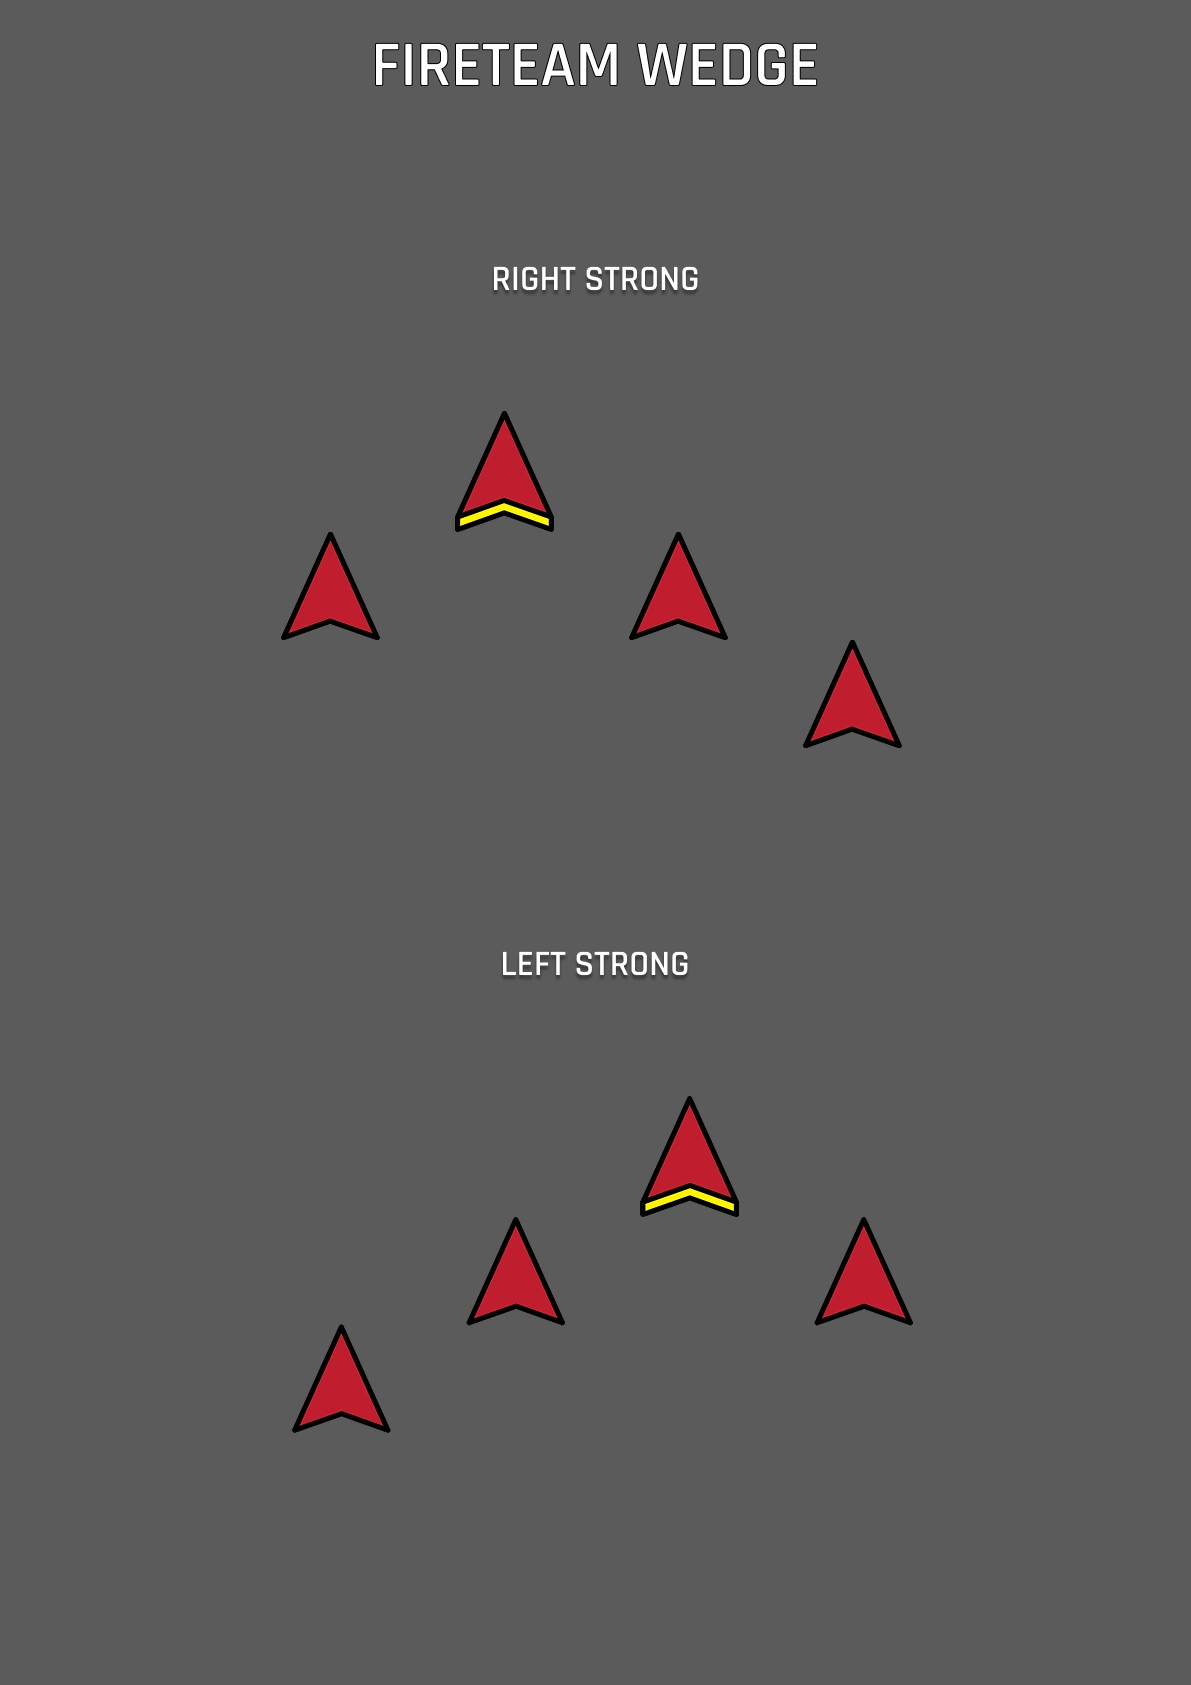
12-1. The most common fireteam movement formation. It provides 360 security for movement when contact is likely. Typically, the AR is placed on the strong side (side where contact is expected). The wedge is the default formation for the fireteam. The interval between soldiers is normally ~10 meters. The wedge expands and contracts depending on the terrain and visibility.
Fireteam File
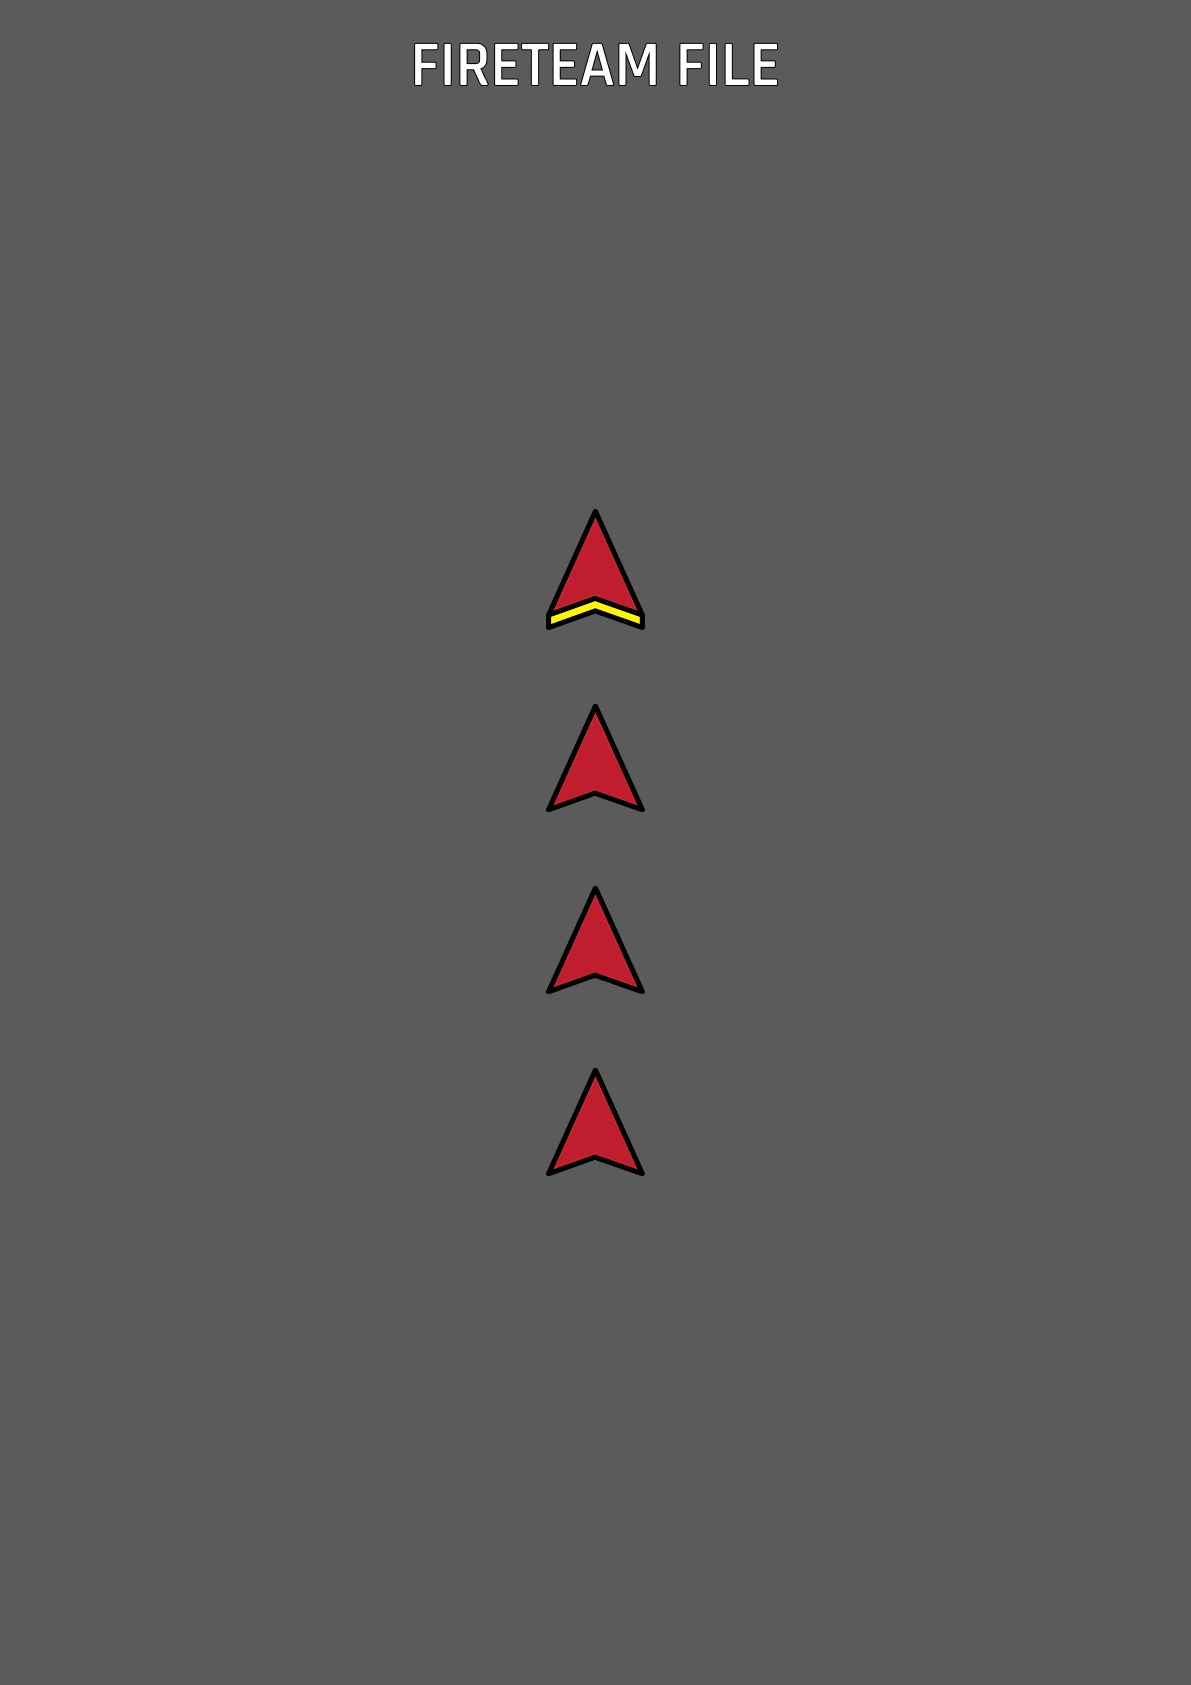
12-2. This formation is typically used as a fast travel formation in difficult terrain. This formation provides little in the way of defense to the front and rear but allows for greater control for the fireteam leader as the fireteam members directly follow the team leader’s movements. Typically used where visibility and maneuverability are limited.
Squad Column, Fireteam Wedge
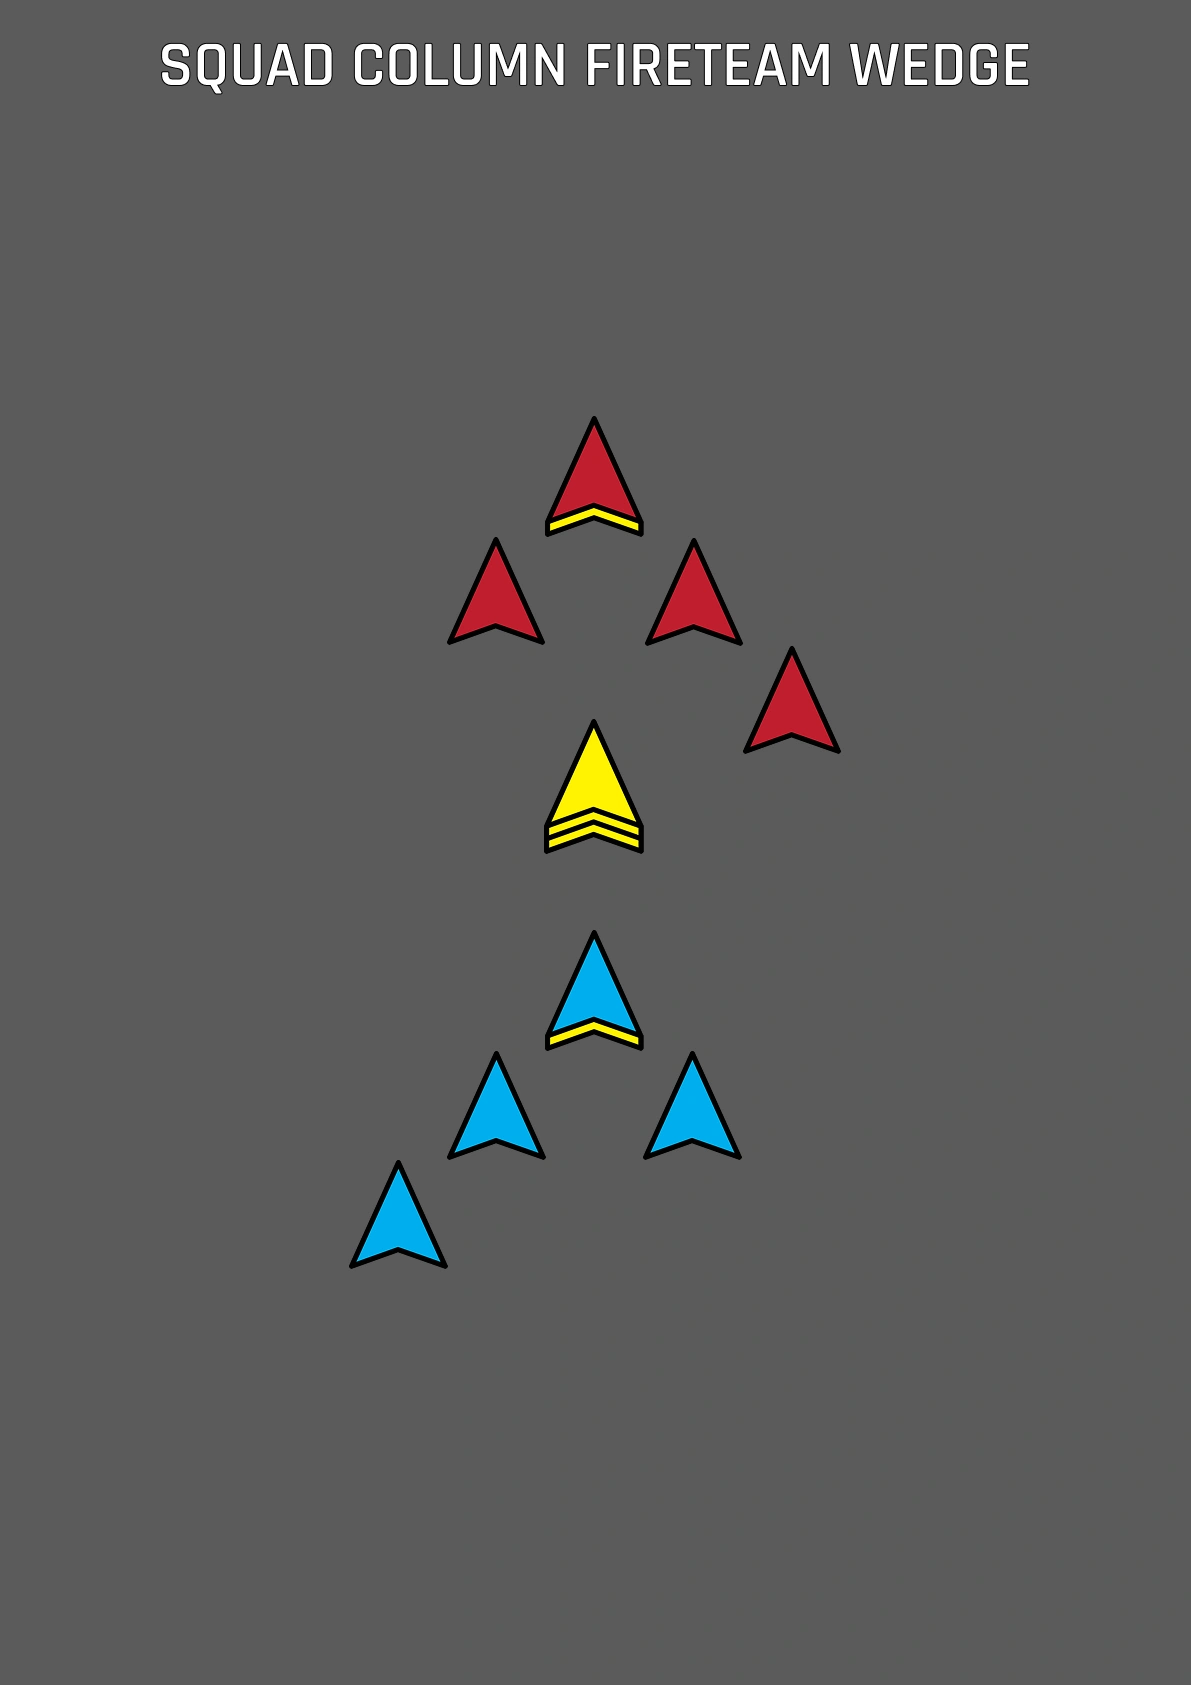
12-3. Consists of one fireteam at the front in a wedge, followed by the SL with the second fireteam trailing in a wedge. Typically the default squad formation whenever possible. Good for movement and reaction to contact from 360.
Squad Line
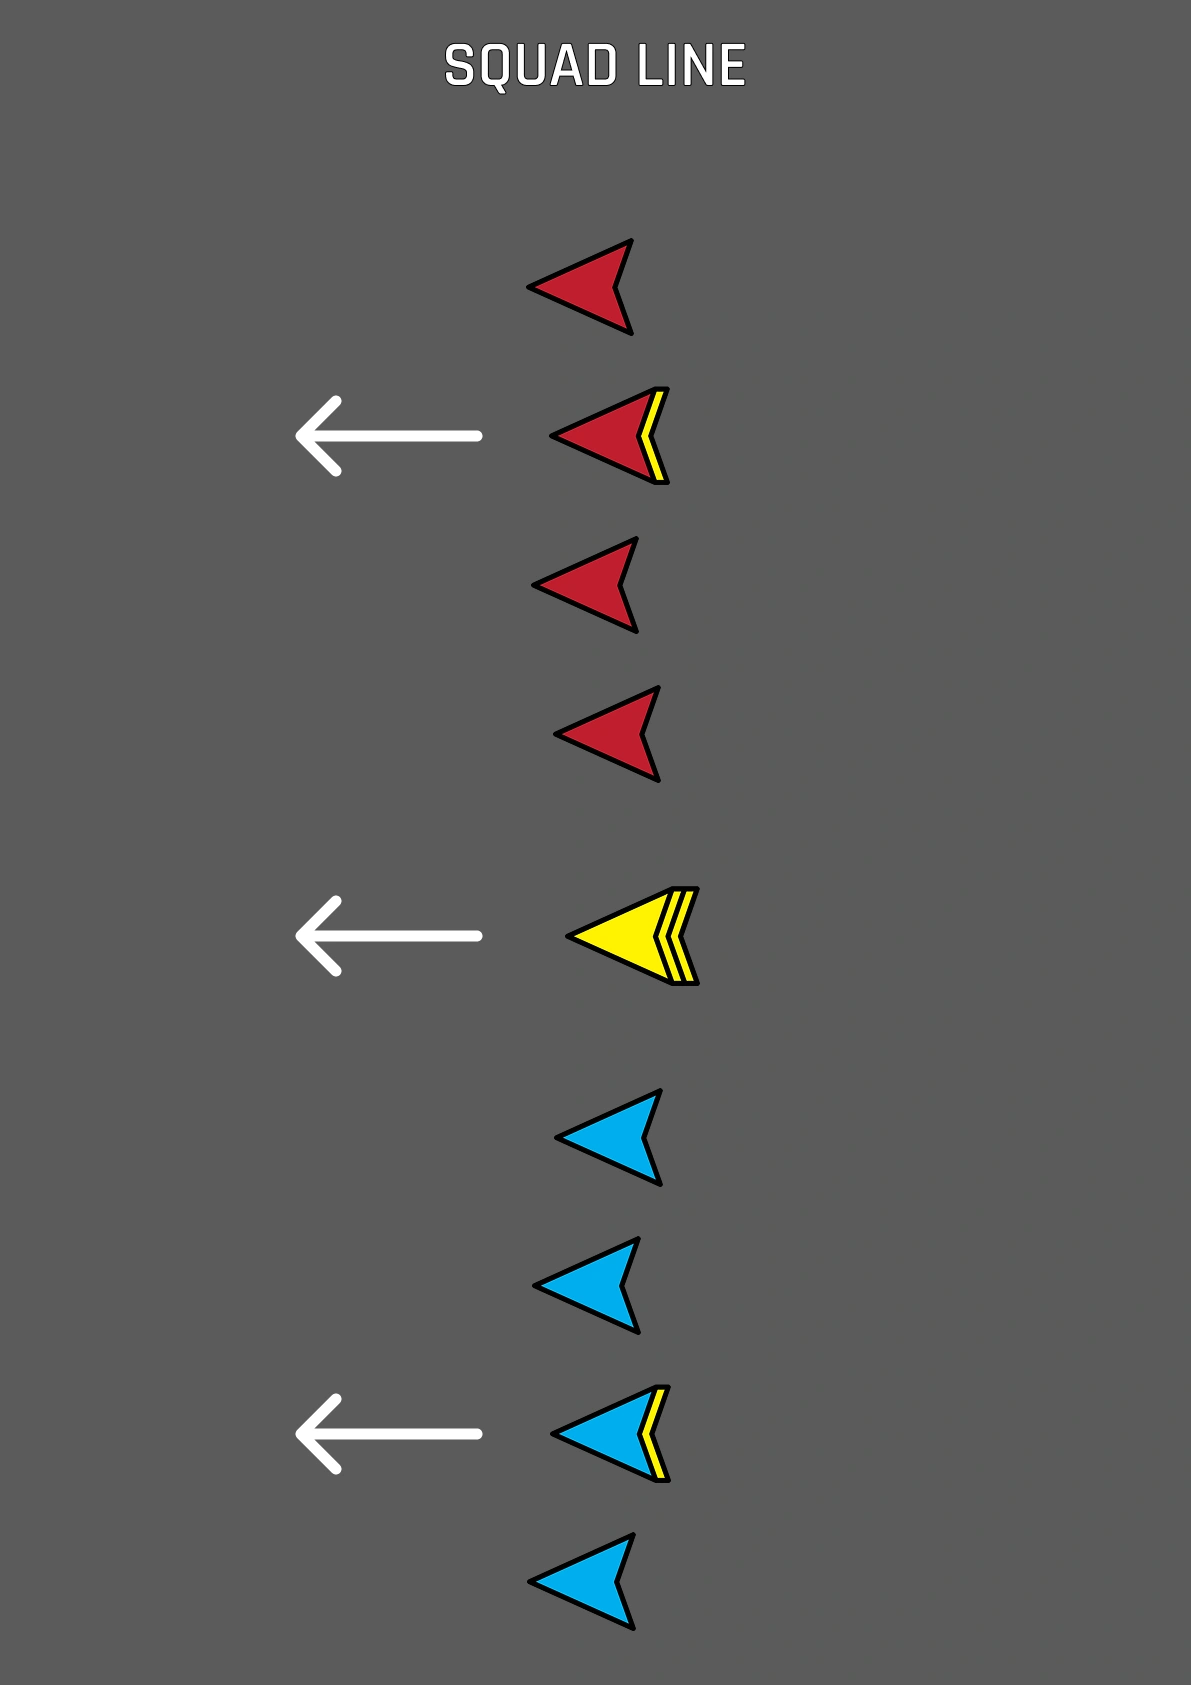
12-4. The squad line consists of two fireteams side by side with the SL in a slight trail in the middle of the formation. Typically used when anticipating contact to the front or when actively engaged, as it provides the most firepower to the front.
Short/Security Halt
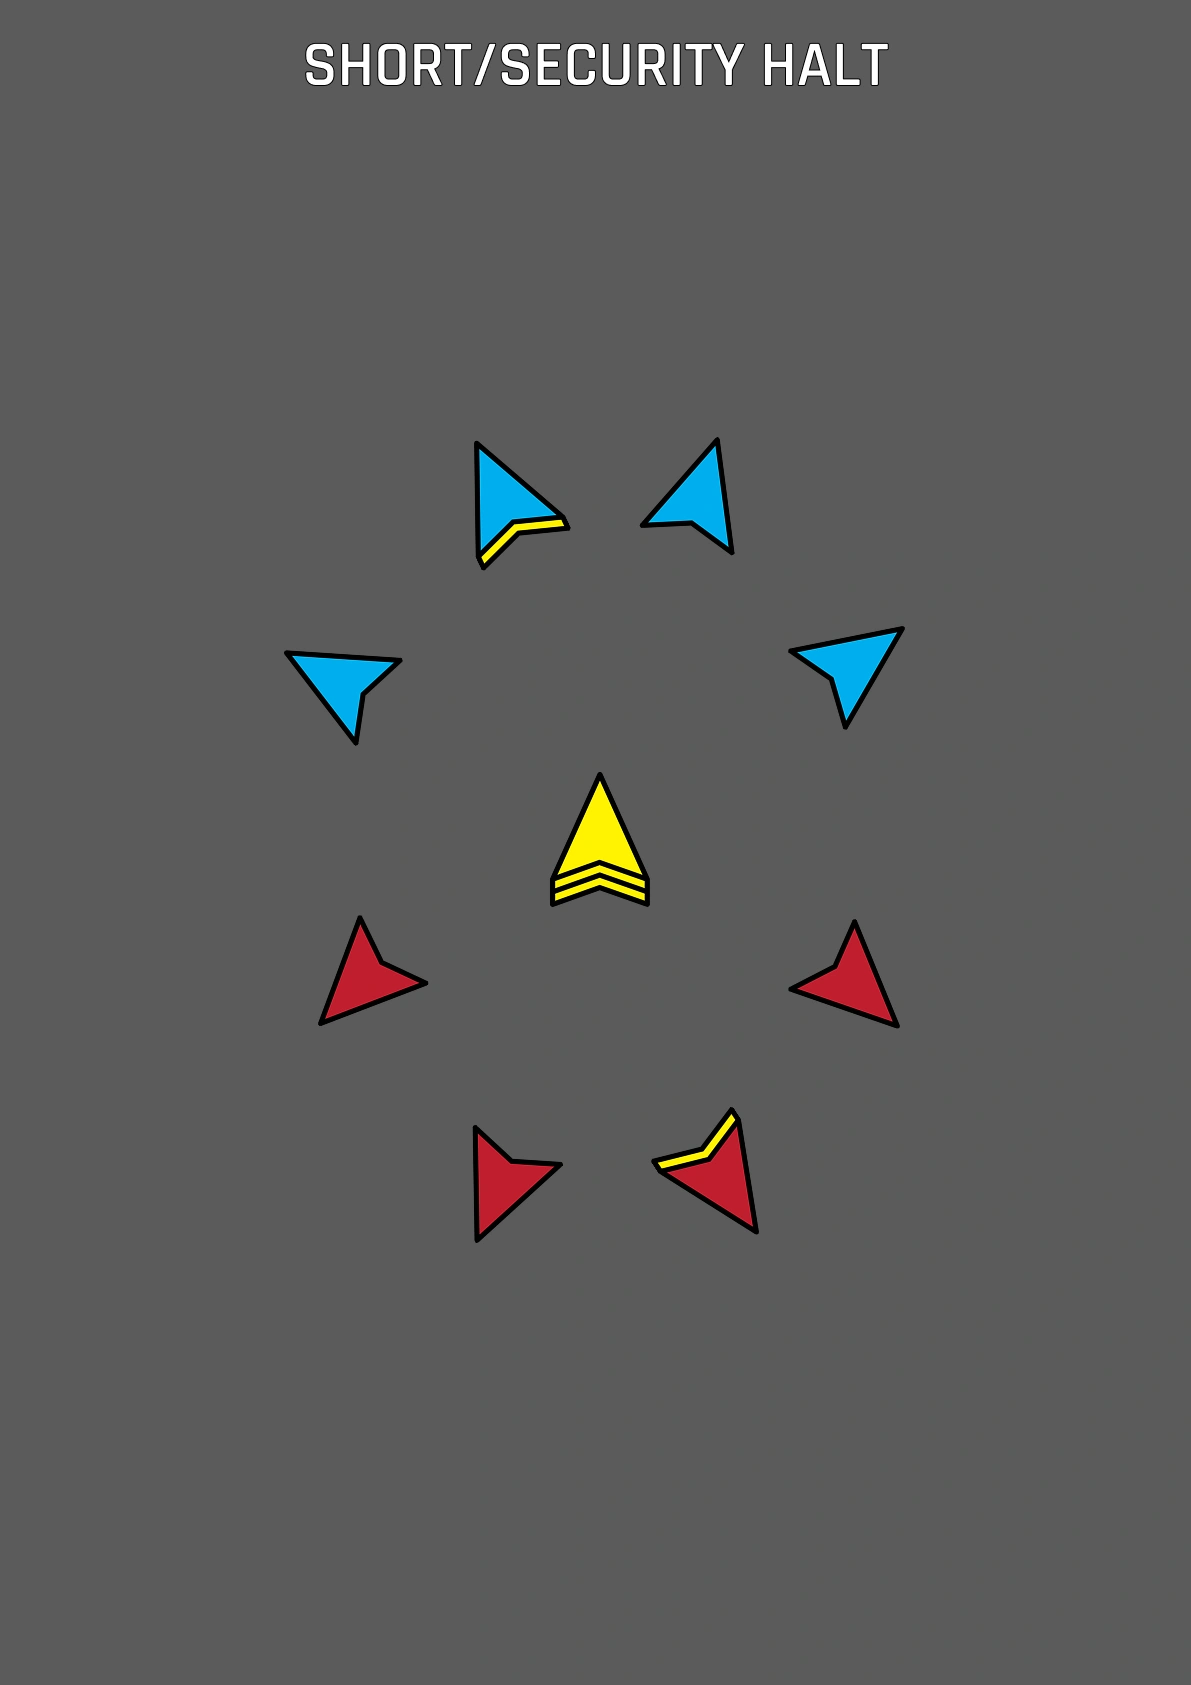
12-5. The short/security halt formation is utilized during brief pauses in movement (2-5 minutes). This is utilized when elements need to adjust spacing, pass a quick brief, reorganize, or reconstitute.
Alternate and Successive Bounding
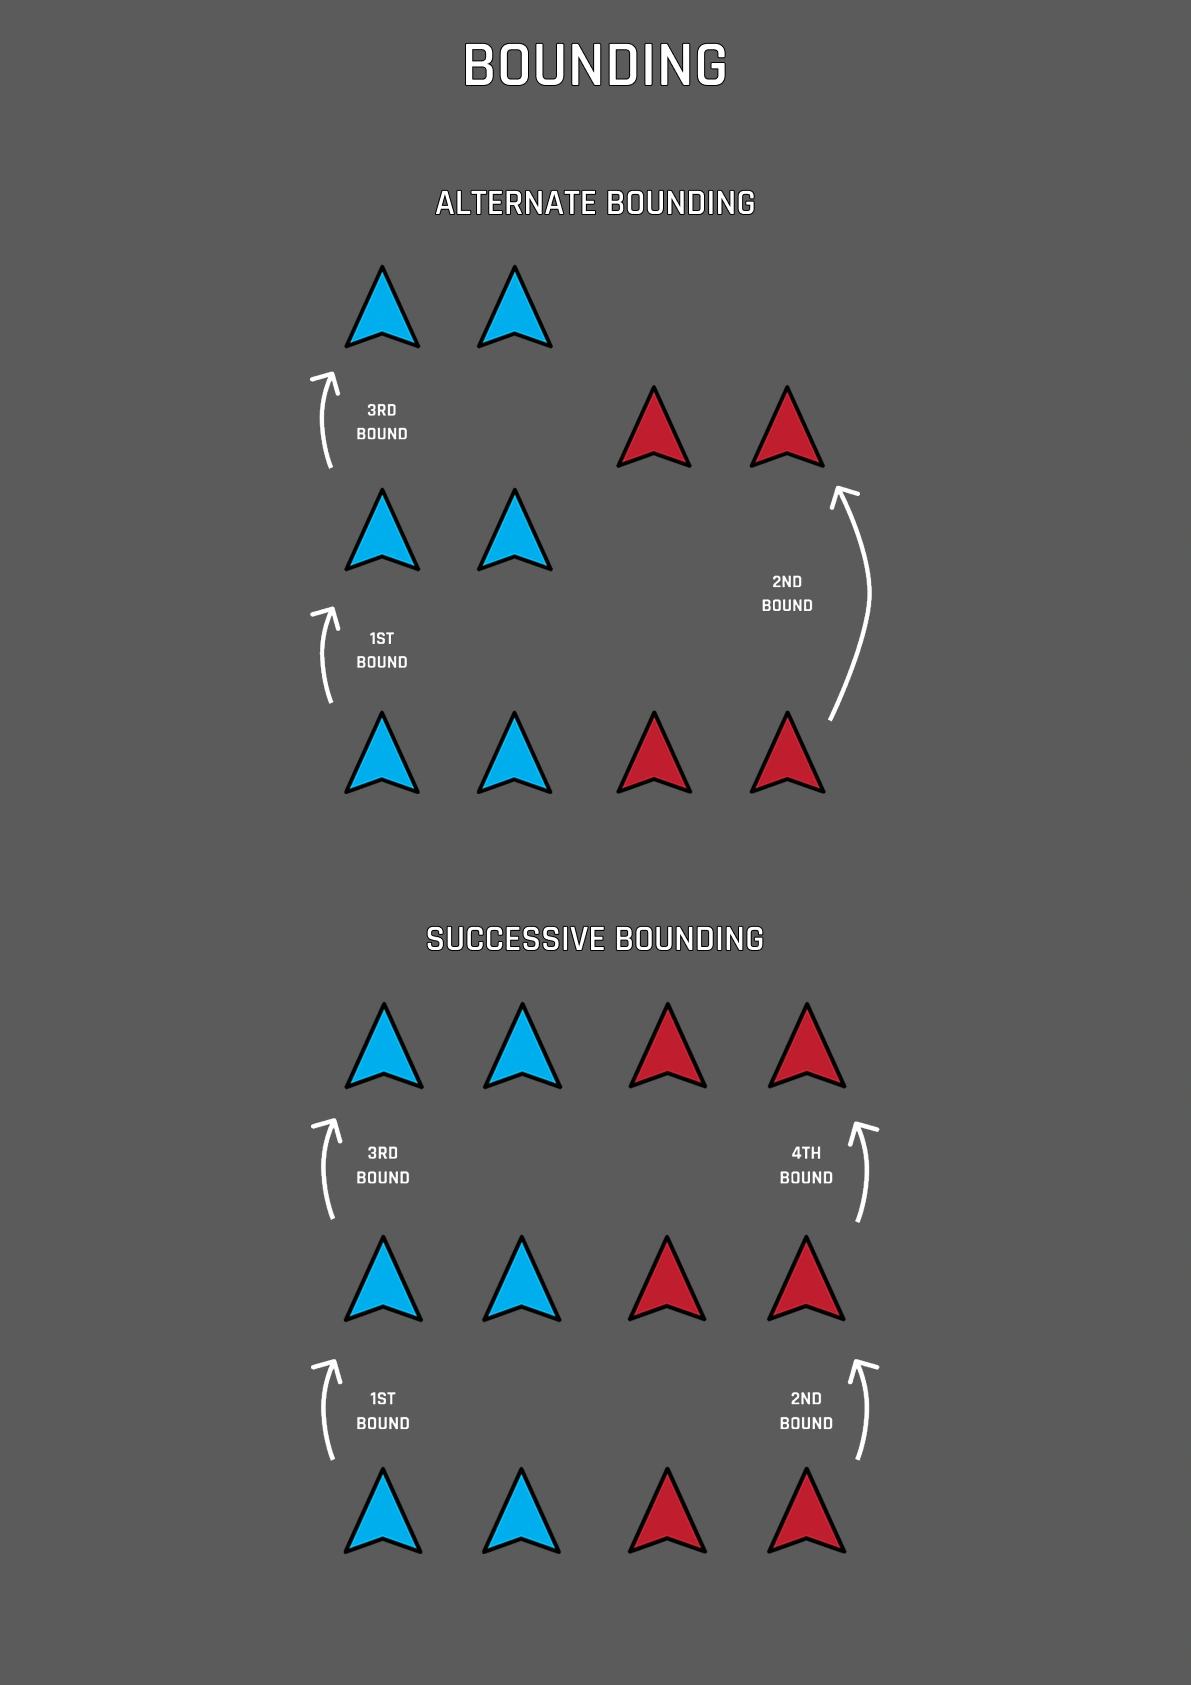
12-6. In bounding overwatch, the group of soldiers is divided into two teams: the bounding team and the overwatch team. The bounding team moves while the overwatch team provides covering fire to protect them. Once the bounding team has moved a certain distance, it stops and assumes a defensive position to provide covering fire for the overwatch team, which then bounds.
Chapter 13: Fire Commands and Controls
“Movement without fire is suicide, and fire without movement is a wasted opportunity.”
Weapon Control Orders
13-1. “Weapons Hold”: Weapon systems may only be fired at targets that have engaged friendly forces or have been explicitly designated by a leader. This setting represents maximum restraint and is used when maintaining a low signature is critical or when preventing fratricide is the highest priority.
13-2. “Weapons Tight”: Weapon systems may only be fired at targets positively identified as hostile. This represents a moderate level of restraint and is typically employed when friendly or civilian elements are present within the AO to minimize collateral damage or friendly fire incidents.
13-3. “Weapons Free”: Weapon systems may be fired at any targets not positively identified as friendly. This represents the least restrictive status, authorizing engagements at will to maintain tempo and initiative in high-intensity combat environments.
Fire Commands
13-4. “Initiate”: Weapon systems engage predesignated targets, and the element opens fire on targets in accordance with the current Weapon Control Order/ROE.
13-5. “Sustain X”: Alternate firing of belt-fed weapon systems by counting the determined number of seconds before firing a 6-9 round burst. Typically utilized to maintain suppressive fire while sustaining ammunition counts and manageable barrel heat.
“Sustain 4” Example:
“Sustain 4 on Gun 1!”
GUN 1 Fires 6-9 Round Burst
One-thousand
Two-thousand
Three-thousand
Four-thousand
GUN 2 Fires 6-9 Round Burst
One-thousand
Two-thousand
Three-thousand
Four-thousand
GUN 3 Fires 6-9 Round Burst
One-thousand
Two-thousand
Three-thousand
Four-thousand
Repeats until given another fire command
13-6. “Rapid X”: Alternate firing of belt-fed weapon systems by counting the determined number of seconds before firing a 10-13 round burst. Typically used to increase the intensity of suppression at the expense of ammunition and barrel heat.
“Rapid 2” Example:
“Rapid 2 on Gun 3!”
GUN 3 Fires 10-13 Round Burst
One-thousand
Two-thousand
GUN 2 Fires 10-13 Round Burst
One-thousand
Two-thousand
GUN 1 Fires 10-13 Round Burst
One-thousand
Two-thousand
Repeats until given another fire command
13-7. “Prepare to Shift/Lift”: Support-by-Fire belt-fed weapons switch to a cyclical fire rate before physically shifting guns to the next set of Target Reference Points (TRPs) or lifting fire.
13-8. “Shift Fire”: Physically shift guns in the direction designated by leadership, at predesignated TRPs, or away from the assault force.
13-9. “Lift/Check/Cease Fire”: Command to stop firing.
13-10. “Watch and Shoot”: Weapon systems do not fire unless directly engaging an identified enemy within the assigned sector.
13-11. The 15° Rule: For safety considerations, fires should cease or shift when friendly elements are within 15° of the arc of fire. This arc can be checked in-game by pressing [F3].
Chapter 14: Battle Drills
“Doctrine is the last refuge of the unimaginative.”
- General Jim N. Mattis
React to Contact
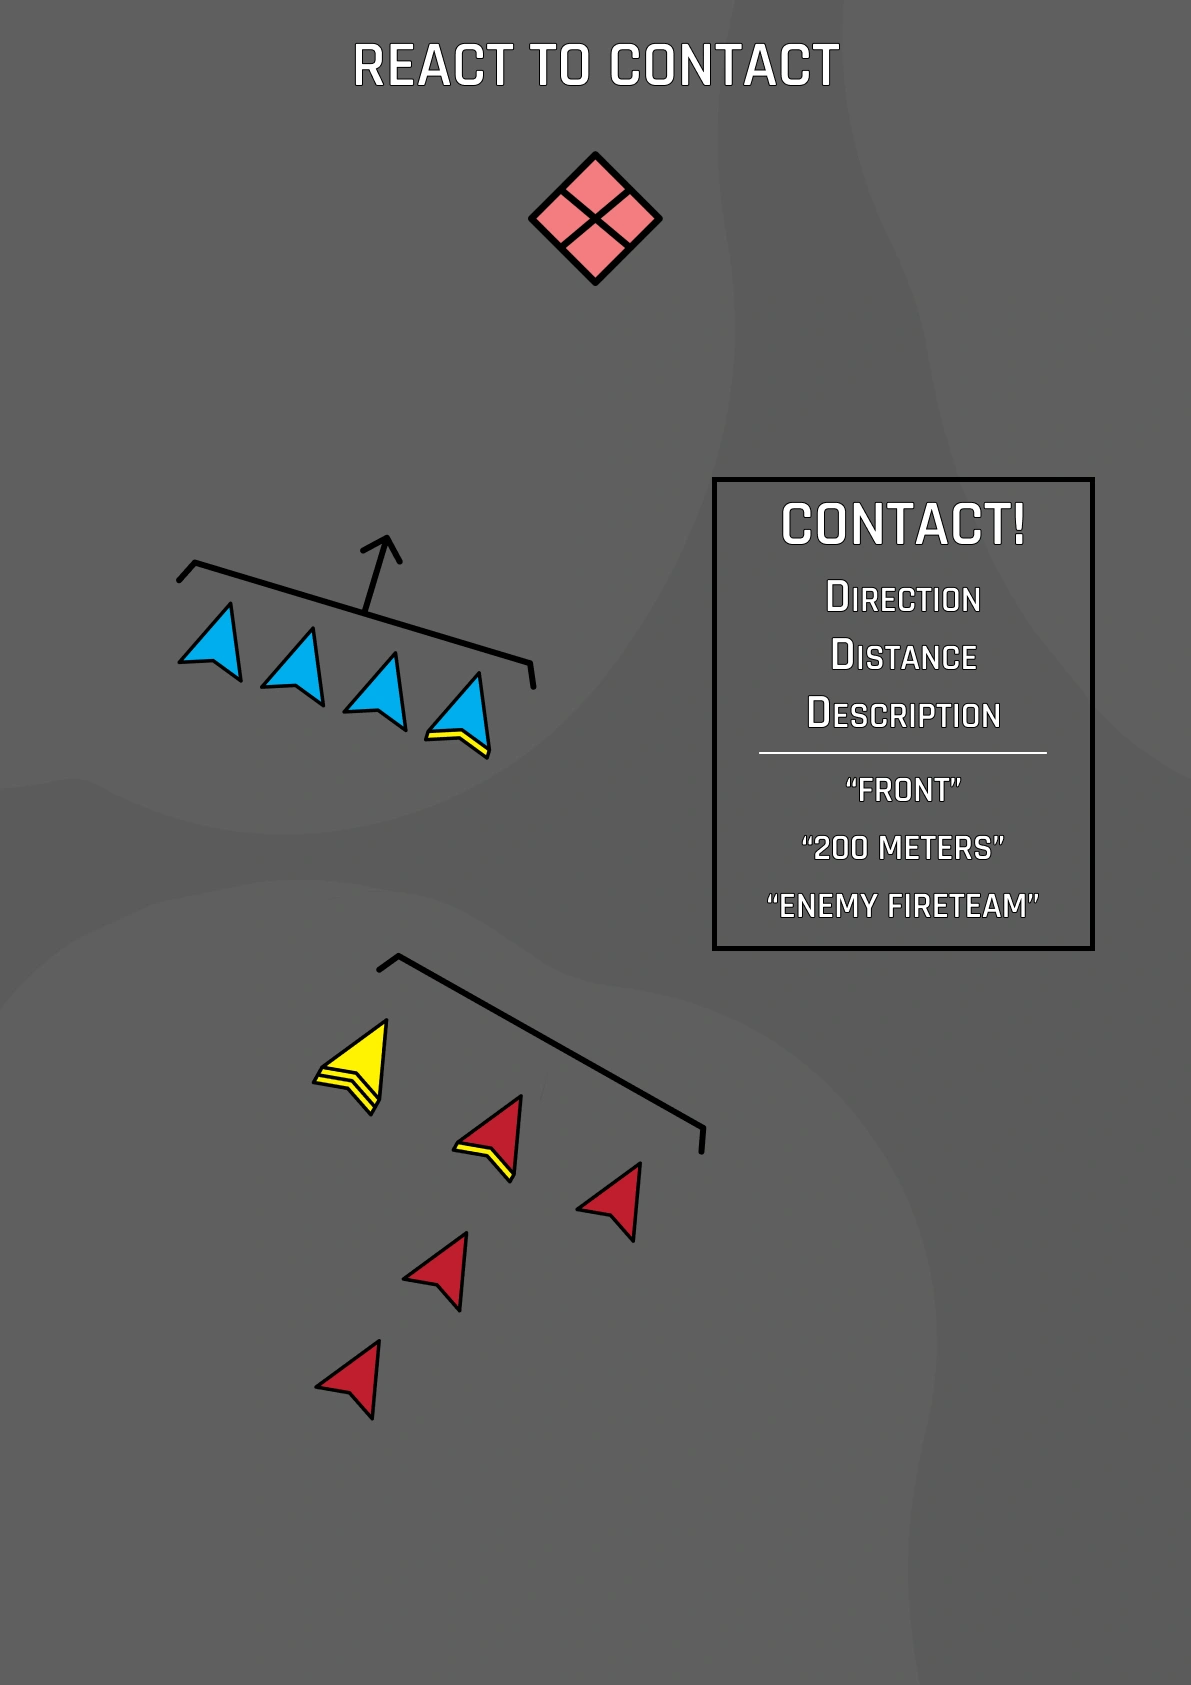
14-1. React to Contact is the immediate sequence of suppressive fire, seeking cover, reporting, and maneuvering executed upon enemy contact to regain fire superiority and defeat or evade the threat. It should generally be executed instinctively without any formally given command.
Element in contact returns fire on known, likely, and suspected enemy positions; vehicles and soldiers move out of the beaten zone if possible.
Soldiers assume the nearest covered and concealed position.
Element leaders pass information to higher and to soldiers, relaying the Direction, Distance, and Description of the enemy.
Soldiers maintain contact with leadership, other soldiers, and vehicles on their left or right.
Leadership checks the status of personnel.
Squad or Platoon Lead links up with element(s) in contact and brings necessary personnel and weapons to bear.
Squad or Platoon Lead determines if the unit needs to move out of the engagement area and if the unit can maintain suppressive fire with the element in contact.
Leadership assesses the situation and identifies enemy position and obstacles, size of enemy force, vulnerable flanks, and covered and concealed flanking routes in preparation for the next course of action (typically Break Contact or Squad/Platoon Attack).
Squad Attack
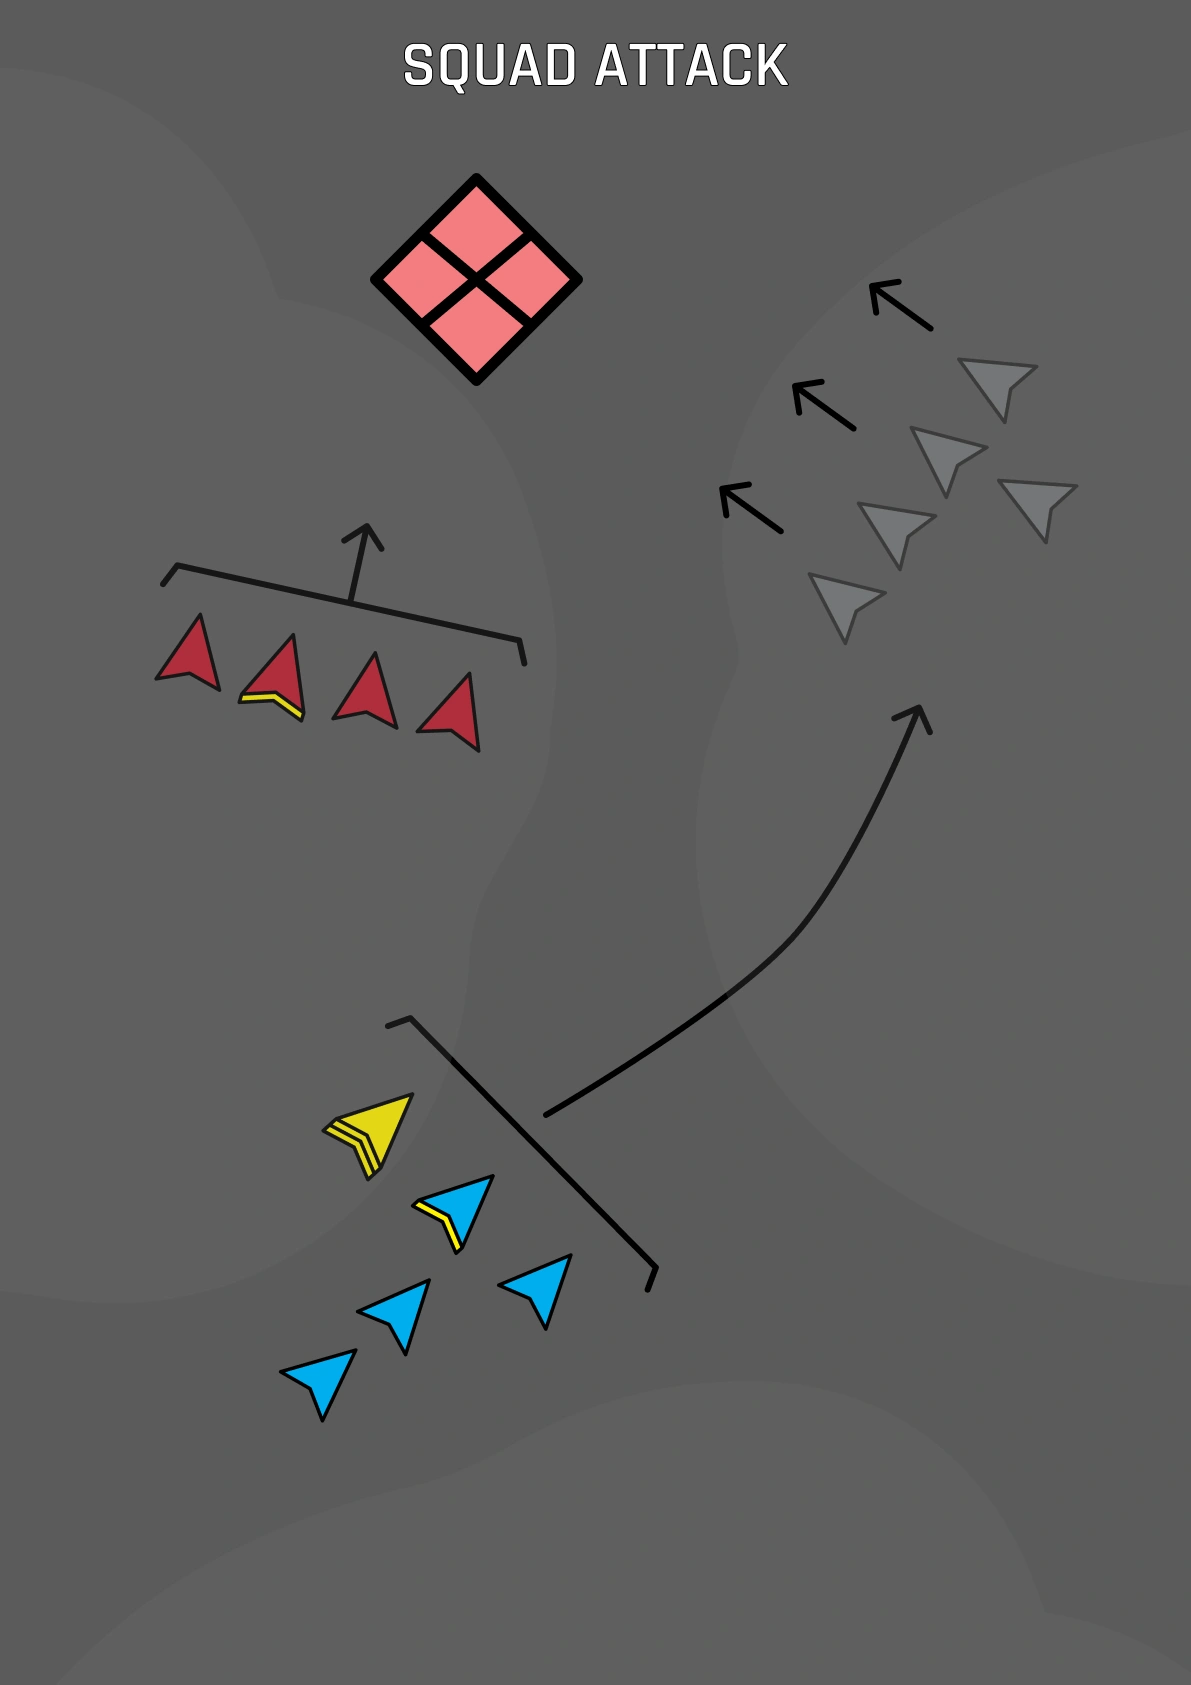
14-2. A Squad Attack is a coordinated concentration of fires and maneuver by a squad to decisively destroy an enemy element or seize key terrain. A Squad Attack should only be considered once fire superiority is achieved and there is high confidence that the enemy force engaged can be destroyed or routed successfully.
Soldiers in contact react to contact.
Fireteam in contact moves to positions with observation, fields of fire, and cover/concealment to engage known, likely, and suspected enemy positions.
The rear fireteam not in contact secures the flanks of the squad.
The fireteam in contact establishes a hasty Support-By-Fire (SBF) position and suppresses known, likely, and suspected enemy positions while the Squad Leader assesses the situation and reports enemy size and location on the platoon net.
If the SBF Fireteam can gain fire superiority, the Squad Leader can then decide to initiate a Squad Attack.
To initiate a Squad Attack, the Squad Leader maneuvers the fireteam not in contact (now the Assault Fireteam) to an assault position, typically utilizing a left or right flank (a frontal assault can also be utilized).
The Assault Fireteam maintains effective fires of their own throughout the assault while the Support-By-Fire (SBF) Fireteam maintains suppression.
The SBF Fireteam maintains visual contact with the Assault Fireteam, shifting or lifting fires once within 15 degrees of the Assault Fireteam or when a “shift” or “lift” call is made.
The Assault Fireteam fights through enemy position(s) using fire and movement to the Limit of Advance (LOA).
- Limit of Advance: The designated limit beyond which an assaulting element will not advance. The LOA can be defined as a set distance beyond the last known enemy, or a recognizable terrain feature.
Once the LOA call is made, the Squad Leader determines whether the SBF Fireteam also assaults through, whether the Assault Fireteam should withdraw, or whether the element should regroup at another location to reconsolidate.
Post-assault, the squad sets security, consolidates, reorganizes, and reconstitutes. They also treat and evaluate wounded, address enemy prisoners-of-war (EPWs), and report the situation to the platoon.
Break Contact
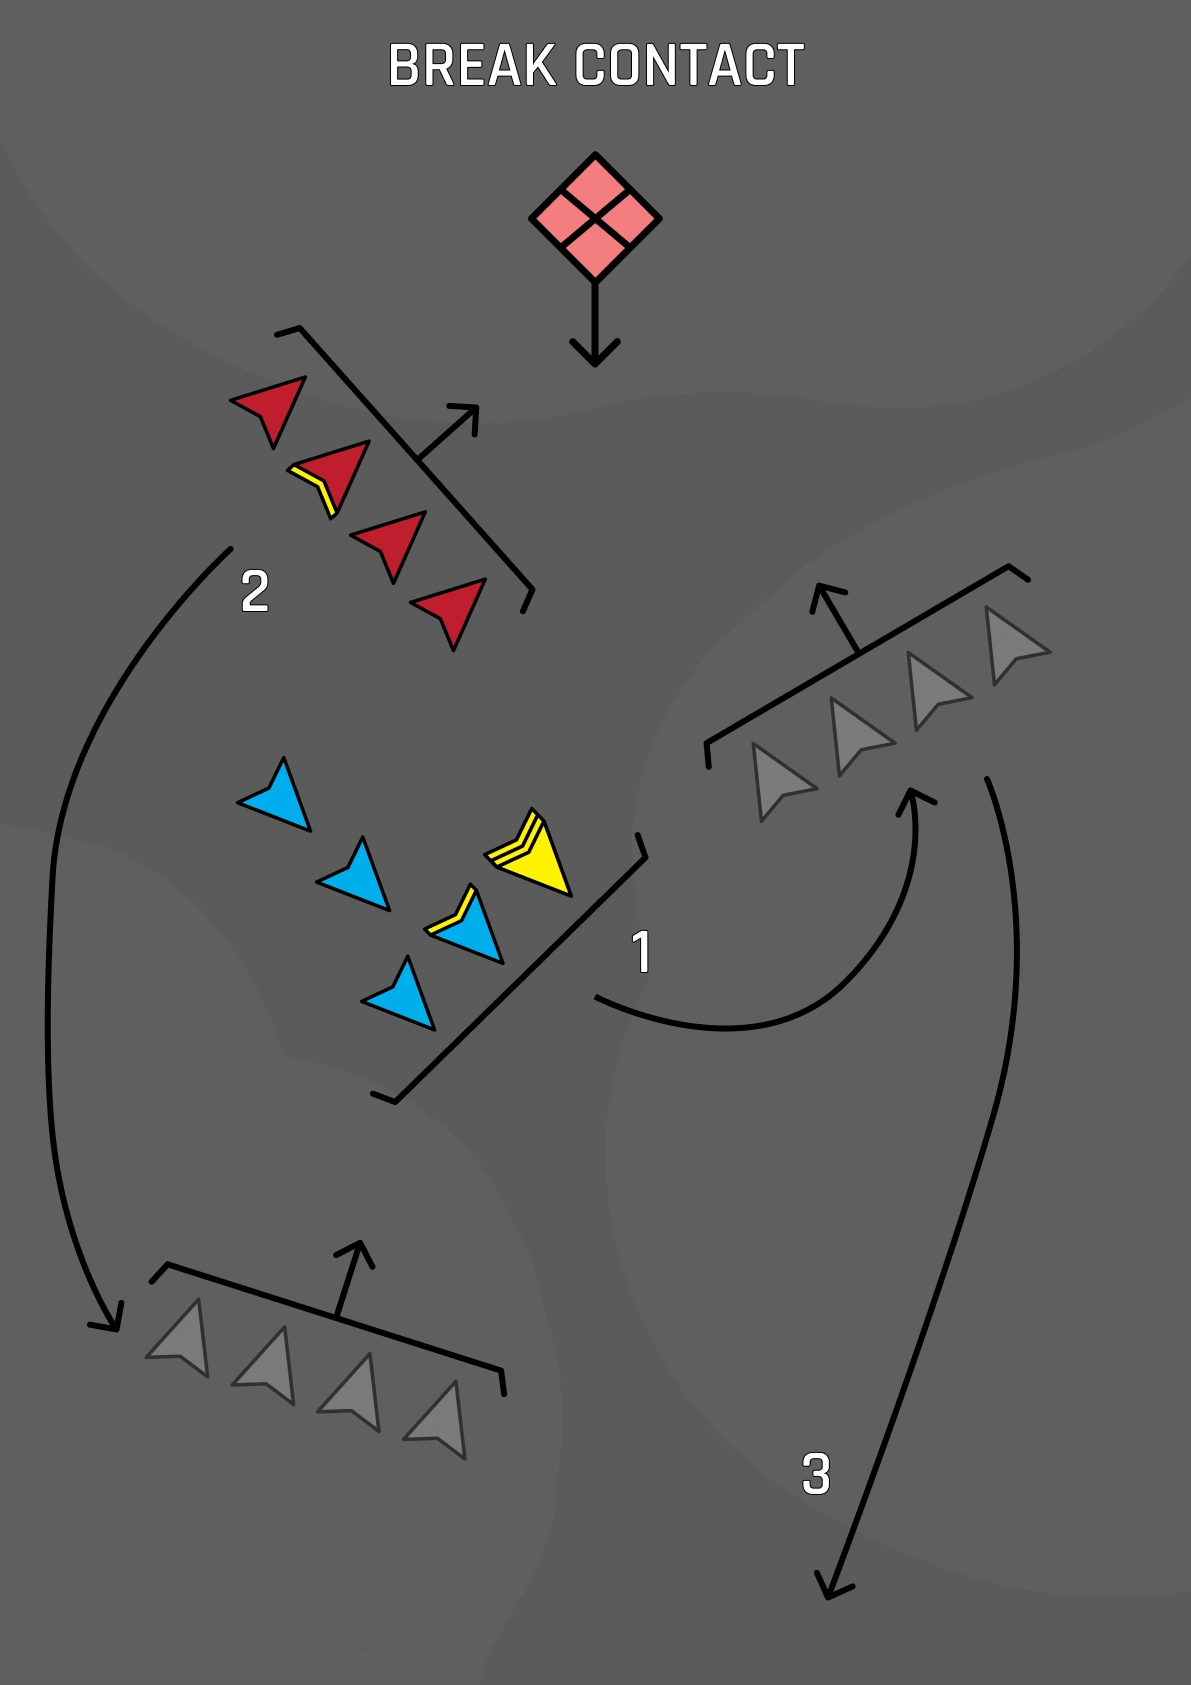
14-3. Break Contact is an organized withdrawal under fire, using suppressive fires and covered movement to disengage from the enemy while preserving combat power. This is typically used when the element in contact is unable to gain fire superiority or is overmatched by the opposing force. Experienced leadership understands when to Break Contact in order to preserve their force and reconstitute their element.
At the Squad Leader’s discretion, a fireteam is designated to suppress the enemy.
The remaining fireteam bounds away from contact at the direction of the Squad Leader.
That bounding fireteam completes their movement, establishes a Support-By-Fire position, engages likely, known, and suspected enemy positions, calls “set”, employs screening measures, and prepares to cover the original fireteam.
The original fireteam communicates their intent to maneuver (“moving”), bounds away to occupy a new overwatch position, and engages enemy positions.
Fireteam bounds continue away from the enemy until contact is broken.
Disrupted elements and soldiers move to the last designated rally point.
React to Near Ambush
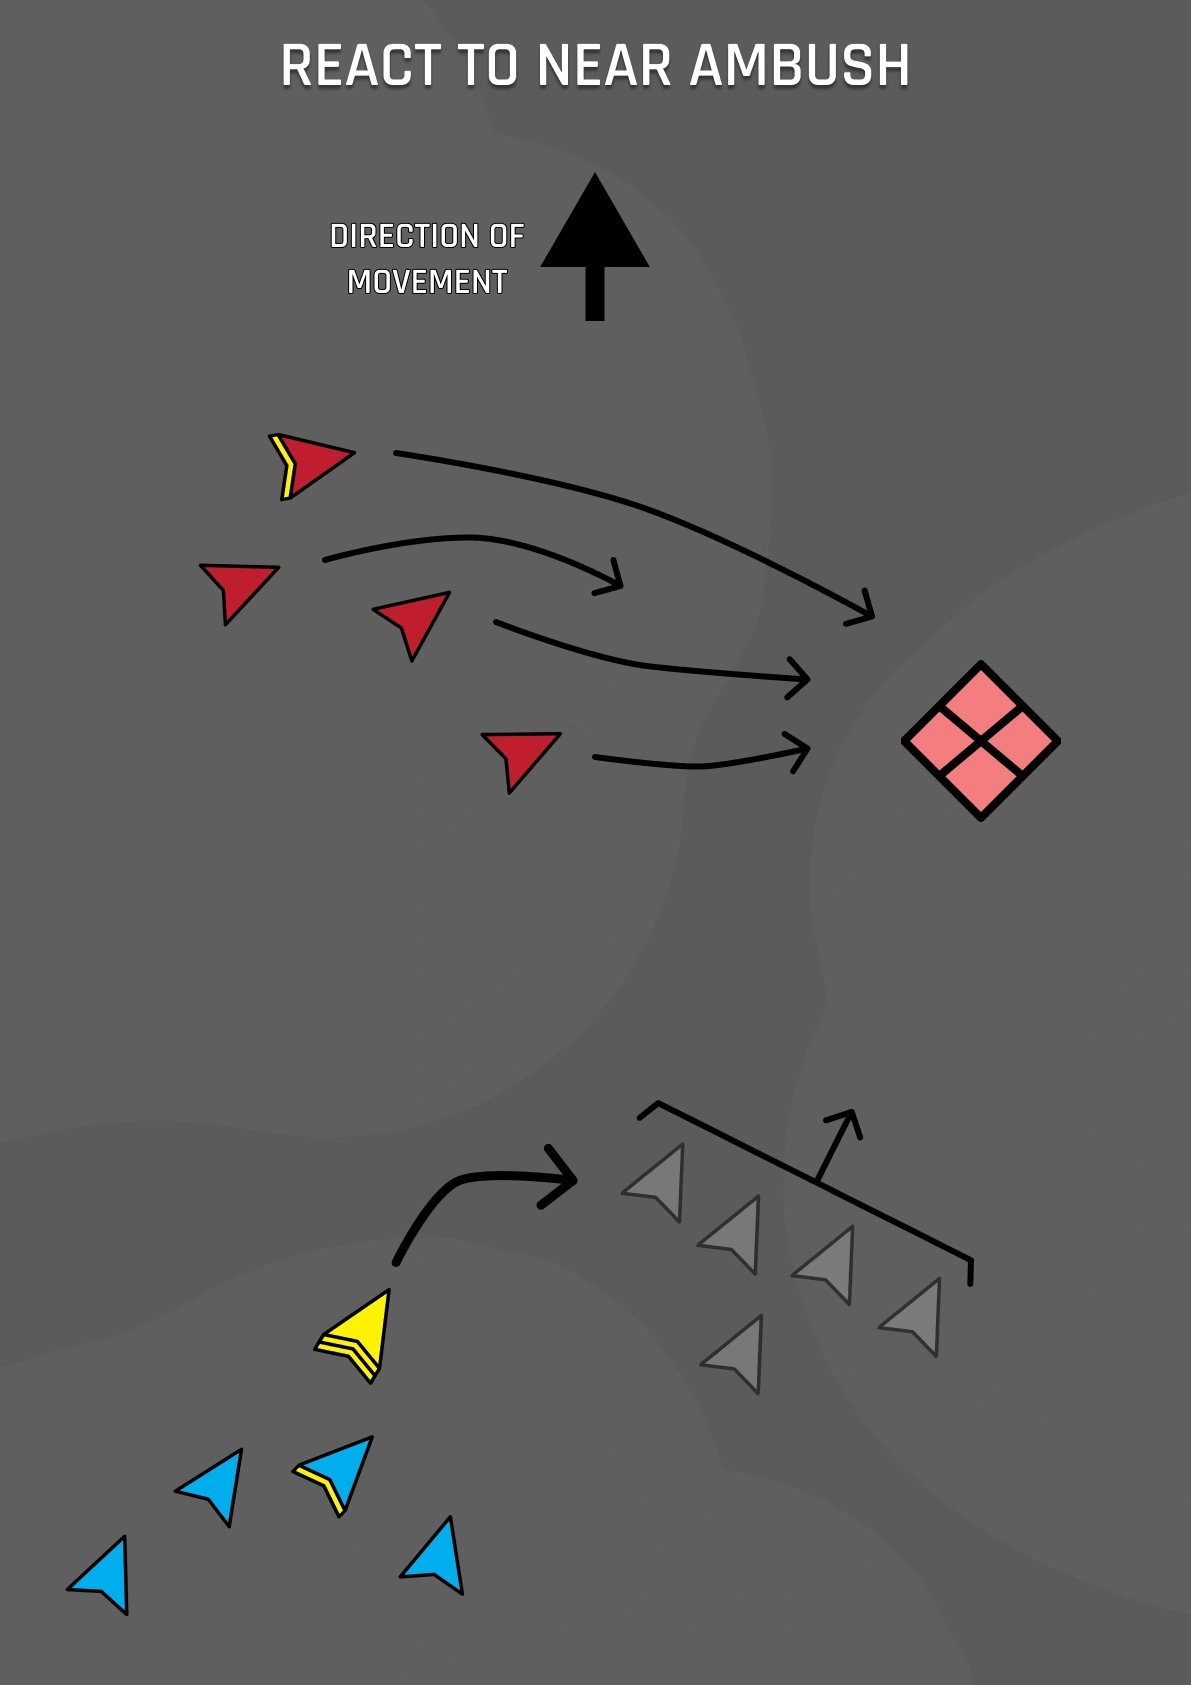
14-4. React to Near Ambush is the immediate response to an imminent or active ambush. Much like React to Contact, React to Near Ambush should happen instinctively without any given order, as the lethality of close-range engagements demands immediate action.
Soldiers in the kill zone return fire immediately, throw frag grenades, and prepare to assault through the ambush using overwhelming fire.
Any support elements in range shift/lift fire as the element in contact assaults and destroys the near ambush positions.
Knock Out a Bunker
14-5. Knock Out a Bunker is a focused assault combining suppression, indirect or explosive fires, and a breaching assault to neutralize a fortified emplacement and secure the position.
The designated Assault Element moves along the covered and concealed route to an assault position and avoids masking the fires of the Support-By-Fire element.
Soldiers constantly watch for other bunkers or enemy positions in support of bunkers.
On the Assault Element’s final approach, Supporting Elements shift or lift fire (both direct fire and indirect fire).
On reaching the Last Covered and Concealed (LCC) position, the Assault Element executes the knockout bunker drill:
Assault Buddy Team #1 members remain where they can cover Assault Buddy Team #2.
Squad Leader shifts/lifts supporting fires from the SBF as required.
Buddy Team #2 moves to a blind spot near the bunker.
One soldier takes up a covered position near the exit.
Another soldier prepares a fragmentation grenade and throws it through an aperture of the bunker.
After the grenade detonates, the soldier covering the exit enters first, and then the team clears the bunker by fire.
Buddy Team #1 moves to join Buddy Team #2.
The Assault Fireteam Leader:
Inspects the bunker.
Marks the bunker as needed.
Signals to other elements that the bunker is clear.
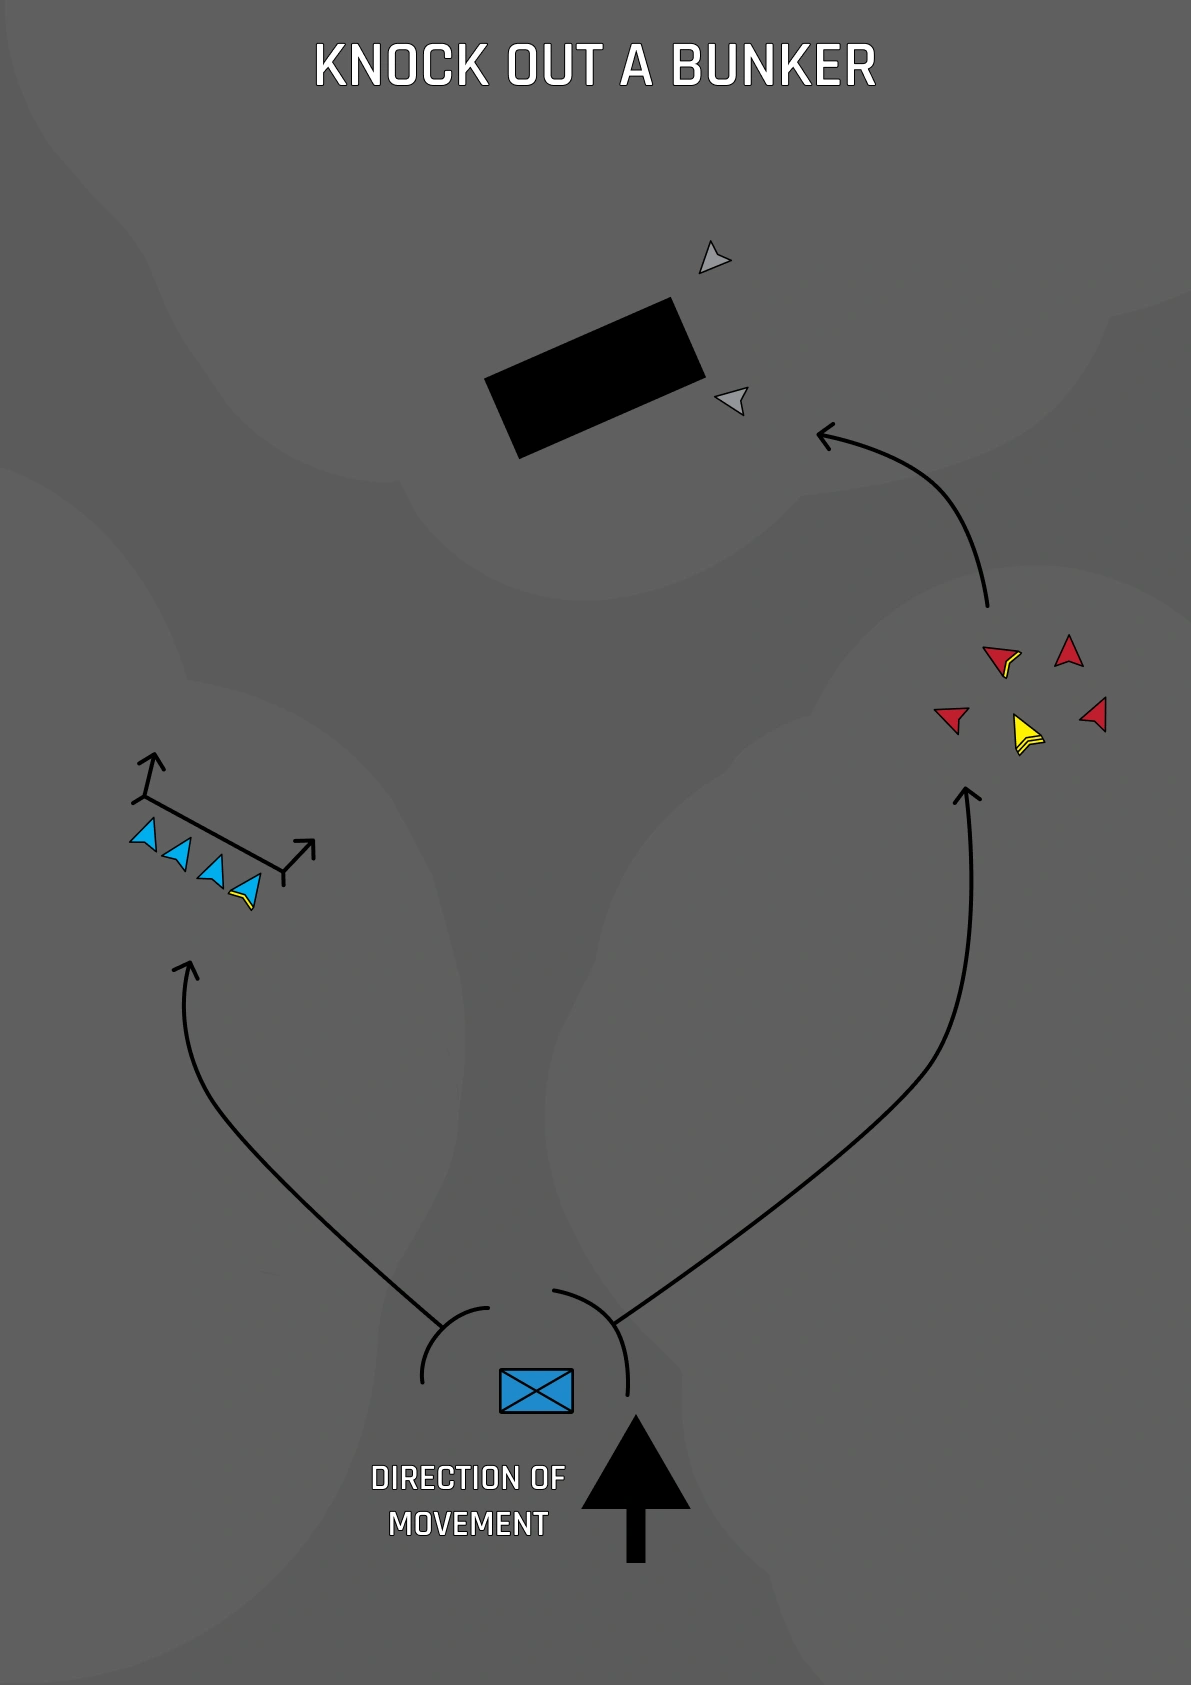
Enter and Clear a Room
14-6. Enter and Clear a Room is a close-quarters battle procedure designed to safely and efficiently neutralize threats and secure the space. Ideally, this battle drill is executed instinctively when faced with room clearance. Like the React to Near Ambush battle drill, the lethal proximity to enemy forces demands swift action.
The Squad Leader controls Security and Clearing Fireteams:
The designated Security Fireteam secures corridors or hallways outside the room with appropriate firepower.
The Clearing Fireteam Leader takes position to control the clearing team outside the room.
The Squad Leader signals to clear the room.
If applicable, a flash or frag grenade is used to prepare the room for clearance.
Clearing Fireteam enters and clears the room:
The first two soldiers enter the room nearly simultaneously.
The first soldier moves left or right to assume the second further point of domination, or corner, on their side.
The second soldier enters and moves in the opposite direction of the first soldier, to the first point of domination on their side.
The third and fourth soldiers move in opposite directions to assume points of domination closest to the entry.
All soldiers then collapse sectors of fire to the center of the room or next uncleared area.
The Clearing Fireteam Leader announces to the Squad Leader when the room is clear.
The Clearing Fireteam marks the entry point and the room as clear.
The squad continues with clearance, consolidates, or reorganizes as needed.
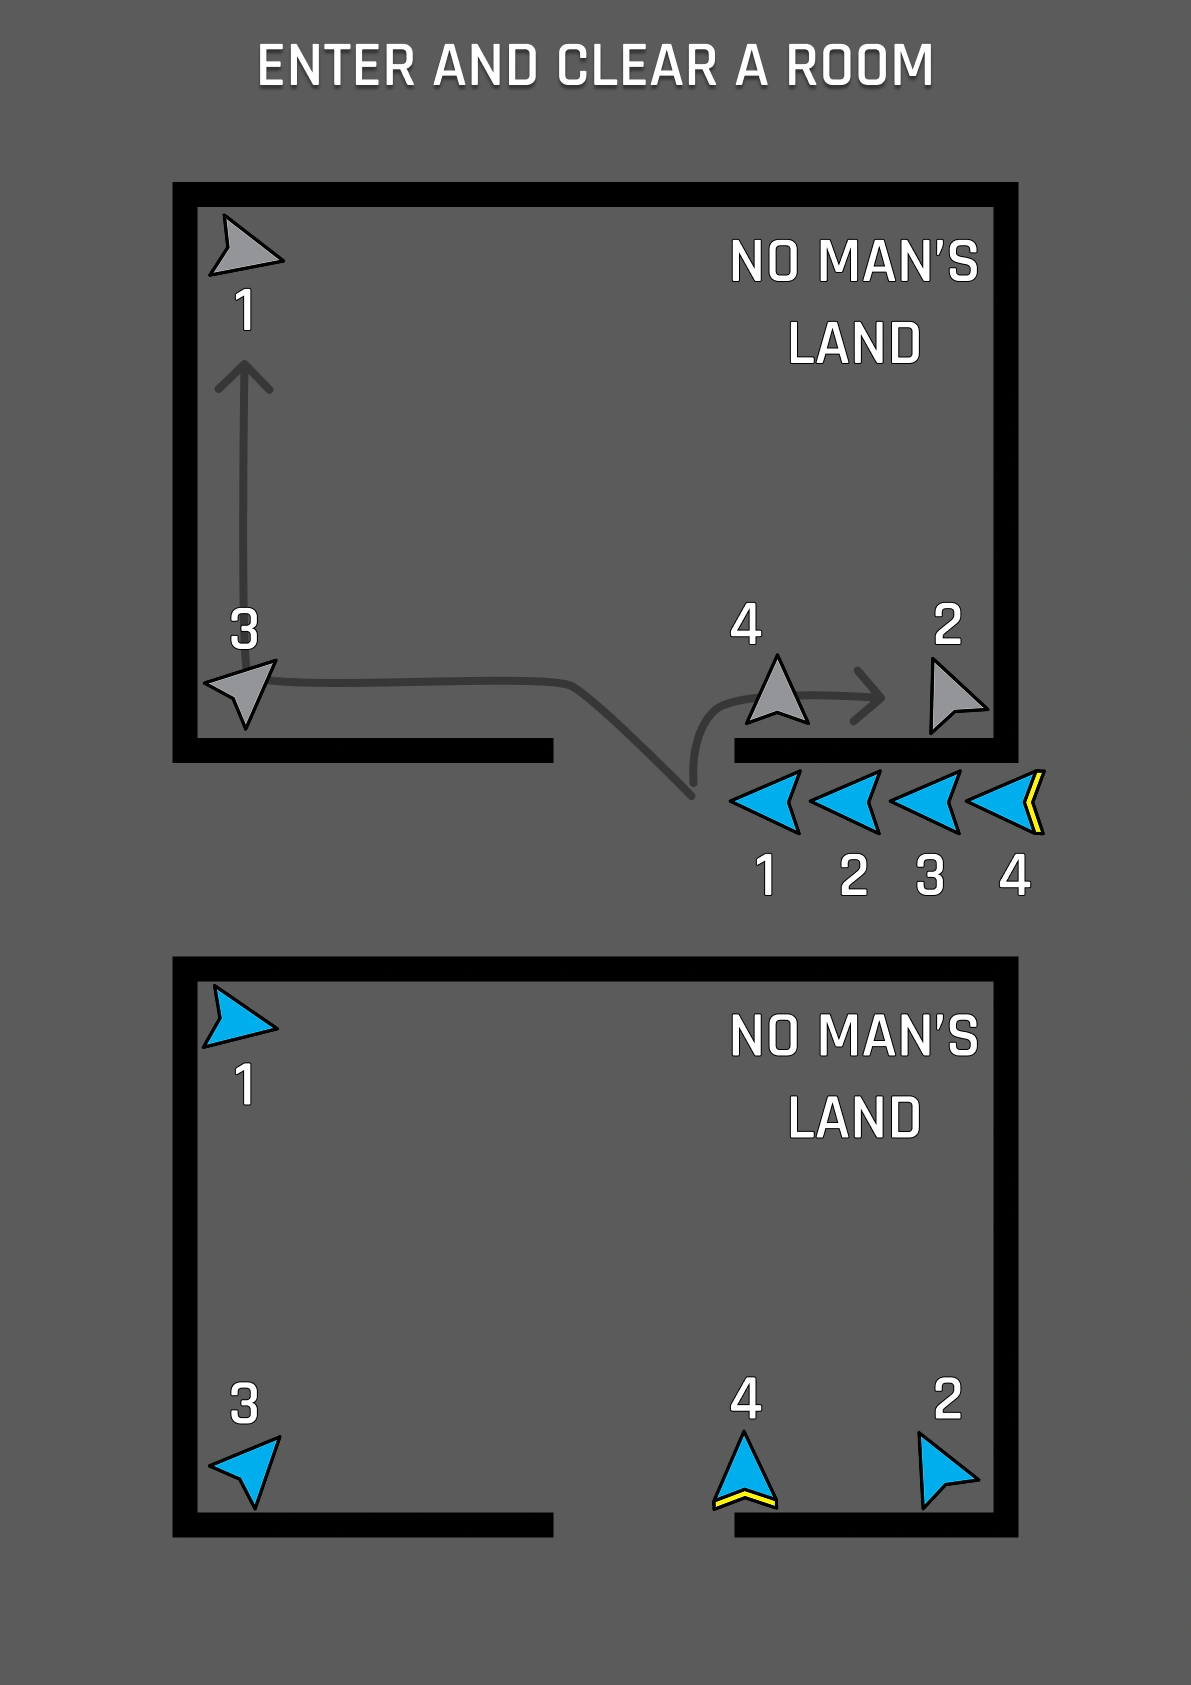
Enter and Clear a Trench
14-7. Enter and Clear a Trench is a close-quarters battle operation to neutralize defenders, secure the trench line, and enable safe movement along its route.
The first two soldiers of the Assault Fireteam position themselves against the edge of the trench. On the Squad Leader’s command, fragmentation grenades are prepared and thrown into the trench.
After ensuring that both grenades detonate, the first two soldiers move into the trench. Immediately, both soldiers move in opposite directions down the trench, clearing to the first corner or intersection by fire.
Soldiers halt and take up positions to block any enemy movement toward the entry point.
After the first two soldiers enter the trench, the remainder of the Assault Fireteam enters the trench, moving to reinforce at the first secured corner or intersection.
The Assault Fireteam clears enough room for the rest of the squad, or clears to the first trench junction.
The Assault Fireteam Leader reports to the squad or platoon that the foothold is secure. The element follows up the successful seizure of the foothold with additional fireteams or squads.
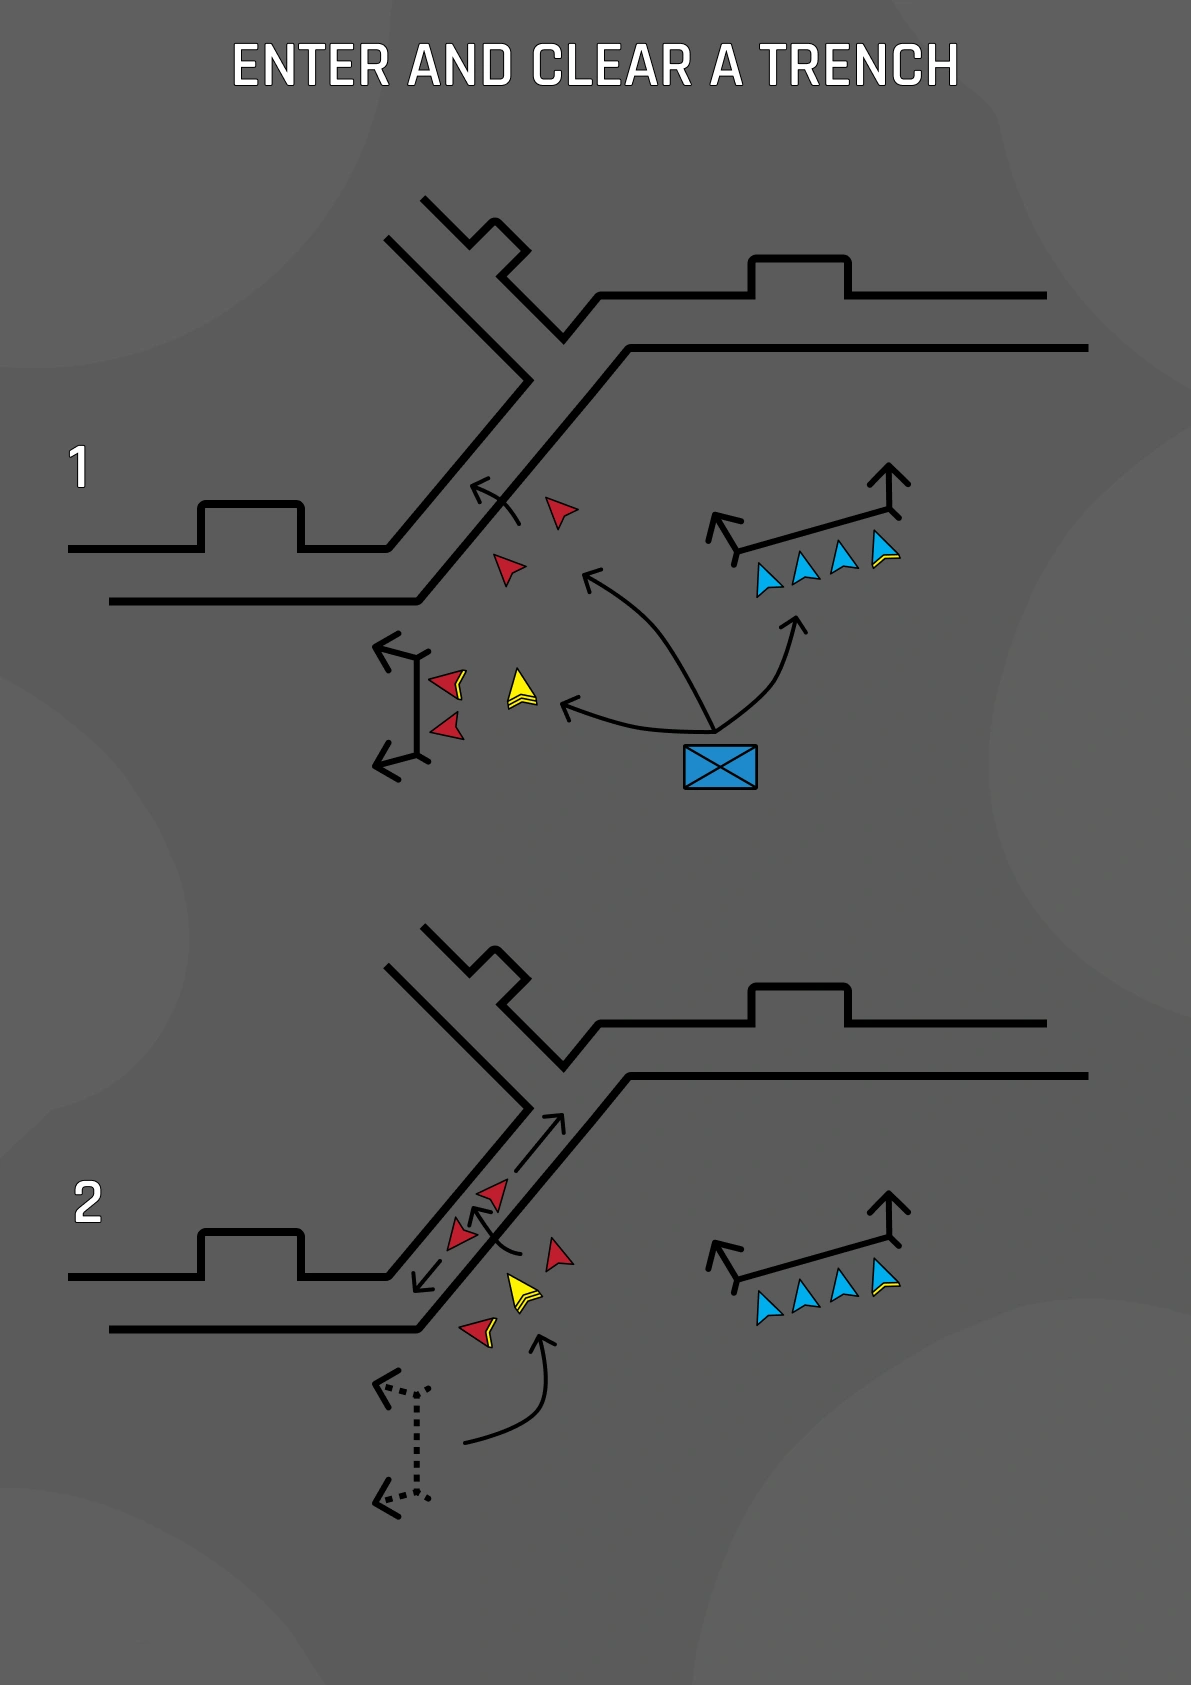
Conducting an Ambush
14-8. An ambush is a deliberate or hasty attack conducted against an unsuspecting enemy moving through a designated kill zone. Ambushes are typically executed in either a linear or L-shaped configuration, with the L-shaped variant generally preferred for its superior coverage and ability to deliver enfilading fire.
The Squad Leader determines the target kill zone and designates the Support-By-Fire Fireteam and the Assault Fireteam. The Squad Leader also designates the initiating action for the ambush.
- Typically, the initiating action should be conducted with the most casualty-producing weapon available, such as a shoulder-fired launcher or medium machine gun. However, this can also be a simple key call or even a rifle shot from the Squad Leader.
The SBF Fireteam should be located on the far side of the suspected enemy direction of travel, with the Assault Fireteam located on the closer side of the enemy direction of travel.
- This is to ensure that the SBF element can suppress and engage without danger of counterattack, and so that the Assault Fireteam can rapidly assault through the ambush site following the initiation.
Once positions are established, all elements maintain situational awareness to the flanks and rear.
On the initiating action, all elements should simultaneously engage for a “Mad Minute” with maximum intensity until the “Cease/Lift Fire” call.
- If, after the “Cease/Lift Fire” call, enemy movement is still observed, elements should re-engage for another “Mad Minute”. Continue until conditions are set for assaulting or withdrawing.
If conditions are met for an assault, the Assault Fireteam is then ordered into the kill zone to finish any remaining enemy forces. They push until they reach either a predetermined Limit of Advance or a point ~15 meters past the last EKIA.
The Squad Leader then determines whether to reconsolidate to the front or withdraw to regroup as an element.
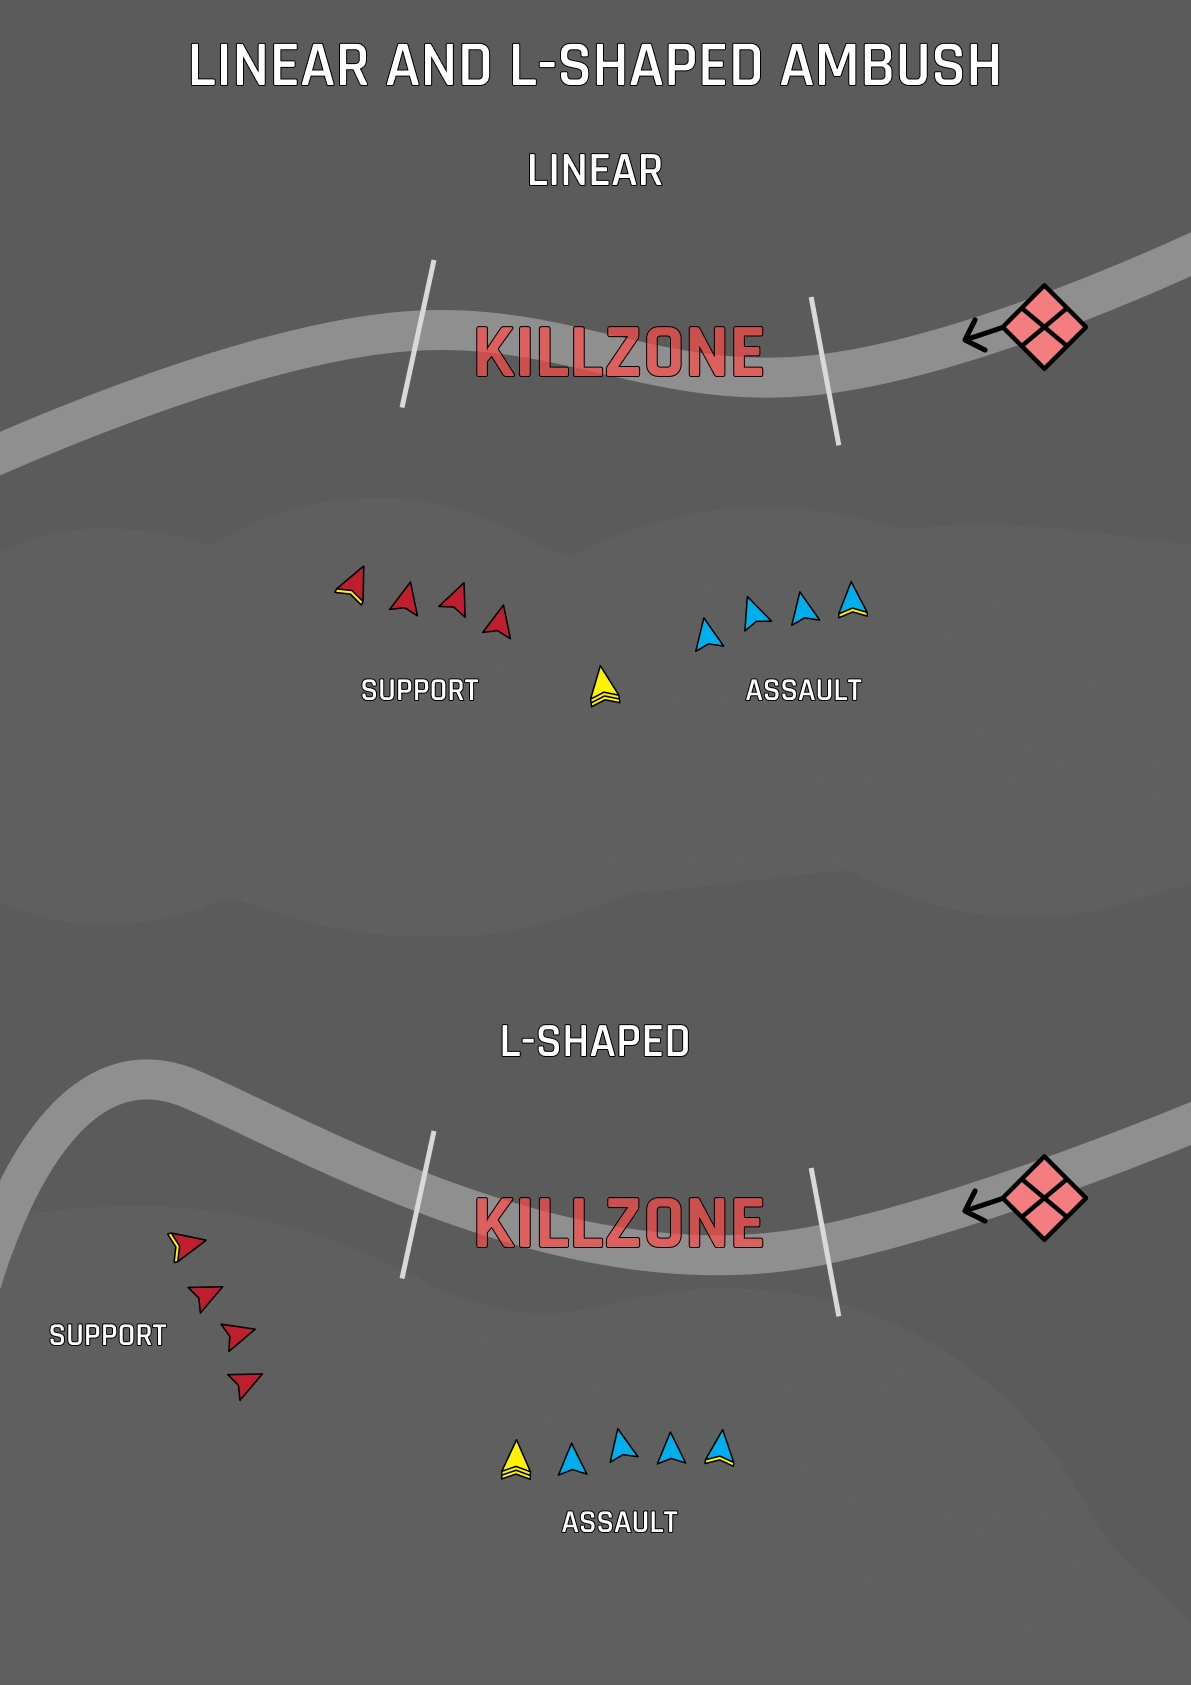
Element Taskings
| Tasking | Definition |
|---|---|
| Attack by Fire | Use direct or indirect fires to suppress, degrade, or destroy an enemy. |
| Breach | Create and exploit an entry through obstacles or fortifications to enable friendly forces to pass through and assault an objective. |
| Bypass | Maneuver around an enemy position to avoid decisive engagement. |
| Clear | Systematically search and render an area or structure free of enemy forces and threats. |
| Contain | Restrict an enemy force in a specific area and prevent it from maneuvering, reinforcing, or achieving its objectives. |
| Control | Establish and maintain authority over terrain to deny enemy use and enable friendly operations. |
| Disengage | Execute an organized withdrawal from contact using suppression and covered movement to break enemy engagement. |
| Displace | Execute an organized movement of friendly forces from one position to another, relinquishing ground to assume a more advantageous location, reduce exposure, or support maneuver. |
| Fix | Use fires or maneuver to hold an enemy in place, preventing its movement or reaction. |
| Follow and Assume | A unit follows a lead element and is prepared to immediately assume the lead’s mission if the lead becomes unavailable. |
| Follow and Support | A unit follows a lead element and provides direct support (fires, reserves, or logistics) to enable the lead’s mission. |
| Isolate | Sever an enemy element from its support, lines of communication, or retreat to force defeat in detail or deny operational reach. |
| Occupy | Move into and establish a presence in terrain or a position to hold and defend it for a specified purpose. |
| Secure | Hold a location in a manner that prevents enemy interference or destruction. |
| Seize | Apply decisive force to capture and retain a key piece of terrain, objective, or enemy asset. |
| Support by Fire | Provide suppressive or neutralizing fires from a fixed or maneuver position to enable another element to maneuver or assault. |
Useful Terminology
| Term | Meaning |
|---|---|
| cloverleaf | a maneuver technique using circular arcs, like clover petals, that reduces lateral movement and exposure |
| defilade | a position or terrain feature that shields a unit from direct enemy fire or line of sight |
| enfilade | the positioning or direction of fire so that it travels parallel to the enemy’s main formation or line, maximizing effectiveness and casualties |
| established | used to communicate when an element has reached a position and is ready to work |
| FRAGO | commonly used to describe a quick change in plans |
| howcopy | asks the receiving station to report the readability of the transmission |
| interrogative | precedes a transmission intended as a question |
| lasso | when an IR laser is waved in a circular motion in the air |
| MSD | the minimum safety distance from ordnance to avoid friendly casualties |
| net call | precedes a message intended for all users on the net |
| occupied | when an element has reached a position but is not yet set or established |
| prep | short for “prepare”; can also be used to call for a grenade before breaching |
| pulse | when an IR laser is turned on and off |
| REDs | the minimum distance friendly troops can approach the effects of friendly fires without suffering appreciable casualties |
| release | command instructing elements to initiate their planned movement or task |
| retrograde | refers to any organized movement of a force away from the enemy |
| slant | describes how many individuals are at a specific location |
| sparkle | another name for the IR laze from an overhead ISR asset |
| splash | called when munitions land or should land |
| squirter | an individual running away from a defined area |
| talking guns | a fire technique used by multiple machine guns to maintain continuous, overlapping suppressive fire on a target area |
| wilco | short for “will comply” |
Acronyms and Abbreviations
AA - Assembly Area or Anti-Air
ACE Report - Ammo, Casualty, Equipment
AL - Assault Lane
AO - Area of Operation
AR - Automatic Rifleman
ARFR - Advanced Ranger First Responder
ASR - Alternate Supply Route
AT - Anti-Tank
BD6 - Battle Drill 6 (Enter and Clear a Room)
BDA - Battle/Bomb Damage Assessment
BP - Blocking Position or Battle Position
CAS - Close Air Support
CCP - Casualty Collection Point
CFF - Call for Fire
COA - Course of Action
COP - Combat Outpost
DO - Decisive Operation
ECAS - Emergency Close Air Support
EI - Enemy Infantry
EKIA - Enemy Killed in Action
EOD - Explosive Ordnance Disposal
EPW - Enemy Prisoner of War
F/A - Follow and Assume
FAC - Forward Air Controller
FTL - Fireteam Leader
FOB - Forward Operating Base
FRAGO - Fragmented Order
FYSA - For Your Situational Awareness
GAF - Ground Assault Force
GFC - Ground Force Commander
GL - Grenade Launcher
GTL - Gun Target Line
HAF - Helicopter Assault Force
HAT - Heavy Anti-Tank
HE - High Explosive
HLZ - Helicopter Landing Zone
HVI/T - High Value Individual/Target
IAW - In Accordance With
IED - Improvised Explosive Device
IOT - In Order To
IR - Infrared
ISBF - Intermediate Support by Fire
ISR - Intel Surveillance Reconnaissance
IVO - In Vicinity Of
JTAC - Joint Terminal Attack Controller
KIA - Killed in Action
LCC - Last Cover and Concealment
LDA - Linear Danger Area
LOA - Limit of Advance
LP - Listening Post
LP/OP - Listening Post/Observation Post
LR - Long Range
MAM - Military Aged Male
MFP - Mortar Firing Point
MG - Machine Gunner
MSD - Minimum Safety Distance
MSR - Main Supply Route
MTRP - Mortar Target Reference Point
NAI - Named Area of Importance
NLT - No Later Than
OP - Observation Post
ORP - Objective Rally Point
PB - Patrol Base
PCC - Pre-Combat Check
PCI - Pre-Combat Inspection
PID - Positively Identify/Identification
PL - Phase Line or Platoon Leader
PLOC - Probable Line of Contact
POE - Point of Entry
POI - Point of Interest
POSREP - Position Report
PSG - Platoon Sergeant
PZ - Pickup Zone
QRF - Quick Reaction Force
RED - Risk Estimate Distance
ROE - Rules of Engagement
RP - Release Point
SA - Situational Awareness
SBF - Support by Fire
SITREP - Situation Report
SNOT - Sniper/Observer Team
SO - Shaping Operation
SR - Short Range
SSE - Sensitive Site Exploitation
TST - Time Sensitive Target
TIC - Troops in Contact
TL - Team Leader
TQ - Tourniquet
TRP - Target Reference Point
VDO - Vehicle Drop Off
WSL - Weapons Squad Leader